6 How to Work with Check Boxes
In Oracle Application Express, you can create check boxes as items, or you can create check boxes in reports. Check boxes on a form work similarly to a list of values. When you define an item to be a check box, you need to provide the check box value in the List of Values section of the Item Attributes page. You define check boxes on a report using the supplied function, APEX_ITEM.CHECKBOX.
This tutorial illustrates different ways in which you can create check boxes and explains how to reference and process the values of checked boxes. Before you begin, you need to import and install the OEHR Sample Objects application in order to access the necessary sample database objects. See "About Loading Sample Objects".
This section contains the following topics:
For additional examples on this and related topics, please visit the following Oracle by Examples (OBEs):
-
Creating and Running an Application
http://www.oracle.com/technology/obe/hol08/apexintro/apex3.1.1_b/apex3.1.1_b_otn.htm -
Using Some Additional New Features in Oracle Application Express 3.1
http://www.oracle.com/technology/obe/apex/apex31nf/apex31misc.htm -
Adding Additional Components to your Existing Application
http://www.oracle.com/technology/obe/hol08/apexintro/apex3.1.1_c/apex3.1.1_c_otn.htm
Creating an Application
First, you need to create an application using the Create Application Wizard.
To create an application using the Create Application Wizard:
-
On the Workspace home page, click the Application Builder icon.
The Application Builder home page appears.
-
Click Create.
-
Select Create Application and click Next.
-
For Name:
-
Name - Enter
Check Boxes. -
Application - Accept the default.
-
Create Application - Select From scratch.
-
Schema - Select the schema where you installed the OEHR sample objects.
-
Click Next.
Next, you need to add a page. For this exercise, you add a report and form.
-
-
To add a report and form:
-
Select Page Type -Select Report and Form.
-
Table Name - Select OEHR_PRODUCT_INFORMATION.
-
Click Add Page.
Two new pages appear in the list at the top of the page. Note that each page has the same page name. Next, edit the page names to make them more meaningful.
-
-
To edit the name of page 1:
-
Click OEHR_PRODUCT_INFORMATION next to page 1 at the top of the page as shown in Figure 6-1.
Figure 6-1 Page Name in the Create Application Wizard

Description of "Figure 6-1 Page Name in the Create Application Wizard"
-
In Page Name, replace the existing text with
Product Report. -
Click Apply Changes.
-
-
To edit the name of page 2:
-
Click OEHR_PRODUCT_INFORMATION next to page 2 at the top of the page as shown in Figure 6-1.
-
In Page Name, replace the existing text with
Update Form. -
Click Apply Changes.
-
-
Click Next.
-
For Tabs, accept the default, One Level of Tabs, and click Next.
-
For Copy Shared Components from Another Application, accept the default, No, and click Next.
-
For Attributes, accept the defaults for Authentication Scheme, Language, and User Language Preference Derived From and click Next.
-
For User Interface, select Theme 2 and click Next.
-
Review your selections and click Create.
The Application home page appears.
Run the Application
Next, review the application by running it.
To run the application:
-
Click Run Application as shown in Figure 6-2.
-
If prompted to enter a user name and password, enter your workspace user name and password and click Login. See "About Application Authentication".
The application appears. Note that the report contains eleven columns displaying product information. Users can link to an update form by clicking the Edit icon in the far left column.
-
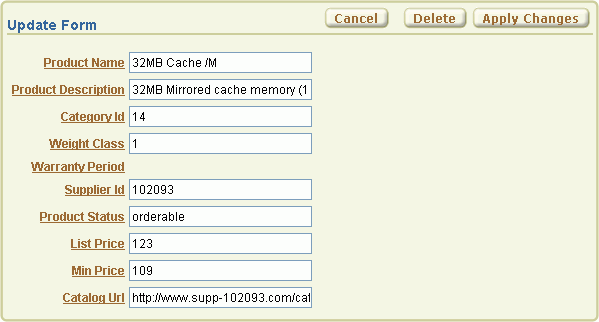
Click the Edit icon next to a specific product. As shown in Figure 6-3, an update form appears.
Editing the Update Form
Page 2 of your application is an update form. In this exercise, you modify this form by hiding the Warranty Period field and creating a new check box.
Topics in this section include:
Hide the Warranty Period Field
First, hide the Warranty Period field by changing the Display As attribute.
To hide the Warranty Period field:
-
Click Edit Page 2 on the Developer toolbar.
The Page Definition for page 2 appears.
-
Scroll down to the Items section.
-
Under Items, select P2_WARRANTY_PERIOD.
-
From Display As in the Name section, select Hidden.
-
Click Apply Changes.
Add a New Checkbox
In this exercise you create a check box that automatically sets the minimum product price to 75% of the list price.
Topics in this section include:
Tip:
For simplicity, this tutorial has you create a checkbox by editing item attributes. As a best practice, however, you can also create a named LOV and reference it.See Also:
"Creating Lists of Values" in Oracle Database Application Express User's GuideAdd a New Item
First, you add a new item. Initially, you create this item to display as a radio group and later change it to a check box.
To add an item that displays as a radio group:
-
On the Page Definition for page 2, scroll down to Items.
-
Under Items, click the Create icon as shown in Figure 6-4.
-
For Item Type, select Radio and click Next.
-
For Radio Group Control Type, select Radio group and click Next.
-
For Display Position and Name:
-
Item Name - Enter
P2_SET_MIN_PRICE. -
Sequence - Enter
9.5.Note that this sequence positions the item below the P2_MIN_PRICE item (the Minimum Price field).
-
Region - Select Update Form.
-
Click Next.
-
-
For List of Values:
-
Named LOV - Select Select Named LOV.
-
Display Null Option - Select No.
-
List of Values Query - Enter:
STATIC:Yes;Y,No;N
-
Click Next.
-
-
For Item Attributes:
-
Label - Replace the existing text with
Set Minimum Price. -
Accept the remaining defaults.
-
Click Next.
-
-
For Source:
-
Item Source - Select SQL Query.
-
Item Source Value - Enter:
SELECT 'Y' FROM DUAL WHERE :P2_LIST_PRICE*0.75=:P2_MIN_PRICE
-
Accept the remaining defaults and click Create Item.
-
Create a Process
Next, you create a page process that sets the minimum price at a 25% discount of the list price.
To create a page process:
-
On the Page Definition for page 2, locate the Page Processing area.
-
Under Processes, click the Create icon.
-
For Process Type, select PL/SQL and click Next.
-
For Process Attributes:
-
Name - Enter
Update Min Price. -
Sequence - Accept the default.
-
Point - Select OnSubmit - After Computations and Validataions.
-
Click Next.
-
-
For Process:
-
Enter the following:
UPDATE oehr_product_information
SET MIN_PRICE=(:P2_LIST_PRICE*0.75)
WHERE PRODUCT_ID=:P2_PRODUCT_ID;
-
Click Next.
-
-
For Messages:
-
Success Message - Enter:
Product successfully updated.
-
Failure Message - Enter:
Unable to update this product. Contact your system administrator.
-
Click Next.
-
-
For Process Conditions:
-
Condition Type - Select Value of Item in Expression 1 = Expression 2.
-
Expression 1 - Enter:
P2_SET_MIN_PRICE
-
Expression 2 - Enter
Y. -
Click Create Process.
-
Run the Page
To run the page:
-
Click the Run Page icon in the upper right corner.
-
If prompted to enter a user name and password, enter your workspace user name and password and click Login. See "About Application Authentication".
The revised form appears as shown in Figure 6-5. Note that the Warranty Period field no longer displays and a new Set Minimum Price radio group appears.
Figure 6-5 Update Form with Set Minimum Price Radio Group
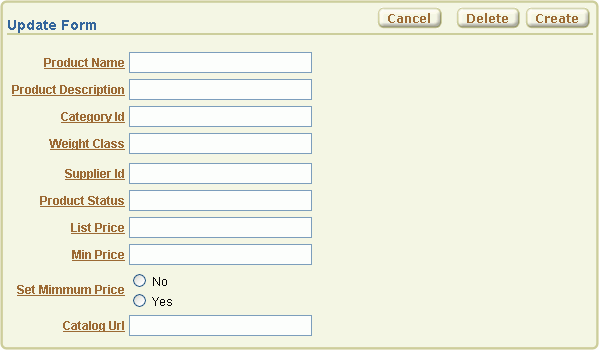
Description of "Figure 6-5 Update Form with Set Minimum Price Radio Group"
Edit the Item to Display as a Check Box
Next, change the Set Minimum Price radio group (P2_SET_MIN_PRICE) to display as a check box.
To edit P2_SET_MIN_PRICE:
-
Click Edit Page 2 on the Developer toolbar.
The Page Definition for Page 2 appears.
-
Under Items, click P2_SET_MIN_PRICE.
-
From Display As, select Checkbox.
-
Scroll down to Label. In Label, delete the existing text,
Set Minimum Price. -
Scroll down to Default. In Default Value, enter
N. -
Under Lists of Values:
-
Number of Columns - Enter
1. -
List of values definition - Enter:
STATIC: <b> Set Minimum Price</b><br/> (25% Discount on List Price);Y
-
-
Click Apply Changes at the top of the page.
Run the Page
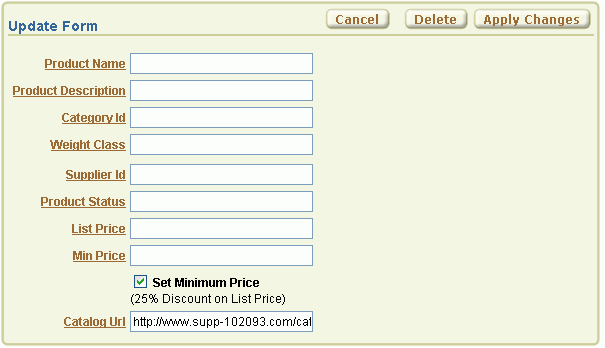
To run the page, click the Run Page icon in the upper right corner. The revised form appears as shown in Figure 6-6. Note the new Set Minimum Price check box.
Figure 6-6 Update Form with Set Minimum Price Check Box
Description of "Figure 6-6 Update Form with Set Minimum Price Check Box"
Change the Report Display
You can alter how a report displays by editing report attributes. In the exercise, you change the number of columns that display on page 1 and then change the format of two columns to include a currency symbol.
To edit report attributes for page 1:
-
Click Application on the Developer toolbar.
The Application home page appears.
-
Click 1 - Product Report.
The Page Definition for page 1 appears.
-
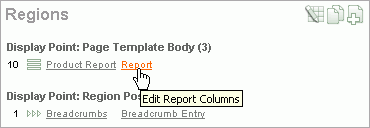
Under Regions, click the Report link as shown in Figure 6-7.
The Report Attributes page appears. You can use this page to precisely control the report layout. First, change the number of columns that display.
-
Deselect the Show check box for the following columns:
-
Weight Class
-
Warranty Period
-
Supplier ID
Next, edit List Price and Min Price columns to include a currency symbol.
-
-
Edit the List Price column:
-
Click the Edit icon next to List Price.
-
From Number / Date Format, select $5,234.10.
-
Click the Next (>) icon at the top of the page.
Clicking the Next icon submits your changes and then displays attributes for the next column, Min Price.
-
-
Edit the Min Price column:
-
From Number / Date Format, select $5,234.10.
Note that you select a format by selecting an example. However, the value that actually displays field is the Oracle number format.
-
Click Apply Changes.
-
-
Click the Run Page icon in the upper right corner.
The revised report appears. Notice the Weight Class, Warranty Period, and Supplier ID no longer appear and the List Price and Min Price columns include a currency symbol.
Create Multi Value Check Boxes to Filter Content
In the next exercise, you change the Search field (P1_REPORT_SEARCH) on the Product Report page to a multi value check box. These check boxes enable users to filter the report by product category (obsolete, orderable, planned, under development).
Topics in this section include:
Change the Search Field to a Multi Value Check Box
To change the search field to a check box:
-
Click Edit Page 1 on the Developer toolbar.
The Page Definition for page 1 appears.
-
Under Items, click P1_REPORT_SEARCH.
-
From Display As, select Checkbox.
-
Scroll down to Label. For Label, delete the existing text and replace with
Product Status. -
Scroll down to Source. In Source Value or Expression, enter:
obsolete:orderable:planned:under development
-
Scroll down to List of Values. Specify the following:
-
Named LOV - Accept the default.
-
Number of Columns - Enter
4. -
List of values definition - Enter:
SELECT DISTINCT product_status display_value, product_status return_value
FROM oehr_product_information
ORDER BY 1
Note:
Note that to create a multi value check box, the List of Values query must return more than one row.
-
-
Click Apply Changes at the top of the page.
The Page Definition for page 1 appears.
Edit the Report Region Definition
To edit the report region definition:
-
Under Regions, click Product Report.
The Region Definition appears.
-
Scroll down to Source.
-
In Source modify the WHERE clause to read as follows:
... WHERE instr(':'||:P1_REPORT_SEARCH||':',product_status)> 0 -
Click Apply Changes at the top of the page.
The Page Definition for page 1 appears.
-
Click Apply Changes at the top of the page.
The Page Definition for page 1 appears.
Change the Default Check Box Behavior
Although the Product Status check boxes correctly filter the content on page 1, if you deselect all the check boxes, notice the report returns all products. This behavior results from the fact that if a check box has a NULL value (that is, it is deselected), then it defaults to the default value Y. The default value of Y, in turn, enables the check box.You can alter this behavior by adding a computation that remembers the state of the check box.To add a computation that tracks the state of the check box:
-
Under Page Processing, Computations, click the Create icon.
The Create Page Computation Wizard appears.
-
For Item Location, select Item on This Page and click Next.
-
For Item, specify the following:
-
Compute Item - Select P1_REPORT_SEARCH.
-
Sequence - Accept the default.
-
Computation Point - Select After Submit.
-
Computation Type - Select Static Assignment.
-
Click Next.
-
-
In Computation:
-
Enter:
none(bogus_value)
-
Click Next.
-
-
For Condition:
-
From Condition Type, select Value of Item in Expression 1 Is NULL.
-
In Expression 1, enter:
P1_REPORT_SEARCH
-
-
Click Create.
The Page Definition for page 1 appears.
-
Click the Run Page icon in the upper right corner. Note that the Product Status check boxes display at the top of the page.
Change the Check Boxes to Display in Bold
Next, you edit the check box display values (or labels) so that they appear as bold text.
To edit check box display values (or labels) to appear in bold:
-
Go to the Page Definition for page 1.
-
Under Items, click P1_REPORT_SEARCH.
-
Scroll down to Element.
-
In Form Element Option Attributes, enter:
class="fielddatabold"
Form Element Option Attributes are used exclusively for check boxes and radio buttons and control the way the Application Express engine renders individual options.
-
Click Apply Changes.
The Page Definition for page 1 appears.
Adding Check Boxes to Each Row in the Report
In the next exercise, you add a delete check box to each row in the Product Report. To accomplish this, you must edit the report query and make a call to the APEX_ITEM package.
APEX_ITEM is a supplied package for generating certain items dynamically. In this instance, you use APEX_ITEM.CHECKBOX to generate check boxes in the Product report. When the page is submitted, the values of the check boxes are stored in global package arrays. You can reference these values using the PL/SQL variables APEX_APPLICATION.G_F01 to APEX_APPLICATION.G_F50 based on the p_idx parameter value that was passed in.
Topics in this section include:
See Also:
"APEX_ITEM" in Oracle Database Application Express User's GuideCall APEX_ITEM.CHECKBOX
To edit the query to call APEX_ITEM.CHECKBOX:
-
Go to the Page Definition for page 1.
-
Under Regions, click Product Report.
-
Scroll down to Source.
-
In Region Source, add the new line appearing in bold face to the query.
SELECT "product_id", apex_item.checkbox(1,product_id) del, "product_name", "product_description", "category_id", "weight_class", "warranty_period", "supplier_id", "product_status", "list_price", "min_price", "catalog_url" FROM "oehr_product_information" WHERE instr(':'||:p1_report_search||':',product_status)> 0APEX_ITEMis an Oracle Application Express supplied package that you can use to generate certain items dynamically. Note that the value passed in forp_idxin the above example is 1. You reference the check box values using the global variableAPEX_APPLICATION.G_F01later on.Oracle Application Express automatically adds new columns to the end of the column list. Next, you need to move the
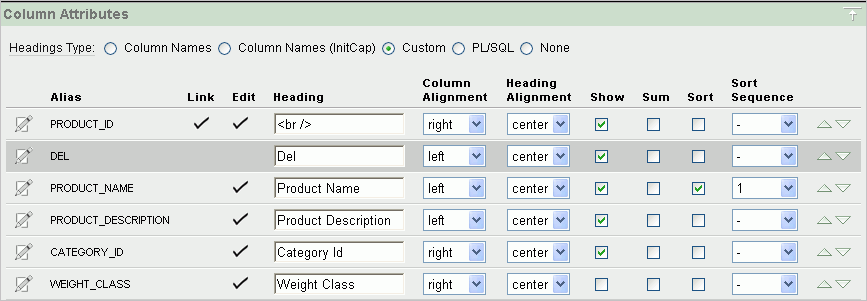
DELcolumn. -
Scroll to the top of the page and select the Report Attributes tab.
-
Under Column Attributes, locate the
Delcolumn. -
Click the Up arrow on the far right until the
DELcolumn is directly belowPRODUCT_ID. (See Figure 6-8). -
Click Apply Changes.
The Page Definition for page 1 appears.
Add a Button to Submit Check Box Array Values
To add a button to submit the check box array values:
-
Go to the Page Definition for page 1.
-
Under Buttons, click the Create icon.
-
For Button Region, select Product Report (1) and click Next.
-
For Position, select Create a button in a region position and click Next.
-
For Button Attributes:
-
Button Name - Enter
DELETE_PRODUCTS. -
Label - Enter
Delete Products. -
Accept the remaining defaults and click Next.
-
-
In Button Template, accept the default selection and click Next.
-
For Display Properties:
-
Position - Select Top of Region.
-
Accept the remaining defaults and click Next.
-
-
For Branching, select 1 Product Report and click Create Button.
Add a Process
To add a process that executes when the user clicks the Delete Products button:
-
Under Page Processing, Processes, click the Create icon.
-
For Process Type, select PL/SQL and click Next.
-
For Process Attributes:
-
Name - Enter
Delete Products. -
Sequence - Accept the default.
-
For Point - Select On Submit - After Computations and Validations.
-
Click Next.
-
-
Enter the following PL/SQL process and then click Next:
FOR i in 1..APEX_APPLICATION.G_F01.count
LOOP
   DELETE FROM oehr_product_information
   WHERE product_id = APEX_APPLICATION.G_F01(i);
END LOOP;
APEX_ITEMis an Oracle Application Express supplied package that you can use to generate certain items dynamically. When a page is submitted, the values of each column are stored in global package arrays, which you can reference using the PL/SQL variableAPEX_APPLICATION.G_F01toAPEX_APPLICATION.G_F50. In this exercise, the value passed in forproduct_idis 1, so you reference the column values using the global variableAPEX_APPLICATION.G_F01. -
On Messages:
-
In Success Message, enter:
Product(s) deleted.
-
In Failure Message, enter:
Unable to delete product(s).
-
-
Click Create Process.
-
Run the page.
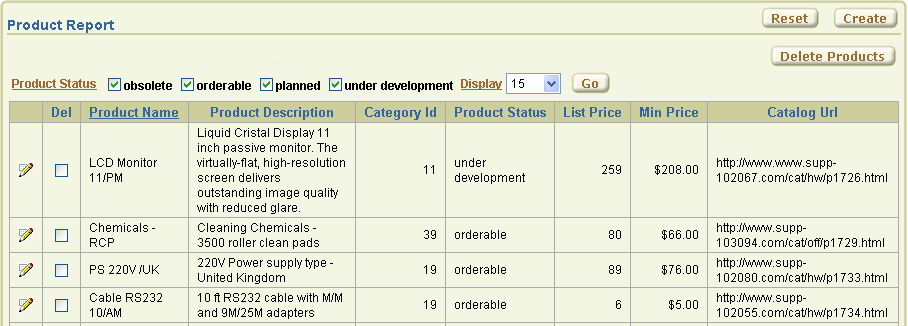
Notice that the Delete Products button appears above the report as shown in Figure 6-9. To remove a product from the report, select the Del check box and then click Delete Products.
Figure 6-9 Product Report with Delete Products Check Box
Description of "Figure 6-9 Product Report with Delete Products Check Box"
