12 How to Review a Packaged Application
A packaged application is a fully functional application that you can view, use, and customize. Each packaged application includes installation scripts that define the application's supporting objects (including database objects, images, and seed data) as well as any preinstallation validations. Packaged applications can also include a de-installation script which can be used to remove all the application's supporting objects.
This tutorial walks you through the OEHR Sample Objects packaged application. By reviewing the supporting objects behind this application, you can learn how to define them in your own applications.
Before you begin, you need to import and install the OEHR Sample Objects application. See "About Loading Sample Objects".
This section contains the following topics:
What Is a Packaged Application?
Importing and installing an application is a complicated process. First, you create the target database objects and seed data. Second, you import and install the application definition and all related files, including images, themes, and any other required static files.
Creating a packaged application simplifies this process. Instead of performing numerous steps to create the database objects and then import and install the application and all supporting files, you can define the supporting objects so that the application and supporting files can be installed using one simple wizard.
After users import and install the application definition, a wizard guides them through a few simple configuration steps. Then, the wizard asks whether or not to install the supporting application objects. Users have the option of installing the supporting application objects then or doing it later.
See Also:
"How to Create a Packaged Application" in Oracle Database Application Express User's Guide.About the Supporting Object Utility
In "About Loading Sample Objects", you imported and installed the OEHR Sample Objects application. Installing this application creates the database objects and loads the sample data needed to complete the tutorials in this guide.
You create a packaged application like OEHR Sample Objects using the Supporting Object Utility. By creating a packaged application, users can install and deinstall your application as well as the underlying database objects, files, and other supporting objects. Supporting objects consists of everything that your application needs to work properly, including the application definition, images, themes, and any other required static files.
Creating a packaged application is also an effective way to move an application to another Oracle Application Express instance or to share an application with others. The Supporting Object Utility provides the easiest way to ensure that all objects your application depends on are migrated in an efficient manner.
Accessing the Supporting Objects Page
You access the Supporting Object Utility on the Supporting Objects page.
To go to the Supporting Objects page:
-
On the Workspace home page, click Application Builder.
-
Click OEHR Sample Objects.
-
On the Application home page, click Supporting Objects.
The Supporting Objects page appears.
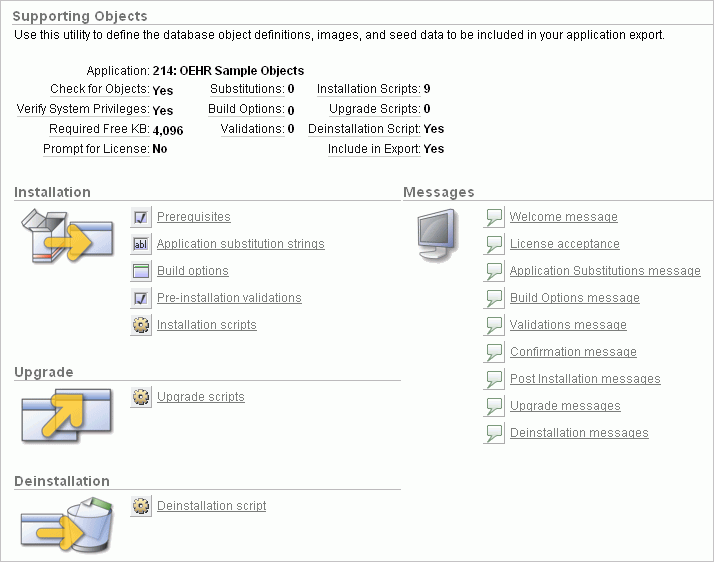
Description of the illustration pck_supobj.gif
The top of the Supporting Objects page displays a detailed report about the currently selected application, including the number of scripts and the amount of required free space. After that, the page is divided into these sections:
-
Installation
-
Upgrade
-
Deinstallation
-
Messages
-
About Supporting Objects Installation
During the installation of supporting objects, a sequence of scripts and validations are run. If a validation fails, the installation process stops. At certain points in the process, messages also display for users to review.
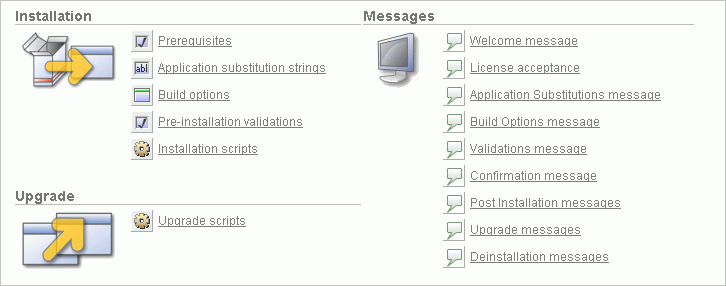
Description of the illustration pck_instl_mes.gif
This section describes the Installation and Messages sections of the Supporting Objects page. Depending upon the needs of your application, you may use all or only some of the functionality.
In order to give context, this section describes the supporting objects in the sequence that they would appear to a user who is performing the installation.
Topics in this section include:
Welcome Message
The welcome message contains text that displays to users immediately after they indicate that they want to install the supporting objects. Use this message to introduce the application to users and to explain any information that they may need during the rest of the installation process.
To review the welcome message text:
-
Go to Supporting Objects page as described in "Accessing the Supporting Objects Page".
-
In the Messages section, click Welcome message.
The Supporting Object Messages page appears. The Welcome message appears in the first section.
Prerequisites
Prerequisites include anything that must be valid for the installation process to continue.
To review the prerequisites:
-
On the Supporting Object Messages page, click the Prerequisites tab.
The Prerequisites page displays the following sections:
-
Required Free Space in KB
-
Required System Privileges
-
Objects that will be Installed
-
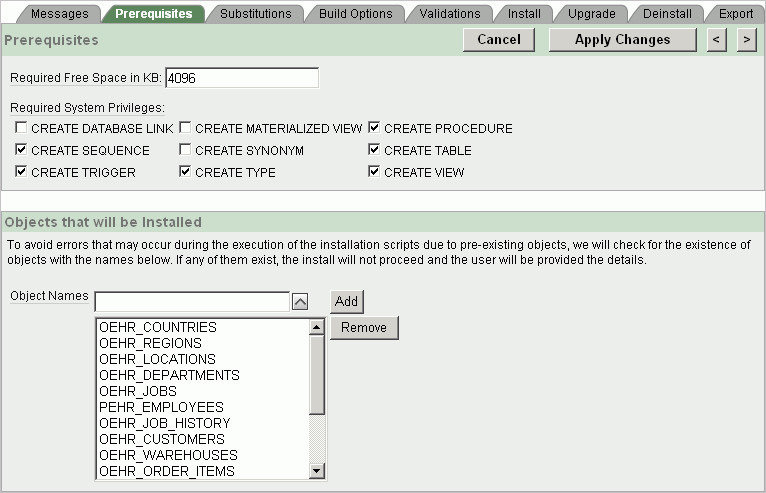
Description of the illustration pck_prerq.gif
If you are creating tables and loading data during the installation, you should specify the amount of required free space. If there is not enough free space available, specifying this prerequisite prevents an error during the installation of supporting objects. For the OEHR Sample Objects application, the required free space is 4800 kilobytes (KB).
To determine the space that your objects require:
-
Remove your supporting objects by either manually deleting them, or running your deinstallation script.
-
Go to the Supporting Objects page as described in "Accessing the Supporting Objects Page".
-
From the Tasks list on the right side of the page, click Deinstall Supporting Objects.
-
On the Deinstall page, select Deinstall Supporting Objects and click Deinstall.
-
-
View that amount of used space:
-
Go to the Workspace home page.
-
From the Administration list on the right, click Manage Services.
-
Under Workspace section, click Workspace Overview.
-
Click the Detailed Tablespace Utilization Report (may take several seconds) link.
The Detailed Tablespace Utilization Report appears.
-
Write down the number that appears in the Amount Used column.
This shows the amount of used space in the tablespace where your schema is located.
-
-
Install your supporting objects by either manually creating them again, or running your installation scripts.
-
Go to the Supporting Objects page as described in "Accessing the Supporting Objects Page".
-
From the Tasks list on the right side of the page, click Install Supporting Objects.
-
For Install Supporting Objects, select Yes and click Next.
-
Click Install.
-
-
View that amount of used space again:
-
Go to the Workspace home page.
-
From the Administration list on the right, click Manage Services.
-
Under Workspace section, click Workspace Overview.
-
Click the Detailed Tablespace Utilization Report (may take several seconds) link.
The Detailed Tablespace Utilization Report appears.
-
Write down the number that appears in the Amount Used column.
-
-
Subtract the initial Amount of Used number from the new number to determine your required free space.
Tip:
The value in the Amount Used column is in megabytes (MB). To calculate the amount in kilobytes (KB), multiply the final figure by 1,024 (1 MB = 1,024 KB).About Required System Privileges
The Required System Privileges section contains a list of system privileges. If you are creating objects through installation scripts, you need to select the appropriate system privileges. Selecting these privileges runs a pre-installation check to determine if the user has the appropriate privileges. This prevents the user from creating some objects but not others due to a lack of privileges.
For the OEHR Sample Objects application, required system privileges include: CREATE SEQUENCE, CREATE TRIGGER, CREATE TYPE, CREATE PROCEDURE, CREATE TABLE, and CREATE VIEW.
The Objects that will be Installed section lists all objects that your installation script creates. If the target schema contains an object with the same name, an error displays to the user. This prerequisite prevents the user from getting errors during installation that result in some objects being created while others are not created because an object of the same name exists.
This prerequisite is important because of the deinstallation implications. If a user installs and already has an object with the same name, the deinstallation script might drop the previously existing object.
For example, if a PROJECTS table already exists and the installation script creates a table with the same name, you would want to alert users before they start the installation process. This warning provides them with the opportunity to rename their table or decide to not install supporting objects.
License Acceptance
If your application requires that users accept a specific license, specify the terms in this area. For a required license, users are prompted to accept the terms. If they do not, the installation does not proceed.
To review the license area:
-
On the Supporting Object Messages page, click the Messages tab.
-
Locate the section, License.
Since the OEHR Sample Objects application does not require a license, no text appears in the License section.
Application Substitution Strings
Each application can include substitution strings defined within the Application Definition. You can use substitution strings to include phrases or labels occurring in many places within an application that might need to be changed for specific installations.
When you define substitution strings for your application, they display within the Supporting Object Utility. You can then decide which substitution strings you want to display during the installation process.
For substitution strings that display during the installation process, you can provide a custom prompt to explain what each string is used for to assist the user in determining the proper value. You can also define a custom header message if you are including substitution strings.
Since the OEHR Sample Objects application does not contain any substitution strings, in the next section you add two substitution strings and then view them the Supporting Object Utility.
Add Substitution Stings
To add substitution strings to the OEHR Sample Objects application:
-
Go to the Shared Components page:
-
Click the Application breadcrumb.
-
Click Shared Components.
-
-
Under Application, click Definition.
-
Scroll down to the Substitutions region.
-
Enter the following Substitution Strings and Substitution Values:
Substitution String Substitution Value APP_DATE_FORMATDD-MON-YYYYAPP_DATETIME_FORMATDD-MON-YYYY HH24:MI -
Scroll back to the top and click Apply Changes.
Review Substitution Strings
To view the substitution strings in Supporting Object Utility:
-
Go to the Supporting Objects page:
-
Click the Application breadcrumb.
-
Click Supporting Objects.
-
-
In the Installation section, click Application Substitution strings.
The Edit Substitutions page appears, showing the two substitution strings that you defined. If have a prompt appear during installation, select it and enter text in the Prompt Text field.

Description of the illustration pck_subst.gif
Build Options
Build options are shared components that enable you to conditionally display objects. Each build option has a status set to Include or Exclude. If an object is associated with a disabled build option, the object does not appear to the user.
Use build options to include functionality in an application that may not be ready for use, or should not be accessible to all installations. The code is included in the application but not exposed to end users. Later, you can enable a build option so that the feature becomes accessible. For each build option, you can define a custom header message to display to the user.
Build options display in the same way as the substitution strings. You specify which build options you want to appear to users. The users can then select them and determine their status.
The OEHR Sample Objects application does not contain any build options.
See Also:
"Using Build Options to Control Configuration" in Oracle Database Application Express User's GuidePre-Installation Validations
Validations ensure that the target database and target schema are capable of running the installation scripts. Built-in validation types include Current Language, Exists, and so on. You can also use any SQL or PL/SQL expressions. Validations can also be conditionally executed.
Use these validations to check for anything that is not built-in under Prerequisites. For example, you can check for a minimum database version or for the installation of Oracle Text. Just as with other supporting objects, there is a Validations Message.
The OEHR Sample Objects application does not contain any validations.
See Also:
"Understanding Validations" in Oracle Database Application Express User's GuideReview the Validation Page
To review the Validations page:
-
Click the Validations tab.
-
Click Create.
The Validation page appears.
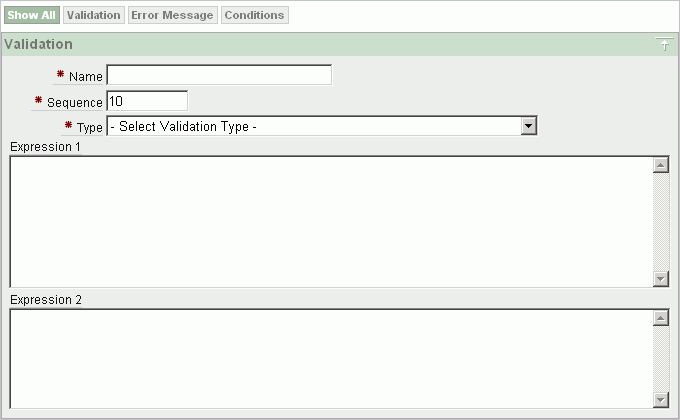
Description of the illustration pck_prinstval.gif
-
For this exercise, click Cancel.
-
To view the Validations Message:
-
Click the Messages tab.
-
Scroll down to the Validations section.
-
Pre-Installation Confirmation Message
If the installation process is not terminated early, one last confirmation message appears before the installation scripts display to the user.
To review the confirmation message:
-
Click the Messages tab.
-
On the Supporting Object Messages page, scroll down to the Confirmation section.
Installation Scripts
Installation scripts are the core of a supporting object installation. Each application can have several installation scripts.
The OEHR Sample Objects application contains nine installation scripts. These scripts create objects and load data.
Tip:
You can also create a custom installation script that loads files. See "About Creating Scripts to Install Files".Topics in this section include:
View Installation Scripts
To review the installation scripts in the OEHR Sample Objects application:
-
On the Supporting Object Messages page, click the Install tab.
The Installation Scripts page shows the list of scripts.
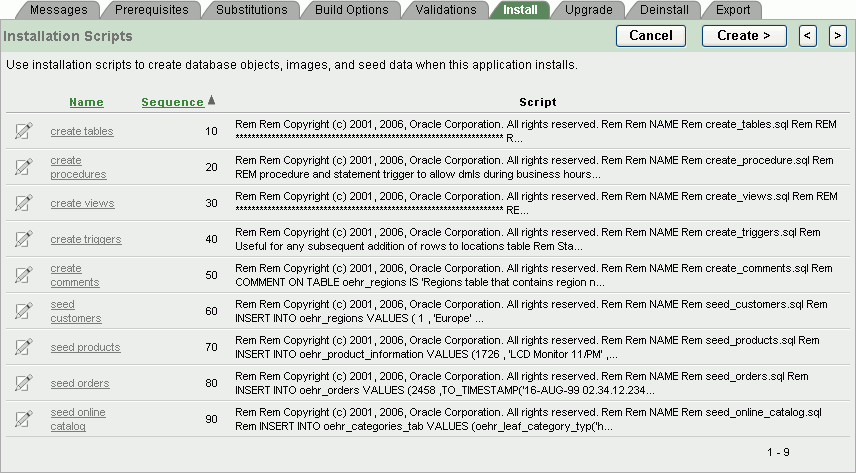
Description of the illustration pck_instscrpts.gif
Notice that each script has a name and a sequence. It is very important to order your installation scripts so that dependent objects are created or compiled correctly.
Review an Existing Installation Script
To review or update an existing script:
-
Click the Edit icon adjacent to the script name.
The Script Editor page displays the script for you to edit or review.
Figure 12-1 Supporting Object Script Editor
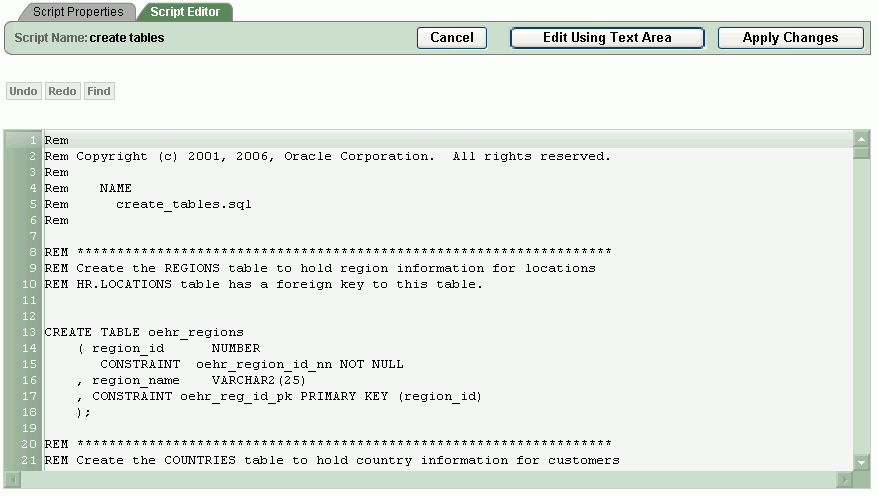
Description of "Figure 12-1 Supporting Object Script Editor"
Tip:
You can toggle between this page and a text page, where you can also edit the script, by clicking the Edit Using Text Area button. -
To view and edit the properties of the script, click the Script Properties tab.
Use the Script Properties page to change the script name or sequence. You can also specify if it should be conditionally executed.
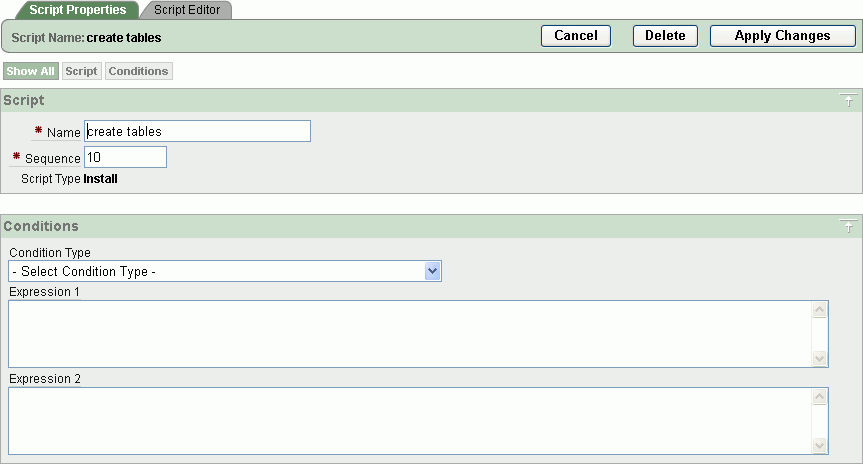
Description of the illustration pck_scrprop.gif
-
For this exercise, click Cancel.
About Creating Installation Scripts from Files
You can create objects and install seed date through files that you create from scratch or upload.
Topics in this section include:
Creating a New Script from Scratch
To create a new script from scratch:
-
Go to the Installation Scripts page:
-
Click the Supporting Objects breadcrumb.
-
Under Installation, click Installation scripts
-
-
On the Installation Scripts page, click Create.
-
Accept the default, Create from Scratch, and click Next.
The Create Script wizard appears.
-
For Script Attributes:
-
Name - Enter
Test Script. -
Sequence - Accept the default, 100.
-
Use Editor - Select this option.
Selecting Use Editor enables you to use the built-in editor to define your script. If you do not select this, a standard text area appears instead.
-
Click Next.
The Script Editor opens, where you can type in or paste your script contents.
-
-
For this exercise, click Cancel.
Uploading a File
Often, you have files that you want to use as the basis of your installation scripts.
To upload a file:
-
On the Installation Scripts page, click Create.
-
Select Create from file and click Next.
-
For Script Attributes:
-
Name - Enter
Test Script. -
Sequence - Accept the default, 100.
-
Click Next.
-
-
For Define Script, select the file to upload.
-
For this exercise, click Cancel.
Creating Scripts for Access Control Tables
If your application includes an access control list, you can create scripts to create the underlying access control tables.
See Also:
"Controlling Access to Applications, Pages, and Page Components" in Oracle Database Application Express User's GuideTo create scripts for access control tables:
-
On the Installation Scripts page, click Create.
-
Click the Create Scripts for Access Control Tables link.
-
If you had wanted to create installation scripts for access control tables, you would click Create Script.
-
For this exercise, click Cancel.
About Creating Scripts to Install Files
To include other types of objects, such as cascading style sheets, images, and static files that your application references, you need to create scripts that install the files as well as bundle the files as supporting objects.
Before you begin, make sure the files you want to include have been added as Shared Components.
See Also:
"Using Custom Cascading Style Sheets," "Managing Images," and "Managing Static Files" in Oracle Database Application Express User's GuideTo create a script that installs files:
-
On the Installation Scripts page, click Create.
-
Click the Create Scripts to Install Files link.
A list of file types appear. Each object is created by its own script, but you can select to create more than one at once.
The OEHR Sample Objects application does not include any files to install.
If you had wanted to include a script you would select the appropriate scripts and click Create Scripts. The name of the script defaults to the name of the object being created, and the sequence is defaulted as well. You can alter these attributes after creation.
For each file that you install, the appropriate deinstallation statement is also written to the deinstallation script.
-
For this exercise, click Cancel.
Success Message
Upon completion of the supporting objects installation, either a success or failure message appears. Use these messages to give the user information they may need to continue.
For example, for a successful installation, you may want to provide instructions on running the application, such as built-in usernames and passwords. For a failed installation, you might want to tell users whom to contact or instruct them to deinstall the application.
To review the success or fail messages:
-
On the Installation Scripts page, click the Messages tab.
-
Scroll down to the Post Installation section to review the messages.
About Supporting Objects Deinstallation
The final part of Supporting Object Utility is the deinstallation process. Deinstalling enables a user who has installed your application to cleanly remove all objects created during the installation process.
On the Supporting Objects page, the Deinstallation section includes a Deinstallation script link.

Description of the illustration pck_deinstall.gif
Topics in this section include:
View the Deinstallation Confirmation Message
When a user initiates the deinstallation process, a deinstallation message appears.
To review the deinstallation confirmation message section:
-
On the Supporting Object Messages page, scroll down to Deinstallation.
-
Scroll down to the Deinstallation section.
For the OEHR Sample Objects application, no deinstallation message is defined.
Review the Deinstallation Script
When a user selects to deinstall supporting objects, the deinstallation script runs. Unlike installation, only one script exists for deinstallation. This script should remove each object created during installation, including database objects, as well as any loaded files, cascading style sheets, or images.
To review the deinstallation script for OEHR Sample Objects:
-
On the Supporting Object Messages page, click the Deinstall tab.
The Deinstall Script page appears.
-
Click the Edit icon to the left of the script.
Notice that the drop table statements contain
CASCADE CONSTRAINTSclauses. Using these clauses is the easiest way to avoid contention between foreign keys when dropping tables. If you create installation scripts for any files, the code to drop those is included in the deinstallation script for you. -
For this exercise, click Cancel.
View the Deinstallation Success Message
The final part to the deinstallation process is the deinstallation success message. This is the message displayed after all the deinstallation scripts have been executed.
To review the deinstallation success message:
-
On the Deinstall Script page, click the Messages tab.
-
Scroll down to the Deinstallation section.
For OEHR Sample Objects, note the post-deinstall message.
About Supporting Objects Export
After defining your supporting objects, you can decide whether or not to include them when you export your application. You set a default value for this export setting on the Export tab.
Topics in this section include:
Review the Supporting Objects Export Setting
To review the export setting:
-
On the Supporting Object Messages page, click the Export tab.
Use the Export Status page to specify whether to include supporting objects in the export. For OEHR Sample Objects, note that Include Supporting Object Definitions in Export is set to Yes.
-
For this exercise, click Cancel.
Where the Export Default Appears When Exporting
Now that you know where to set the export default, next you learn where this setting appears in the export steps.
To see where the export setting default appears in the export steps:
-
Go to the Supporting Objects page by clicking the Supporting Objects breadcrumb.
-
From the Tasks list on the right, click Export Application.
In the Export Application section, notice that Export Supporting Object Definitions is set to Yes. If this option is set to No, your export only included your application definition.
-
To return to the Supporting Object Installation page, click Manage Supporting Objects on the Tasks list on the right.
About Creating Upgrade Scripts
Creating upgrade scripts enables you to modify a distributed application, but enables users to retain their existing objects. You can use upgrade scripts to add database objects, alter existing database objects (for example, add columns or change column definitions), or create new files.
If you plan to include upgrade scripts, remember to also modify your installation scripts and deinstallation scripts. Then, when new users install your application, they will have the full set of supporting objects and if the upgraded application is removed, all the objects will also be removed.
The wizard that installs the supporting objects needs to be able to determine whether to run the installation scripts or the upgrade scripts. This decision point is determined by the Detect Existing Supporting Objects query. If the query returns at least one row then the upgrade scripts are run. If the query returns no rows, the installation scripts are run. A common approach is to have the query check the Oracle data dictionary for the existence of the tables that the application depends on as shown in the following example:
SELECT 1
  FROM user_tables
 WHERE table_name in ('OEHR_ORDERS','OEHR_ORDER_ITEMS')
If your upgrade consists only of application-level changes (that is, there are no supporting objects changes) you do not need to create upgrade scripts. You can simply instruct users to install the new application, but not install supporting objects.
Utilizing Upgrade Messages
When creating an upgrade, there are four messages you can use: Welcome Message, Confirmation Message, Success Message, and Failure Message. Use these messages to inform the user that they are upgrading their supporting objects instead of just installing them.
If you distribute an application that is used as an upgrade, you should recommend that users install the application using a new application ID. This approach retains the initial application and its associated supporting object definitions. Once the user runs and reviews the upgraded application, they can then delete the prior version. Remember to also make sure users understand that they should not remove supporting objects.
About Refining Your Installation Scripts
Once you create your supporting objects, you should test them. As a best practice, be sure to:
-
Perform the test in another workspace, or in the same workspace using a different schema.
-
Export your application and include the supporting object definitions.
-
Then, import the application into another workspace and experience the installation process.
This will enable you to edit the messages to fit your application.
-
If the supporting objects are created successfully, you should run and test the application.
-
If the applications displays and performs as expected, delete the application and then deinstall your supporting objects.
-
Finally, use Object Browser to verify that all your supporting objects have been removed.
Since installation scripts are rarely correct the first time, this is typically an iterative process.
Downloading Public Packaged Applications and Sample Code
If you are using Oracle Application Express 2.2 or higher, you can download packaged applications and sample code from the Oracle Application Express Web site. Packaged applications are fully functional applications that you can view, use, and customize. Sample code is provided as packaged applications that contain a snippet of code to explain a solution.
To download public packaged applications and sample code:
-
In a Web browser, go to the following Web site:
-
Scroll down to review the available applications or code.
-
Click the link for the zip file you want to download, and save the file to your computer.
-
Unzip the file.
-
Review the Readme file.
Each application includes a Readme file that contains details about the application functionality, installation procedures, how to remove sample data (if appropriate), and default user names and passwords (if applicable).
-
Log in to the workspace in Oracle Application Express where you want to use the packaged application or code.
-
Import and install the application.
Follow the same steps you performed when installing the sample objects for this guide. See "About Loading Sample Objects".