Creating Tabs
Tabs are an effective way to navigate users between pages of an application. You can create a tabbed application look by using parent tabs, standard tabs, and lists.
Application Builder includes two different types of tabs:
-
Standard tabs
An application having only one level of tabs uses a standard tab set. A standard tab set is associated with a specific page and page number. You can use standard tabs to link users to a specific page.
-
Parent tabs
A parent tab set functions as a container to hold a group of standard tabs. Parent tabs give users another level of navigation and a context (or sense of place) within the application. You can use parent tabs to link users to a specific URL associated with a specific page.
Topics in this section include:
Note:
When running the Create Application Wizard, you have the option of creating an application with tabs. The following procedures assume you have created an application that does not have any tabs.See Also:
"Creating an Application"About Template Support
Before you can create parent and standard tabs, you must check that your default template has positions defined for both standard and parent tabs using the appropriate substitution strings. You also must make sure you do not override this template at the page-level.
See Also:
-
"Template Defaults" for information about setting a default page template at the application level
About the Tabs Section of the Page Definition
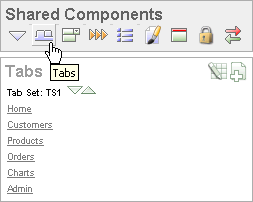
You can create and edit tabs on the Page Definition. Tabs display under the Shared Components section.

Description of the illustration pg_def_tabs.gif
You can temporarily hide all other Shared Components subsections by clicking the Tabs icon under the Shared Components title. To restore the view, click Show All. The Show All icon resembles an inverted triangle.
The following icons appear in the Tabs section:
-
Edit All. The Edit All icon resembles a small grid with a pencil on top of it. Use this icon to edit all tabs at once.
-
Create. The Create icon resembles a plus (+) sign overlapping a small page. Click this icon to create a new tab.
-
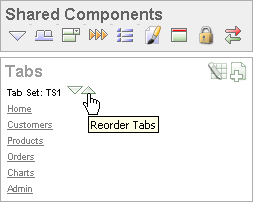
Reorder. The Reorder icon resembles light green down and up arrows. Click this icon to edit the label and location of tabs.
To edit a tab, click the tab name.
Using the Reorder Tabs Icon
You can quickly edit the label and location of tabs by clicking the Reorder Tabs icon. It appears in the Tabs section of the Page Definition. This icon resembles light green down and up arrows.

Description of the illustration reorder_tabs.gif
To edit tabs using the Reorder Tabs icon:
-
Navigate to the appropriate Page Definition. See "Accessing a Page Definition".
-
Under Tabs, click the Reorder Tabs icon.
The Reorder Tabs page appears.
-
Edit the appropriate information:
-
Label - Enter a label for the tab.
-
Page - Enter the page number that corresponds to the tab.
-
Tab Also Current For - List other pages that also correspond to this tab. To enter multiple pages, enter a list of pages delimited by a comma. For example:
11,12,13,14,29,14
-
-
To change the order in which tabs display, click the up and down arrows in the far right column.
-
Click Apply Changes.
About the Tabs Page
The Tabs page displays a graphical representation of the tabs defined in your application. You access the Tabs page from the Shared Components page, or by clicking the heading Tabs on the Page Definition.
How to Create a Tab
You create a parent tab or standard tab from the Tabs page.
To create a tab:
-
Access the Tabs page:
To access the Tabs page from the Shared Components page:
-
On the Workspace home page, click the Application Builder icon.
-
Select an application.
-
On the Application Builder home page, click Shared Components.
-
Under Navigation, click Tabs.
To access the Tabs page from a Page Definition:
-
Navigate to the appropriate Page Definition. See "Accessing a Page Definition".
-
Under Shared Components, click the Create icon in the Tabs section.
-
-
To create a tab:
-
Click Add in the appropriate row:
-
Use the Add button in the upper row to add Parent tabs.
Think of parent tabs as a container to hold standard tabs. For example, to add two levels of tabs, you first create a parent tab and then add standard tabs to it.
-
Use the Add button in the lower row to add Standard tabs.
The Create Parent Tab or Create Standard Tab Wizard appears.
-
-
Follow the on-screen instructions.
-
Editing Tabs
You can edit multiple tabs simultaneously. Also, for standard tabs, you can update tab properties, such as their labels and order sequence, by using the Standard Tab Tasks list.
Editing Multiple Tabs Simultaneously
You can edit multiple tabs simultaneously.
To edit multiple tabs simultaneously:
-
Navigate to the Tabs page:
-
On the Workspace home page, click the Application Builder icon.
-
Select an application.
-
Click Shared Components.
-
Under Navigation, click Tabs.
-
-
Click one of the following buttons:
-
Edit Standard Tabs
-
Edit Parent Tabs
-
Using the Standard Tab Task List
The Standard Tab Task list displays on the right side of the Tabs page. You can access the links on this list to rename a standard tab set, resequence the display order, associate pages with a tab set, create a new standard tab, or create a new standard tab set.
To access the Standard Tab Task list:
-
Navigate to the Tabs page:
-
On the Workspace home page, click the Application Builder icon.
-
Select an application.
-
Click Shared Components.
-
Under Navigation, click Tabs.
-
-
Make a selection from the Standard Tab Task list:
-
Rename Standard Tab Set
-
Resequence Display Order
-
Associate Page(s) with Selected Standard Tab
-
Create New Standard Tab
-
Create New Standard Tab Set
-
Accessing Tab Reports
You can view the Tab Utilization and Tab History reports by clicking the appropriate tab at the top of the Tab Manager page.
Standard Tab Utilization
Click Utilization to access the Standard Tab Utilization report. This report lists the standard tabs used in the current application.
Standard and Parent Tab History
Click History to view the Standard Tab History and Parent Tab History reports. These reports display a history of changes to tab attributes for the current application.