7 Creating a Master-Detail Application Using JPA and Oracle ADF
This chapter describes how to create a master-detail application usingJava Persistence API(JPA)and Oracle Application Developer Framework (Oracle ADF) in the following sections:
Note:
To develop, the master-detail application as described in this chapter, you must have an installation of Oracle JDeveloper 11g or later Studio Edition.7.1 Overview of the Master-Detail Application
A master-detail application allows you to view data from related tables at the same time. The records from a master table can be viewed along with related records from the detail table. If provisioning to edit the master-detail data is built into the application, you can also edit data from both the tables from a common interface. The master-detail application created in this chapter consists of:
-
JPA/EJB middle-tier components exposed through the ADF binding layer, to allow data in the table from the
HRschema to be accessed and updated. This is in one project calledmodel. -
A user interface (UI), or view, that consists of a set of JavaServer Faces(JSF) pages that serve as the UI for the application. This will be in a project called
view.
The model and view projects are based on the Java EE Model-View-Controller (MVC) design pattern, that is easily implemented using Oracle ADF.
Figure 7-1 shows the relationships among the items developed for this application.
Figure 7-1 Master Detail Application Pages
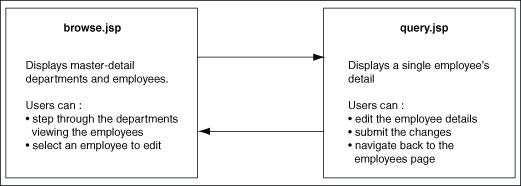
Description of "Figure 7-1 Master Detail Application Pages"
This application accesses the HR schema on Oracle Database. It uses the departments table as the master table to display detail data from the employees table. This chapter describes how you can use Oracle ADF with JDeveloper to create this application.
7.2 Using Java Persistence API (JPA) with Oracle ADF
Oracle ADF is an end-to-end application framework that builds on Java EE standards and open-source technologies to simplify and accelerate creating service-oriented applications. You can use Oracle ADF to develop enterprise solutions that search, display, create, modify, and validate data using web, wireless, desktop, or web services interfaces. Used in tandem, Oracle JDeveloper 11g and Oracle ADF give you an environment that covers the full development lifecycle from design to deployment, with drag-and-drop data binding, visual UI design, and team development features built-in.
The following subsections introduce Java Persistence API (JPA) and some of the Oracle ADF features that you will use to create the master detail application:
See Also:
http://www.oracle.com/technology/products/adf/pdf/ADF_11_overview.pdffor more information on Oracle ADF architecture-
http://www.oracle.com/technology/products/adf/index.htmlfor a compilation of resources on Oracle ADF
7.2.1 Java Persistence API (JPA)
JPA is part of the Java EE specification that deals with object/relational mapping and data persistence between Java and databases.
The Java Persistence consists of:
-
The Java Persistence API or JPA
-
The query language
-
Object or relational mapping metadata
7.2.2 Oracle ADF Faces
Oracle ADF Faces is based on the JavaServer Faces (JSF) JSR 127 specification. Oracle ADF Faces components are used in the user interfaces of the application. These components can be used in any IDE that supports JSF.
You can use Oracle ADF Faces to determine a consistent look and feel for your application. This allows you to focus on user interface interaction rather than look and feel compliance. ADF Faces components also support multi–language and translation implementation as well as accessibility features.
JDeveloper provides several design tools, wizards, special dialogs, and property editors that help you insert and use ADF Faces components in your pages. For example, the Visual Editor lets you design user interfaces by dragging and dropping components from the Component Palette. If you are familiar with XML or JSP/HTML coding, you can also edit the source of the page files to insert ADF Faces component tags.
7.2.3 ADF Data Controls
Oracle ADF data controls permit the application client to access business services defined by the model object layer. Business services can be any collection, value, or action that your model project defines. At runtime, the ADF Model layer reads the information describing the data controls and bindings from appropriate XML files and implements the two-way connection between the user interface and the business service.
7.3 Building the Data Model with EJB 3.0 Using the EJB Diagramer
In the next few steps, you create an application in JDeveloper and create a data model for your application.
7.3.1 Creating an Application and Project
Before you proceed to developing the master detail application, you must create a Connection object HRConn that establishes a connection between the application and the database. For instructions to create a Connection object, refer to Chapter 3.
-
From the File menu, select New to display the New Gallery. From the General category, select Application and then select Generic Application. The Create Generic Application wizard is displayed.
-
Enter
HR_EJB_JPA_Appas the Name of the application, enteroracleas the Application Package Prefix, and click Next. -
In the Name your Generic project screen, enter
EJBModelas the Project Name and click Finish. -
In the Navigator pane, click the Database Navigator tab. Select the HRConn connection in the IDE connections list and drag and drop it inside the
HR_EJB_JPA_Appnode to make the connection available for your application.
You now have an application called HR_EJB_JPA_App, which contains a project called EJBModel.
7.3.2 Creating the Persistence Model
In the model project, you will create the persistence model for hr.Departments and hr.Employees table using EJB 3.0 entity beans.
-
In the JDeveloper Application Navigator, select the EJBModel project.
-
From the File menu, select New to display the New Gallery. Expand the Business Tier category, and select EJB. In the Items list, select Entities from Tables. Click OK.
-
In Select EJB Version, select EJB 3.0 -- JPA Entities as the EJB version, then Next. Click Next to skip the Persistence Unit page.
-
In the Type of Connection page choose the Online Database Connection option and accept the default Offline Database name, then click Next.
-
In the Database Connection Details page, select HRConn as the connection to use. Click Next.
-
Click Query to retrieve the available objects for the HR schema. Then move DEPARTMENTS and EMPLOYEES to the Selected list. Click Next.
-
In this step, make sure the package name is
oracle. Click Next, then Finish. -
Right click the EJBModel node in the Application Navigator and select New.
-
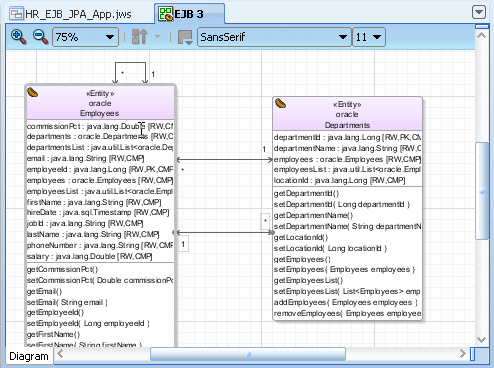
In the New Gallery select Business Tier, then EJB as the category and double click EJB Diagram (JPA/EJB 3.0).
-
In the Create EJB Diagram dialog, change the default name for the diagram (EJB Diagram1) to EJB 3 and verify
oracleis the Package name. Click OK. -
On the Associate Diagram With Persistence Unit dialog, click OK to accept the proposed Persistence Unit EJBModel (
EJBModel.jpr). A new empty diagram opens in the diagram editor. -
Select the Departments and Employees entities from the Application Navigator then drag and drop them onto the diagram. Reorganize the layout of the diagram to have both entities horizontally aligned. Save all your work.
7.3.3 Creating the Data Model
In this section, you create a session bean that implements a method to find employee and department records.
-
Select EJB Components from the Component Palette library and open the EJB Nodes. Select the Session Bean component and drag and drop it onto the diagram. The Create Session Bean Wizard opens.
-
In the EJB Name and Options step, set the EJB Name to HRFacade and make sure that the following values are properly set:
-
Session Type: Stateless
-
Transaction Type: Container
-
Generate Session Facade Method is checked
-
Entity Implementation: JPA Entities
-
Persistence Unit: EJBModel
Click Next.
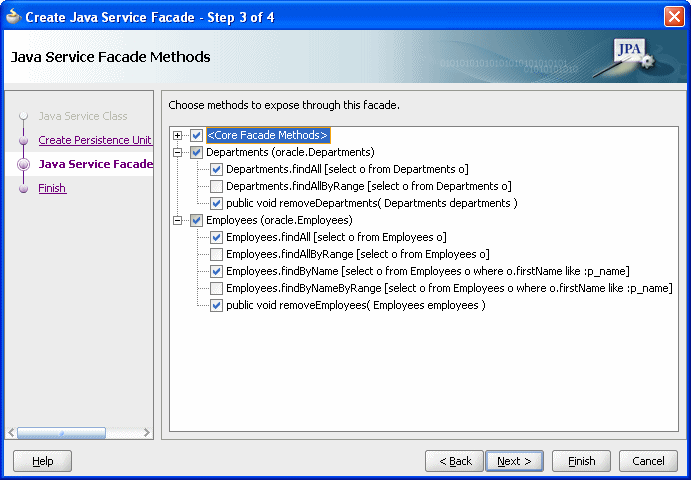
-
-
Expand the Employees and Departments nodes and deselect the findAllByRange method for each entity. Click Next.
-
In the Class Definition step, make sure that the full name for Bean Class is
oracle.HRFacadeBean. Click Next. -
In the following step, we have both Remote and Local interface implementation selected. The remote interface is used for client applications that run in a separate virtual machine, such as Java clients whereas local interface is used for client applications that run in the same virtual machine, such as Web clients. Click Next to review the summary of the created classes and then click Finish.
The session bean is made up of three files: HRFacadeBean - contains the session bean code. HRFacade - describes the capabilities of the bean for remote clients and HRFacadeLocal describes the capabilities for the local client.
-
Double click the Employees entity bean on the diagram to open the source code for the class.
-
Add a comma at the end of the last
@NamedQuerystatement, then add the following statement:@NamedQuery(name = "Employees.findByName", query = "select o from Employees o where o.firstName like :p_name")
The code will look as follows:
@Entity
@NamedQueries({
@NamedQuery(name = "Employees.findAll", query = "select o from Employees o"),
@NamedQuery(name = "Employees.findByName", query = "select o from Employees o where o.firstName like :p_name")
})
Note:
What makes these objects different from other Java files are the annotations that identify them as EJB entities. A key feature of EJB 3.0 and JPA is the ability to create entities that contain object-relational mappings by using metadata annotations rather than deployment descriptors as in earlier versions. -
Click the Make icon to compile the
Employees.javaclass. Make sure that the Message - Log window does not report any errors. -
Right-click the HRFacadeBean node in the Application Navigator and select Edit Session Facade from the context menu.
-
Expand the Employees node of the dialog. The new named query
Employees.findByNameappears as an exposable method. Select it and click OK. This will add the new method to the session bean.
7.3.4 Running the Java Service outside Java EE container
A persistence unit can be configured to run inside or outside the container. In this section, you create a session bean that implements a method to find employee and department records.
-
Expand META-INF then right-click the persistence.xml. Select New Java Service Facade from the context menu.
-
In the Java Service Class panel, you can choose to create a new persistence unit or use an existing unit. Select Choose a Persistence Unit or Create one in the next Panel, and check the Generate a main() method checkbox. Click Next.
-
Name the the Persistence Unit
outside. Choose JDBC Connection and make sure the JDBC connection is set toHRConn. Click Next. -
All methods should be selected by default. Deselect all the
byRangemethods. Click Next, then Finish. -
In the source editor window, for the JavaServiceFacade class, add a new line after the
// TODO commentand enter the following statement:Employees a = javaServiceFacade.queryEmployeesFindByName("P%").get(0); -
Compile the class and save your work.
-
Right-click the JavaServiceFacade node in the Application Navigator and select Run from context.
The Log window displays the result of the execution of the class running outside Java EE container, returning the first
lastNameof the retrieved records. -
Expand META-INF and double-click persistence.xml to display the contents of the file.
-
Both persistence units are described. The default inside one and the newly-created for outside Java EE run. Click the Source tab to review details.
-
You now expose the EJB as a data control for the Oracle ADF framework. This simplifies the way that you bind user interfaces to the EJB.
Right-click the HRFacadeBean node in the Application Navigator and select Create Data Controls from context.
-
In the Choose EJB Interface dialog, select Local, and click OK. Save all your work.
7.4 Create a New Project for the User Interface
The application user interface consists of a set of JSP pages. For this application, the user interface (UI), referred to as the view, is defined in a separate project.
To create the application UI, you define a project called UserInterface as follows:
-
In the Application Navigator, select the HR_EJB_JPA_App application and from the File menu, select New to display the New Gallery. From the General category, select Project. From the Items list, select Generic Project and click OK.
-
In the Create Generic Project screen, enter
UserInterfaceas the Name of the new project, and click Finish. -
In the Application Navigator, right click the UserInterface node and select Project Properties from context.
-
In the Project Properties dialog, select the JSP Tag Libraries node. Select Distributed libraries, then click Add.
-
In the Tag Libraries list, select ADF Faces Components 11. Click OK.
-
Select the Technology scope node. In the Available technologies list, select JSF. Notice that selecting JSF automatically propagates the required associated technologies, Java, JSP and Servlets. Click OK. Save your work.
7.5 Creating the Page Flow
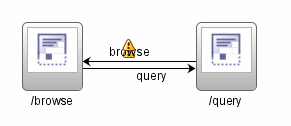
You now use JDeveloper's JSF Navigation Modeler to diagrammatically plan and create your application's pages, and the navigation between them.
-
In the Application Navigator, expand UserInterface, then Web Content, and then WEB_INF. Double click faces-config.xml to open a page flow diagram.
-
In the JSF Navigation Diagram page of the Component Palette, select JSF Page, and click in the diagram where you want the page to appear. Rename the page
browse. -
From the Component Palette, drag and drop a JSF Page next to the previous one. Rename the page
query. -
Select JSF Navigation Case in the Component Palette. Click the icon for the source JSF page (
browse), and then click the icon for the destination JSF page (query) for the navigation case.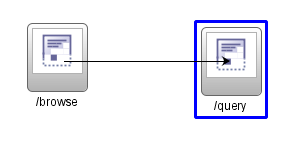
-
Modify the default label,
success, by clicking it and typingqueryover it. Notice that there is a warning icon above the Navigation Case. This is because you have not yet created the JSF pages.This warning disappears when you create the respective pages. -
Select JSF Navigation Case in the Component Palette. Click the icon for the source JSF page (
query), and then click the icon for the destination JSF page (browse) for the navigation case. Rename the label tobrowse. Save your work.
7.6 Creating a Master-Detail JavaServer Faces Page
In the next few steps, you create a JavaServer Faces Page using ADF Faces components for the Department Employees Master Detail page.
-
On the Page Flow diagram, double-click the browse icon to launch the Create JSF JSP wizard.
-
The File name should be
browse.jspx, select the Create as XML Document option. Click OK.You now have an empty
browse.jspxpage. In the next few steps, you add a data-bound ADF Faces component to the page. This component displays a department along with the employees belonging to this department. -
From the Component palette, for the ADF Faces library, select the Layout section and drag a Panel Stretch Layout component onto the page
-
From the Component Palette, drag a Panel Splitter component on the middle of the page. The cursor should be on the left of the center tag.
-
Open the Data Controls component and expand HRFacadeLocal, then queryDepartmentsFindAll and then drag and drop the Departments node within the first facet. In the pop up menu, select Forms, then ADF Read-only Form.
-
In the Edit Form Fields, check the Include Navigation Controls option. Click OK.
-
In the Data Controls, expand the Departments node, select the employeesList node and drop it in the second facet. In the pop up menu, select Tables, then ADF Read-only Table.
-
In the Edit Table Columns dialog delete all columns except the following:
-
commissionPct
-
email
-
employeeId
-
firstName
-
hiredate
-
jobId
-
lastName
-
phoneNumber
-
salary
Select Row Selection, and Sorting options. Click OK.
-
-
In the Structure pane, select the af:panelSplitter pane and in the Property Inspector, set the Orientation to
vertical. -
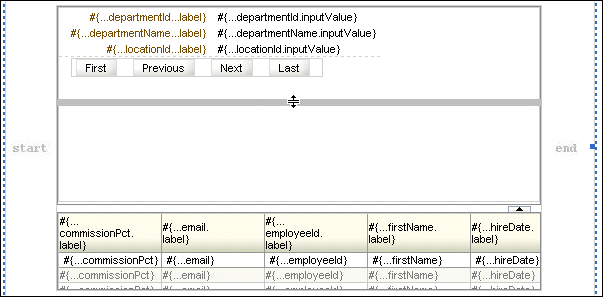
Select the af:panelStretchLayout tag. In the Property Inspector, expand Style. In the Box tab set the Width to 600 Pixel and the Height to 400 Pixel so that the Employees table appears in the layout editor.
Select the af:table tag in the second pane. In the Property Inspector, expand Style. In the Box tab set the Width to 100 Pct and the Height to 100 Pct.
Reduce the height of the Department block on the page using your mouse to drag the line.
-
You want the employees section of this page to refresh when the user navigates between departments. You implement that by adding a Partial Page Rendering trigger to the employees table.
Select the First button and in the Properties Inspector add
firstas the ID. Repeat this for the remaining 3 buttons. Set Previous toprevious, Next tonext, and Last tolast. -
Set the Partial Page Rendereing trigger to fire when the user clicks any of those buttons.
Select the employees table. In the Properties Inspector, expand Behavior, then PartialTriggers property and click on Edit. The Edit button is on the far right of the field.
-
In the Edit Property dialog, expand facet (first), then panelFormLayout - Departments , then facet (footer), and then panelGroupLayout to expose the navigation buttons. Add all four buttons to the selected list. Click OK.
-
From the Component Palette, in the Common Components, select the Panel Menu Bar component and drop it onto the Facet Top tag, in the Design of the page. Click the Menu component then drag and drop it inside the Menu Bar.
-
(AFBrandingBarTitle, AFHeaderLevelTwo, Click Browse Employees and select Heading2. Drag to resige top facet)
-
In the Property Inspector change the Text from
menu 1toOptions. Click the Behavior tab and set the Detachable field to true. -
In the Structure Pane, right-click the af:menu tag and from context select Insert Inside af:menu and then MenuItem.
-
In the Property Inspector, using the Common tab, change the Text to
Queryand from the drop down list set the Action toquery. Save your work.
7.7 Creating a Query and Edit Page
In the next few steps, you use ADF Faces to build the query page to edit Employees.
-
Click the faces-config.xml tab to switch back to the Page Flow diagram, and double-click the query icon to launch the page wizard.
-
The file name should be
query.jspxand Create as XML Document is checked. Click OK -
A new Design page opens. In Data Controls, under the HRFacadeLocal node, select the queryEmployeesFindByName(Object) node and drop it onto the page. From the popup menu, select Parameters, then ADF Parameter Form.
-
In the Edit Form Fields click OK to accept the proposed fields.
-
In the Edit Action Binding dialog click OK.
-
In the Data Controls, expand the queryEmployeesFindByName node and select the Employees node. Drop it onto the page below the Parameter Form. From the popup menu, select Forms, then ADF Form.
-
In the Edit Form Fields, select Include Navigation Controls and Include Submit Button checkboxes. Click OK.
-
This page needs to be updatable. To specify this, select the mergeEntity(Object) method in the Data Controls pane, and drop it onto the Submit button. In the Edit Action Binding dialog, click the down arrow and select Show EL Expression Builder.
-
In the Variables dialog, expand ADF Bindings, then Bindings, then queryEmployeesFindByNameIterator, then currentRow and select dataProvider. As you select each node in the expression. the editor adds it to the expression in the top of the window.
Click OK. Click OK again. In the Confirm Component Rebinding dialog, click OK.
-
In the design of the query page, select the mergeEntity button
In the Property Inspector, Common tab, set the Text value to
Saveand in the Button Action section, set the the Action tobrowsefrom the drop down list. Save your work.
7.8 Running the Application
You may now run the application as follows:
-
In the Application Navigator, right-click
browse.jspand select Run from the shortcut menu. -
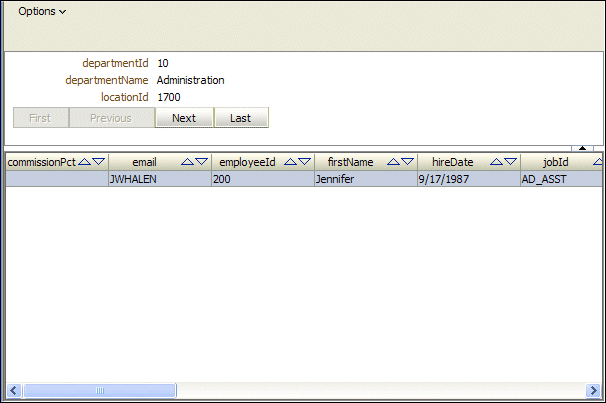
As you run the application, you will be able to navigate through the different Departments and then select individual Employees for editing. Experiment with updating either the salary or hiredate of an employee.
The Employees page displayed in a browser is shown in Figure 7-5.
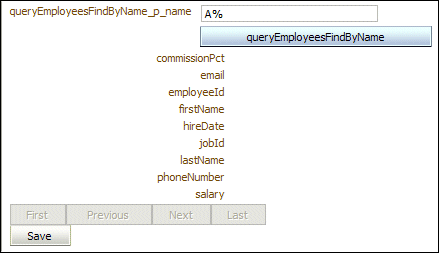
The edit page displayed in a browser is similar to that shown in Figure 7-6.
