4 Querying for and Displaying Data
This chapter adds functions and code to the DataHandler.java file for querying the database. This chapter has the following sections:
4.1 Overview of Querying for Data in Oracle Database
In outline, to query Oracle Database from a Java class to retrieve data, you must do the following:
-
Create a connection by using the
OracleDataSource.getConnectionmethod. This is covered in Chapter 3, "Connecting to Oracle Database". -
Define your SQL statements with the methods available for the connection object. The
createStatementmethod is used to define a SQL query statement. -
Using the methods available for the statement, run your queries. You use the
executeQuerymethod to run queries on the database and produce a set of rows that match the query conditions. These results are contained in aResultSetobject. -
You use a
ResultSetobject to display the data in the application pages.
The following sections describe important Java Database Connectivity (JDBC) concepts related to querying the database from a Java application:
4.1.1 SQL Statements
Once you connect to the database and, in the process, create a Connection object, the next step is to create a Statement object. The createStatement method of the JDBC Connection object returns an object of the JDBC Statement type. Example 4-1 shows how to create a Statement object.
The Statement object is used to run static SQL queries that can be coded into the application.
In addition, for scenarios where many similar queries with differing update values must be run on the database, you use the OraclePreparedStatement object, which extends the Statement object. To access stored procedures on Oracle Database, you use the OracleCallableStatement object.
4.1.2 Query Methods for the Statement Object
To run a query embedded in a Statement object, you use variants of the execute method. Important variants of this method are listed in Table 4-1.
Table 4-1 Key Query Execution Methods for java.sql.Statement
| Method Name | Return Type | Description |
|---|---|---|
|
|
Runs the given SQL statement, which returns a Boolean response: true if the query runs successfully and false if it does not. |
|
|
|
|
Adds a set of parameters to a |
|
|
Submits a batch of commands to the database for running, and returns an array of update counts if all commands run successfully. |
|
|
|
Runs the given SQL statement, which returns a single |
|
|
|
Runs the given SQL statement, which may be an |
4.1.3 Result Sets
A ResultSet object contains a table of data representing a database result set, which is generated by executing a statement that queries the database.
A cursor points to the current row of data in a ResultSet object. Initially, it is positioned before the first row. You use the next method of the ResultSet object to move the cursor to the next row in the result set. It returns false when there are no more rows in the ResultSet object. Typically, the contents of a ResultSet object are read by using the next method within a loop until it returns false.
The ResultSet interface provides accessor methods (getBoolean, getLong, getInt, and so on) for retrieving column values from the current row. Values can be retrieved by using either the index number of the column or the name of the column.
By default, only one ResultSet object per Statement object can be open at the same time. Therefore, to read data from multiple ResultSet objects, you must use multiple Statement objects. A ResultSet object is automatically closed when the Statement object that generated it is closed, rerun, or used to retrieve the next result from a sequence of multiple results.
See Also:
-
http://java.sun.com/j2se/1.3/docs/guide/jdbc/getstart/mapping.htmlfor more information on mapping SQL types and Java types -
Oracle Database JDBC Developer's Guide and Referencefor more information on result sets and their features
4.1.3.1 Features of ResultSet Objects
Scrollability refers to the ability to move backward as well as forward through a result set. You can also move to any particular position in the result set, through either relative positioning or absolute positioning. Relative positioning lets you move a specified number of rows forward or backward from the current row. Absolute positioning lets you move to a specified row number, counting from either the beginning or the end of the result set.
When creating a scrollable or positionable result set, you must also specify sensitivity. This refers to the ability of a result set to detect and reveal changes made to the underlying database from outside the result set. A sensitive result set can see changes made to the database while the result set is open, providing a dynamic view of the underlying data. Changes made to the underlying column values of rows in the result set are visible. Updatability refers to the ability to update data in a result set and then copy the changes to the database. This includes inserting new rows into the result set or deleting existing rows. A result set may be updatable or read-only.
4.1.3.2 Summary of Result Set Object Types
Scrollability and sensitivity are independent of updatability, and the three result set types and two concurrency types combine for the following six result set categories:
-
Forward-only/read-only
-
Forward-only/updatable
-
Scroll-sensitive/read-only
-
Scroll-sensitive/updatable
-
Scroll-insensitive/read-only
-
Scroll-insensitive/updatable
Example 4-2 demonstrates how to declare a scroll-sensitive and read-only ResultSet object.
Example 4-2 Declaring a Scroll-Sensitive, Read-Only ResultSet Object
stmt = conn.createStatement(ResultSet.TYPE_SCROLL_SENSITIVE, ResultSet.CONCUR_READ_ONLY);
Note:
A forward-only updatable result set has no provision for positioning at a particular row within theResultSet object. You can update rows only as you iterate through them using the next method.4.2 Querying Data from a Java Application
This section discusses how you can use JDeveloper to create a Java class that queries data in Oracle Database in the following sections:
4.2.1 Creating a Method in JDeveloper to Query Data
The following steps show you how to add a simple query method to your DataHandler.java class. If DataHandler.java is not open in the JDeveloper integrated development environment (IDE), double-click it in the Application Navigator to display it in the Java Source Editor.
-
In the
DataHandlerclass, add the followingimportstatements after the existingimportstatements to use theStatementandResultSetJDBC classes:import java.sql.Statement; import java.sql.ResultSet;
-
After the
connectiondeclaration, declare variables forStatement,ResultSet, andStringobjects as follows:Statement stmt; ResultSet rset; String query; String sqlString;
-
Create a method called
getAllEmployees, which will be used to retrieve employee information from the database. Enter the signature for the method:public ResultSet getAllEmployees() throws SQLException{ -
Press Enter to include a closing brace for this method, and a new line in which to start entering the method code.
-
Call the
getDBConnectionmethod created earlier:getDBConnection();
-
Use the
createStatementmethod of theConnectioninstance to provide context for executing the SQL statement and define theResultSettype. Specify a read-only, scroll-sensitiveResultSettype:stmt = conn.createStatement(ResultSet.TYPE_SCROLL_SENSITIVE, ResultSet.CONCUR_READ_ONLY);
The Java Code Insight feature can help you ensure that the statement syntax is correct.
-
Define the query and print a trace message. The following code uses a simple query: it returns all the rows and columns in the
Employeestable and the data is ordered by the Employee ID:query = "SELECT * FROM Employees ORDER BY employee_id"; System.out.println("\nExecuting query: " + query); -
Run the query and retrieve the results in the
ResultSetinstance as follows:rset = stmt.executeQuery(query);
-
Return the
ResultSetobject:return rset;
-
Save your work. From the File menu, select Save All.
The code for the getAllEmployees method should be as shown in Example 4-3.
Example 4-3 Using the Connection, Statement, Query, and ResultSet Objects
public ResultSet getAllEmployees() throws SQLException{
getDBConnection();
stmt = conn.createStatement(ResultSet.TYPE_SCROLL_SENSITIVE,
ResultSet.CONCUR_READ_ONLY);
query = "SELECT * FROM Employees ORDER BY employee_id";
System.out.println("\nExecuting query: " + query);
rset = stmt.executeQuery(query);
return rset;
}
4.2.2 Testing the Connection and the Query Methods
In the following steps, you create a simple Java class to test the methods in the DataHandler.java class. To test your application at this stage, you can temporarily set the value of the jdbcUrl variable to the connection string for your database and set the values of the userid and password variables to the values required to access the HR schema ("hr" in each case).
-
Open the
DataHandler.javaclass in the Java Visual Editor from the Application Navigator. -
Change the
jdbcUrl,useridandpasswordvariables to contain the values required for theHRschema as follows:String jdbcUrl = "connect-string" String userid = "hr"; String password = "hr";where
connect-stringis, for example:jdbc:oracle:thin:@dbhost.companyname.com:1521:ORCL
-
Create a new Java class in the
hrpackage. Name itJavaClient, make it a public class, and generate a default constructor and amainmethod. The skeletonJavaClient.javaclass is created and displayed in the Java Source Editor.See Also:
Chapter 3 for information on creating a Java class file -
Import the
ResultSetpackage:import java.sql.ResultSet;
-
In the
mainmethod declaration, add exception handling as follows:public static void main(String[] args) throws Exception{ -
Replace the
JavaClientobject created by default with aDataHandlerobject. Locate the following line:JavaClient javaClient = new JavaClient();
Replace this with:
DataHandler datahandler = new DataHandler();
-
Define a
ResultSetobject to hold the results of thegetAllEmployeesquery, and iterate through the rows of the result set, displaying the first four columns,Employee Id,First Name,Last Name, andEmail. To do this, add the following code to themainmethod:ResultSet rset = datahandler.getAllEmployees(); while (rset.next()) { System.out.println(rset.getInt(1) + " " + rset.getString(2) + " " + rset.getString(3) + " " + rset.getString(4)); } -
Compile the
JavaClient.javafile to check for compilation errors. To do this, right-click in the Java Source Editor, and select Make from the shortcut menu.If there are no errors in compilation, you should see the following message in the Log window:
Successful compilation: 0 errors, 0 warnings -
Run the
JavaClient.javafile. To do this, right-click in the Java Source Editor window and select Run from the shortcut menu. -
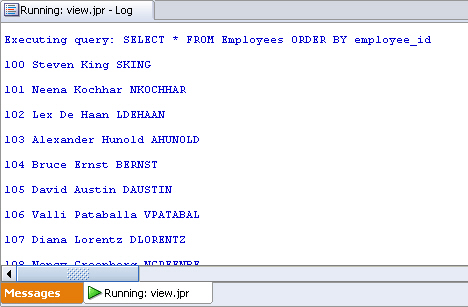
Examine the output in the Log window. Notice the trace message, followed by the four columns from the
Employeestable as shown in Figure 4-1.Figure 4-1 Test Output for Query Method in Log Window
Description of "Figure 4-1 Test Output for Query Method in Log Window"
-
When you finish testing the application, set the
jdbcUrl,useridandpasswordvariables inDataHandler.javaback tonull.
See Also:
Declaring Connection-Related Variables4.3 Creating JSP Pages
The HRApp application uses JavaServer Pages (JSP) technology to display data. JSP technology provides a simple, fast way to create server-independent and platform-independent dynamic Web content. A JSP page has the .jsp extension. This extension notifies the Web server that the page should be processed by a JSP container. The JSP container interprets the JSP tags and scriptlets, generates the content required, and sends the results back to the client as an HTML or XML page.
To develop JSP pages, you use some or all of the following:
-
HTML tags to design and format the dynamically generated Web page
-
Standard JSP tags or Java-based scriptlets to call other components that generate the dynamic content on the page
-
JSP tags from custom tag libraries that generate the dynamic content on the page
See Also:
Sun Microsystems documentation for JSP atIn this section, you will see how you can create JSP pages for the application in this guide in the following sections:
4.3.1 Overview of Page Presentation
In the application created in this guide, JSP pages are used to do the following tasks:
-
Display data.
-
Hold input data entered by users adding employees and editing employee data.
-
Hold the code needed to process the actions of validating user credentials and adding, updating, and deleting employee records in the database.
Because JSP pages are presented to users as HTML or XML, you can control the presentation of data in the same way as you would for static HTML and XML pages. You can use standard HTML tags to format your page, including the title tag in the header to specify the title to be displayed for the page.
You use HTML tags for headings, tables, lists and other items on your pages. Style sheets can also be used to define the presentation of items. If you use JDeveloper to develop your application, you can select styles from a list.
The following sections describe the main elements used in the JSP pages of the sample application:
4.3.1.1 JSP Tags
JSP tags are used in the sample application in this guide for the following tasks: to initialize Java classes that hold the application methods and the JavaBean used to hold a single employee record, and to forward the user to either the same or another page in the application.
The jsp:useBean tag is used in pages to initialize the class that contains all the methods needed by the application, and the jsp:forward tag is used to forward the user to a specified page. You can drag the tags you need from the Component Palette of JSP tags, and enter the properties for the tag in the corresponding dialog box that is displayed.
See Also:
http://java.sun.com/products/javabeans/for more information on JavaBeans
4.3.1.2 Scriptlets
Scriptlets are used to run the Java methods that operate on the database and to perform other processing in JSP pages. You can drag a scriptlet tag component from the Component Palette and drop it onto your page, ready to enter the scriptlet code. In JDeveloper, the code for scriptlets is entered in the Scriptlet Source Editor dialog box.
In this application, you use scriplets for a variety of tasks. As an example, one scriptlet calls the DataHandler method that returns a ResultSet object containing all the employees in the Employees table, which you can use to display that data in your JSP page. As another example, a scriplet is used to iterate through the same ResultSet object to display each item in a row of a table.
4.3.1.3 HTML Tags
HTML tags are typically used for layout and presentation of the nondynamic portions of the user interface, for example headings and tables. In JDeveloper, you can drag and drop a Table component from the Component Palette onto your page. You must specify the number of rows and columns for the table, and all the table tags are automatically created.
4.3.1.4 HTML Forms
HTML forms are used to interact with or gather information from the users on Web pages. The FORM element acts as a container for the controls on a page, and specifies the method to be used to process the form input.
For the filter control to select which employees to display, the employees.jsp page itself processes the form. For login, insert, edit, and delete operations, additional JSP pages are created to process these forms. To understand how the JSP pages in this application are interrelated, refer to Figure 1-2.
You can add a form in a JSP page by selecting it from the Component Palette of HTML tags. If you attempt to add a control on a page outside of the form component or in a page that does not contain a form, then JDeveloper prompts you to add a form component to contain it.
4.3.2 Creating a Simple JSP Page
The following steps describe how to create a simple JSP page:
-
In the Application Navigator, right-click the View project and choose New from the shortcut menu.
-
In the New Gallery, select the All Technologies tab.
-
Expand the Web Tier node from the Categories list and select JSP.
-
In the Items list, select JSP and click OK. The Create JSP Dialog box is displayed.
-
On the JSP File screen, enter a name for the JSP page and select JSP Page.
-
On the Create JSP screen, enter a name for the JSP page and click OK. The new page opens in the JSP/HTML Visual Editor and is ready for you to start adding text and components to your web page.
4.3.3 Adding Static Content to a JSP Page
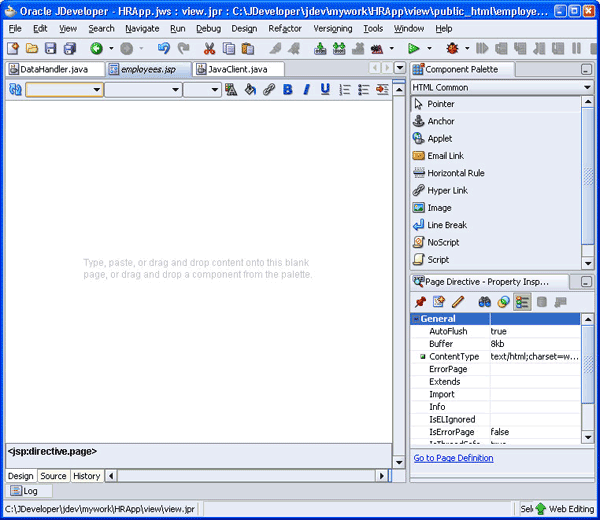
JDeveloper provides the Component Palette and the Property Inspector on the right hand side of the JSP/HTML Visual Editor. You can also use the JSP Source Editor by clicking the Source Editor tab next to the Design tab at the bottom of the page. The Component Palette allows you to add components to the page and the Property Inspector allows you to set the properties of the components. A blank page in the Visual Editor is shown in Figure 4-2.
Figure 4-2 Adding Content to JSP Pages in the JDeveloper Visual Source Editor
Description of "Figure 4-2 Adding Content to JSP Pages in the JDeveloper Visual Source Editor"
The following steps show how you can add text to the employees.jsp page. They use the Visual Editor to modify the JSP. The Visual Editor is like a WYSIWYG editor and you can use it to modify content.
-
With
employees.jspopen in the Visual Editor, in the top line of your page, enter AnyCo Corporation: HR Application. From the list of styles at the top of the page, on the left-hand side, select Heading 2. -
With the cursor still on the heading you added, from the Design menu select Align, and then Center.
-
In a similar way, on a new line, enter Employee Data, and format it with the Heading 3 style. Position it on the left-hand side of the page.
4.3.4 Adding a Style Sheet to a JSP Page
You can add a style sheet reference to your page, so that your headings, text, and other elements are formatted in a consistent way with the presentation features, such as the fonts and colors used in the Web pages. You can add a style sheet to the page as follows:
-
With
employees.jspopen in the Visual Editor, click the list arrow at the top right of the Component Palette, and select CSS. -
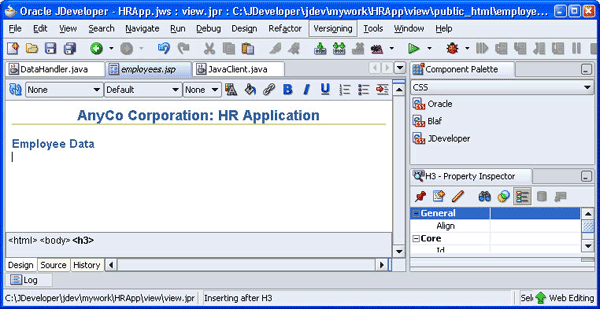
From the CSS list, drag JDeveloper onto your page. As soon as you select the style sheet it is added to your page and formats the page with the JDeveloper styles. Figure 4-3 shows the JSP Page with the content added to it in the previous section and the JDeveloper stylesheet applied to it.
Figure 4-3 Adding Static Content to the JSP Page
Description of "Figure 4-3 Adding Static Content to the JSP Page"
Note:
In JDeveloper version 10.1.3, you can associate a stylesheet with the JSP page while creating it in the JSP Creation Wizard. The only difference is that you need to browse and locate the stylesheet to be applied to the JSP page, instead of just dragging and dropping it onto the page.
4.4 Adding Dynamic Content to the JSP Page: Database Query Results
This section includes the following subsections:
4.4.1 Adding a JSP useBean Tag to Initialize the DataHandler Class
A jsp:useBean tag identifies and initializes the class that holds the methods that run in the page. To add a jsp:useBean tag, follow these steps:
-
Open
employees.jspin the Visual Editor. -
In the Component Palette, select the JSP set of components. Scroll through the list to select UseBean. Then, drag and drop it onto your JSP page, below the headings.
-
In the Insert UseBean dialog box, enter
empsbeanas the ID, and for the Class, browse and select thehr.DataHandlerclass. Set the Scope tosession, and leave the Type and BeanName fields blank. -
Click OK to create the tag in the page.
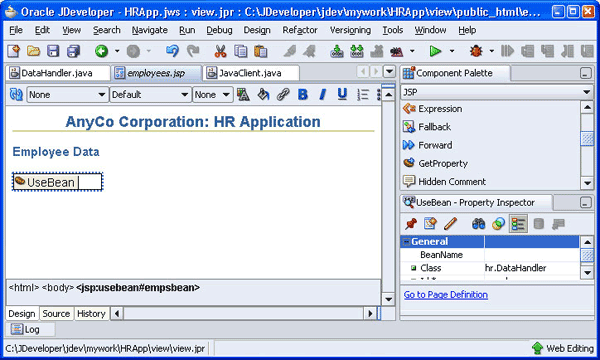
Figure 4-4 shows the representation of the useBean tag in the employees.jsp page.
Figure 4-4 useBean Representation in the employees.jsp File
Description of "Figure 4-4 useBean Representation in the employees.jsp File"
4.4.2 Creating a Result Set
The following steps describe how you can add a scripting element to your page to call the getAllEmployees method and hold the result set data that is returned. This query is defined in the DataHandler class, and initialized in the page by using the jsp:useBean tag.
-
Open the
employees.jsppage in the Visual Editor. In the JSP part of the Component Palette, select Scriptlet and drag and drop it onto the JSP page next to the representation of the UseBean. -
In the Insert Scriptlet dialog box, enter the following lines of code, which will call the
getAllEmployeesmethod and produce aResultSetobject:ResultSet rset; rset = empsbean.getAllEmployees();
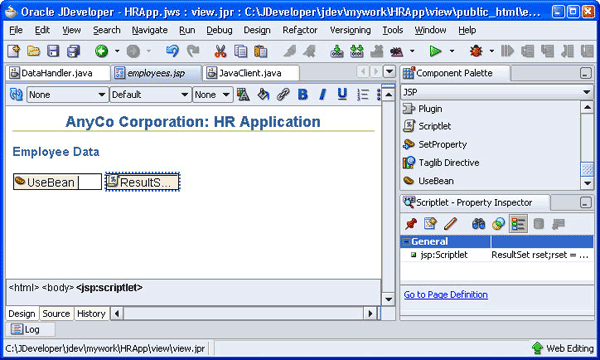
Click OK. A representation of the scriptlet is displayed on the page as shown in Figure 4-5.
Figure 4-5 Scriptlet Representation in a JSP Page
Description of "Figure 4-5 Scriptlet Representation in a JSP Page"
-
Select the Source tab at the bottom of the Visual Editor to see the code that has been created for the page so far. A wavy line under
ResultSetindicates that there are errors in the code. -
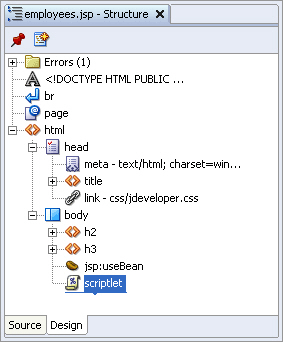
The Structure window on the left-hand side also indicates any errors in the page. Scroll to the top of the window and expand the JSP Errors node. Figure 4-6 shows how the error in the code is shown in the Structure window.
Figure 4-6 Viewing Errors in the Structure Window
Description of "Figure 4-6 Viewing Errors in the Structure Window"
-
You must import the
ResultSetpackage. To do this, click the page node in the Structure window to display the page properties in the Property Inspector. -
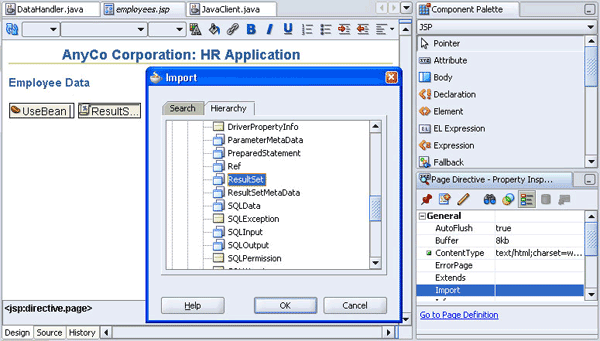
Click in the empty box to the right of the import property. Click the ellipsis symbol (...). The import dialog box is displayed, which is shown in Figure 4-7.
Figure 4-7 Importing Packages in JDeveloper
Description of "Figure 4-7 Importing Packages in JDeveloper"
-
In the import list, select the Hierarchy tab, expand the java node, then the sql node, and then select ResultSet. Click OK.
-
On the Source tab, examine the code to see if the
importstatement has been added to the code for your page. The error should disappear from the list in the Structure window. Before continuing with the following sections, return to the design view of the page by selecting the Design tab.
4.4.3 Adding a Table to the JSP Page to Display the Result Set
The following steps describe how you can add a table to the JSP page to display the results of the getAllEmployees query:
-
If the
employees.jsppage is not open in the Visual Editor, double-click it in the Application Navigator to open it, and work in the Design tab. With theemployees.jspfile open in the Visual Editor, position the cursor after the scriptlet and from the HTML Common page of the Component Palette, select the Table component. -
In the Insert Table dialog box, specify
1row and6columns. Leave all Layout properties as defaults. Click OK. -
In the table row displayed on the page, enter text as follows for the headings for each of the columns: First Name, Last Name, Email, Job, Phone, Salary. Use Heading 4 to format the column names.
-
Add a scripting element for output, this time to display the values returned for each of the columns in the table. To do this, select the table as follows. Position the cursor on the top border of the table, and click when the cursor image changes to a table image. From the JSP Component Palette, select Scriptlet. (You need not drag the scriptlet into your table; it is inserted automatically.)
-
In the Insert Scriptlet dialog box, enter the following lines of code:
while (rset.next ()) { out.println("<tr>"); out.println("<td>" + rset.getString("first_name") + "</td><td> " + rset.getString("last_name") + "</td><td> " + rset.getString("email") + "</td><td> " + rset.getString("job_id") + "</td><td>" + rset.getString("phone_number") + "</td><td>" + rset.getDouble("salary") + "</td>"); out.println("</tr>"); } -
Click OK.
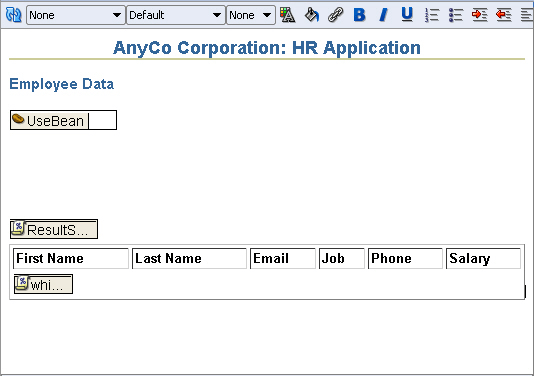
The JSP page created is shown in Figure 4-8.
4.5 Filtering a Query Result Set
You can filter the results of a query by certain parameters or conditions. You can also allow users of the application to customize the data filter. In the sample application created in this guide, the procedure of filtering the query result consists of the following tasks:
-
Determining what filtered set is required
Users can specify the set of employee records that they want to view by entering a filter criterion in a query field, in this case, a part of the name that they want to search for. The
employees.jsppage accepts this input through form controls, and processes it. -
Creating a method to return a query
ResultSetThe user input string is used to create the SQL query statement. This statement selects all employees whose names include the sequence of characters that the user enters. The query searches for this string in both the first and the last names.
-
Displaying the results of the query
This is done by adding code to the
employees.jsppage to use the method that runs the filtered query.
This section describes filtering query data in the following sections:
4.5.1 Creating a Java Method for Filtering Results
The following steps describe how you can create the getEmployeesByName method. This method allows users to filter employees by their first or last name.
-
From the Application Navigator, open the
DataHandler.javaclass in the Java Visual Editor. -
After the
getAllEmployeesmethod, declare thegetEmployeesByNamemethod as follows:public ResultSet getEmployeesByName(String name) throws SQLException { } -
Within the body of the method, add the following code to convert the name to uppercase to enable more search hits:
name = name.toUpperCase();
-
Call the method to connect to the database:
getDBConnection();
-
Specify the
ResultSettype and create the query:stmt = conn.createStatement(ResultSet.TYPE_SCROLL_SENSITIVE, ResultSet.CONCUR_READ_ONLY); query = "SELECT * FROM Employees WHERE UPPER(first_name) LIKE \'%" + name + "%\'" + " OR UPPER(last_name) LIKE \'%" + name + "%\' ORDER BY employee_id"; -
Print a trace message:
System.out.println("\nExecuting query: " + query); -
Run the query and return a result set as before:
rset = stmt.executeQuery(query);
return rset;
-
Save the file and compile it to ensure there are no compilation errors.
4.5.2 Testing the Query Filter Method
You can use the JavaClient.java class created in Testing the Connection and the Query Methods to test the getEmployeesByName method. You must add the getEmployeesByName method to display the query results as described in the following steps:
-
Open the
JavaClient.javaclass in the Java Source Editor. -
After the result set displaying the results from the
getAllEmployeesquery, define a result set for the conditional query as follows:rset = datahandler.getEmployeesByName("King"); System.out.println("\nResults from query: "); while (rset.next()) { System.out.println(rset.getInt(1) + " " + rset.getString(2) + " " + rset.getString(3) + " " + rset.getString(4)); } -
To test your application at this stage, you can temporarily adjust the values of the
jdbcUrl,useridandpasswordvariables in theDataHandlerclass to provide the values required for theHRschema. Save the file, and compile it to check for syntax errors.Note:
Make sure you change the values ofuserid,password, andjdbcUrlback tonullafter testing. For more information, refer to Declaring Connection-Related Variables. -
To test-run the code, right-click in the Java Source Editor and select Run from the shortcut menu. In the Log window, you will first see the results of the
getAllEmployeesmethod, then the results from thegetEmployeesByName("xxx")query. Here,xxxis set to "King" to test the filtering functionality. In actual operation, this parameter will be set to the value provided by the user of the application to filter the search.
4.5.3 Adding Filter Controls to the JSP Page
To accept the filter criterion and to display the filter results, you must modify the employees.jsp page. In the following steps, you add a form element and controls to the employees.jsp page that accepts input from users to filter employees by name:
-
With the
employees.jsppage displayed in the Visual Editor, position the cursor between theuseBeantag and the scriptlet. -
In the HTML Forms page of the Component Palette, select Form.
-
In the Insert Form dialog box, use the down arrow for the Action field and select employees.jsp. Leave the other fields empty and click OK.
The form is displayed on the page in the Visual Editor, represented by a dotted-line rectangle.
-
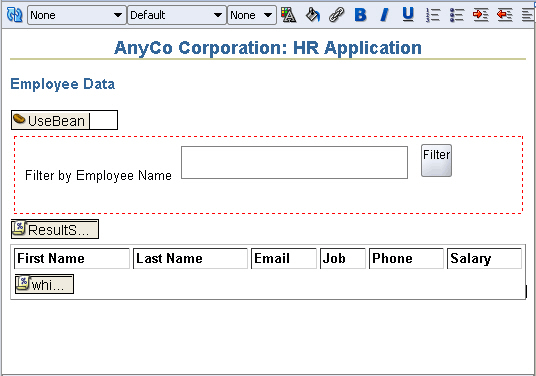
In the HTML Forms page of the Component Palette, scroll to Text Field. Select it and drag and drop it inside the Form component. In the Insert Text Field dialog, enter
queryas the value of the Name field and click OK. The text field box is displayed within the form. This field allows users to enter filter criteria. -
Position the cursor to the left of the Text Field and add the following text:
Filter by Employee name:
-
In the HTML Forms page of the Component Palette, scroll to Submit Button. Select it and drop it inside the Form component to the right of the Text Field.
-
In the Insert Submit Button dialog box, leave the Name field empty and enter
Filteras the value of the Value field, and click OK.Figure 4-9 shows these HTML Form components in the
employees.jspfile.Figure 4-9 HTML Form Components in the JSP Page
Description of "Figure 4-9 HTML Form Components in the JSP Page"
4.5.4 Displaying Filtered Data in the JSP Page
In the previous section, you created a text field component on the JSP page that accepts user inputs. In this text field, users can specify a string with which to filter employee names. You also added a submit button.
In the following steps, you add code to the scriptlet in the employees.java file to enable it to use the getEmployeesByName method. This method is used only if a user submits a value for filtering the results. If this filter criterion is not specified, the getAllEmployees method is used.
-
Open the
employees.jspfile in the Visual Editor. -
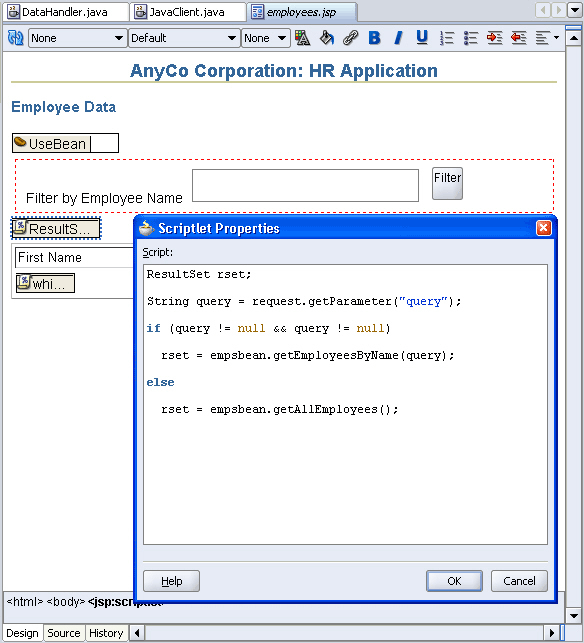
Double-click the Scriptlet tag on the page (not the one inside the table) to open the Properties dialog box. Modify the code as follows:
ResultSet rset;
String query = request.getParameter("query");
if (query != null && query != null)
  rset = empsbean.getEmployeesByName(query);
else
  rset = empsbean.getAllEmployees();
Figure 4-10 shows how you can use the Scriptlet Properties dialog box to modify the code.
Figure 4-10 Using the Scriptlet Properties Dialog Box
Description of "Figure 4-10 Using the Scriptlet Properties Dialog Box"
-
Click OK.
-
Save the file.
4.6 Adding Login Functionality to the Application
The login functionality used in the sample application is a simple example of application-managed security. It is not a full Java EE security implementation, but simply used as an example in the sample application.
To implement this simple login functionality, you must perform the following tasks:
4.6.1 Creating a Method to Authenticate Users
In the following steps, you create a method in the DataHandler.java class that authenticates users by checking that the values they supply for the userid and password match those required by the database schema.
-
Open the
DataHandler.javaclass in the Source Editor. -
Create a method called
authenticateUserthat checks if theuserid,password, andhostvalues supplied by a user are valid:public boolean authenticateUser(String jdbcUrl, String userid, String password, HttpSession session) throws SQLException { } -
JDeveloper prompts you with a wavy underline and a message that you need to import a class for
HttpSession. Press the Alt+Enter keys to import thejavax.servlet.http.HttpSessionclass. -
Within the body of the method, assign the
jdbcUrl,userid, andpasswordvalues from the call to the attributes of the current object as follows:this.jdbcUrl= jdbcUrl; this.userid = userid; this.password = password;
-
Attempt to connect to the database using the values supplied, and if successful, return a value of
true. Enclose this in atryblock as follows:try { OracleDataSource ds; ds = new OracleDataSource(); ds.setURL(jdbcUrl); conn = ds.getConnection(userid, password); return true; }See Also:
For information about usingtryandcatchblocks, refer to Exception Handling in Chapter 5. -
To handle the case where the login credentials do not match, after the
tryblock, add acatchblock. The code in this block prints out a log message and sets up an error message. This error message can be displayed to the user if a login attempt fails. ThejdbcUrl,useridandpasswordvariables are set back tonull, and the method returns the valuefalse. To do this, enter the following code:catch ( SQLException ex ) { System.out.println("Invalid user credentials"); session.setAttribute("loginerrormsg", "Invalid Login. Try Again..."); this.jdbcUrl = null; this.userid = null; this.password = null; return false; }
The complete code is shown in Example 4-4.
Example 4-4 Implementing User Validation
public boolean authenticateUser(String jdbcUrl, String userid, String password,
HttpSession session) throws SQLException {
this.jdbcUrl = jdbcUrl;
this.userid = userid;
this.password = password;
try {
  OracleDataSource ds;
  ds = new OracleDataSource();
  ds.setURL(jdbcUrl);
  conn = ds.getConnection(userid, password);
  return true;
} catch ( SQLException ex ) {
System.out.println("Invalid user credentials");
session.setAttribute("loginerrormsg", "Invalid Login. Try Again...");
this.jdbcUrl = null;
this.userid = null;
this.password = null;
return false;
}
}
4.6.2 Creating a Login Page
The following steps create a login.jsp page, on which users enter the login details for the schema they are going to work on:
-
In the View project, create a new JSP page. Change the Name to
login.jspand accept all other defaults. The new page opens in the JSP/HTML Visual Editor and is ready for you to start adding text and components to your Web page. -
Apply the JDeveloper style sheet to the page.
-
Give the page the same heading as earlier, AnyCo Corporation: HR Application, apply the Heading 2 style to it, and align it to the center of the page.
-
On the next line, enter Application Login, with the Heading 3 style applied. Align this heading to the left-hand side of the page.
4.6.3 Preparing Error Reports for Failed Logins
The following steps add functions to the login.jsp page for displaying error messages when a user login fails. The scriptlets and expression used in the login.jsp page set up a variable to hold any error message. If the user login fails, the connection method sets a message for the session. This page checks to see if there is such a message, and if present, it displays the message.
-
With the
login.jsppage open in the Visual Editor, position the cursor after the text on this page. Then, from the JSP page of the Component Palette, drag and drop the Scriptlet element from the palette onto the page. -
In the Insert Scriptlet dialog box, enter the following code:
String loginerrormsg = null; loginerrormsg = (String) session.getAttribute("loginerrormsg"); if (loginerrormsg != null) { -
Add another scriptlet in exactly the same way, and this time enter only a single closing brace (
}) in the Insert Scriptlet dialog box. -
Place the cursor between the two scriptlets and press Enter to create a new line. Apply the Heading 4 style to the new line.
-
With the cursor still on the new line, in the JSP page of the Component Palette, click Expression.
-
In the Insert Expression dialog box, enter
loginerrormsg. -
To see the code that has been added to your l
ogin.jsppage, below the Visual Editor, select the Source tab. The code should appear as follows:<% String loginerrormsg = null; loginerrormsg = (String) session.getAttribute("loginerrormsg"); if (loginerrormsg != null) { %> <h4> <%= loginerrormsg %> </h4> <% } %>
Before continuing with the following sections, return to the design view of the page by selecting the Design tab.
4.6.4 Creating the Login Interface
In these steps, you add fields to the login.jsp page on which users enter their login details.
-
If the
login.jsppage is not open in the Visual Editor, double-click it in the Application Navigator to open it, and check that the Design tab is selected. -
Position the cursor after the second scriptlet and, in the HTML Forms page of the Component Palette, select Form. The Form is displayed on the page in the Visual Editor, represented by a dotted-line rectangle.
-
In the HTML Forms page of the Component Palette, select Form. In the Insert Form dialog box, enter
login_action.jspas the value for the Action field. This file will be used to process the user input in the login.jsp file. (You cannot select this page from a list as it is not created yet.) Leave the other fields empty and click OK.The Form is displayed on the page in the Visual Editor, represented by a dotted rectangle.
-
Add a Table to the page. Position it inside the Form. Specify a 3-row and 2-column layout, and accept other layout defaults.
-
In the first column of the three rows, enter the following as the text to display for users:
User ID:
Password:
Host:
-
From the HTML page of the Component Palette, drag a Text Field into the table cell to the right of the User ID: cell. In the Insert Text Field dialog box, enter
useridas the value of the Name property. Leave the other fields empty and click OK. -
In the same way, add a Text Field to the table cell to the right of the Password: cell and enter
passwordas the value of the Name property. Similarly, add a Text Field to the table cell to the right of the Host: cell and enterhostas the value of the Name property. -
Drag a Submit button to the Form below the table. Enter
Submitfor the Value property of the button.
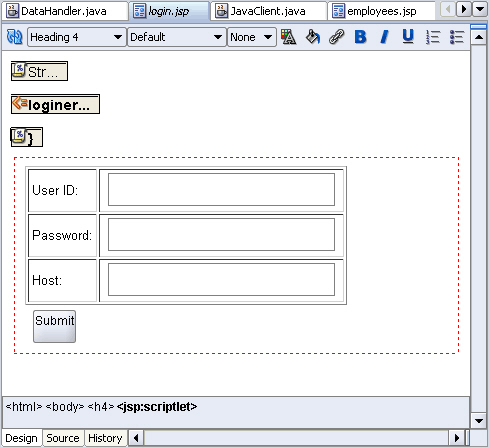
Your login.jsp page should now appear as shown in Figure 4-11.
4.6.5 Creating a JSP Page to Handle Login Action
In the following steps, you create the login_action.jsp page, which is a nonviewable page that processes the login operation.
-
Create a JSP page and call it
login_action.jsp. Accept all default settings for the JSP page. -
With
login_action.jspopen in the Visual Editor, from the JSP page of the Component Palette, drag a Page Directive component to the page. In the Insert Page Directive dialog box, for the Import field, browse to import java.sql.ResultSet. Click OK. -
Drag a jsp:usebean tag onto the page. Enter
empsbeanas the ID and browse to select hr.DataHandler as the Class. Set the Scope tosession, and click OK. -
Position the cursor after the useBean tag and add a Scriptlet to the page. Enter the following code into the Insert Scriptlet dialog box and click OK.
boolean userIsValid = false; String host = request.getParameter("host"); String userid = request.getParameter("userid"); String password = request.getParameter("password"); String jdbcUrl = "jdbc:oracle:thin:@" + host + ":1521:ORCL"; userIsValid = empsbean.authenticateUser(jdbcUrl, userid, password, session); -
Add another Scriptlet, and add the following code to it:
if (userIsValid){ -
In the JSP page of the Component Palette, find Forward and drag it onto the page to add a jsp:forward tag onto the page. In the Insert Forward dialog box, enter employees.jsp.
-
Add another scriptlet, and enter the following code:
} else { -
Add another jsp:forward tag, and this time move forward to
login.jsp. -
Add a final Scriptlet, and enter a closing brace (
}). -
Save your work.
To see the code that has been added to login_action.jsp, select the Source tab. The code displayed is similar to the following:
<body>
<%@ page import="java.sql.ResultSet"%><jsp:useBean id="empsbean"
                                                   class="hr.DataHandler"
                                                   scope="session"/>
<%boolean userIsValid = false;
String host = request.getParameter("host");
String userid = request.getParameter("userid");
String password = request.getParameter("password");
String jdbcUrl = "jdbc:oracle:thin:@" + host + ":1521:ORCL";
userIsValid = empsbean.authenticateUser(jdbcUrl, userid, password, session);%><%if (userIsValid){%><jsp:forward page="employees.jsp"/><%if (userIsValid){%><jsp:forward page="login.jsp"/><%}%>
</body>
4.7 Testing the JSP Page
To test the login page and the filtering of employees, do the following:
-
In the Application Navigator, right-click the view project, and select Run.
You might be prompted to specify a Default Run Target for the project. For now, set this to
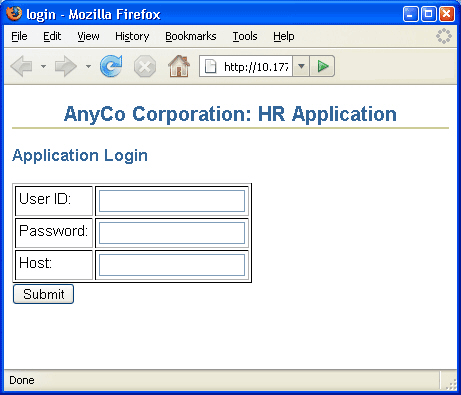
login.jsp. You can later change the project properties for the default run target page to be any page of your choice.The login page is displayed in your browser, as shown in Figure 4-12.
Figure 4-12 Login Page for Sample Application in the Browser
Description of "Figure 4-12 Login Page for Sample Application in the Browser"
-
Enter the following login details for your database, and then click Submit.
User ID:
hrPassword:
hrHost:
Host name of the machine with Oracle DatabaseThe
Employee.javafile is displayed in your browser as shown in Figure 4-13.Figure 4-13 Unfiltered Employee Data in employee.jsp
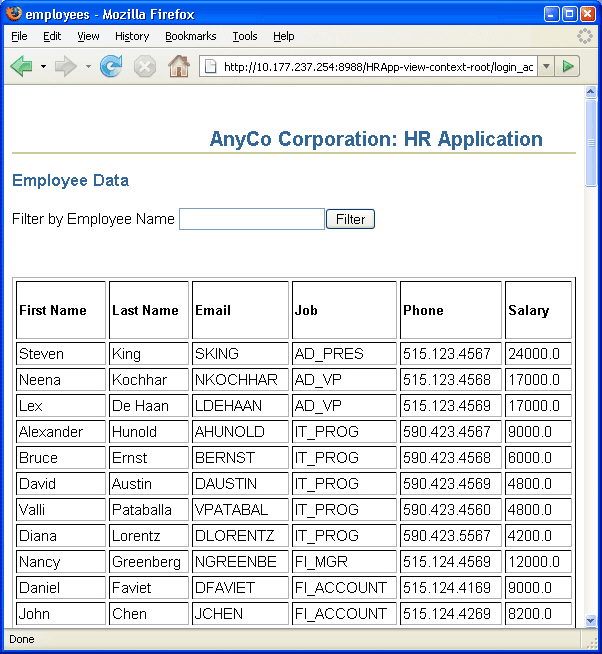
Description of "Figure 4-13 Unfiltered Employee Data in employee.jsp"
-
Enter a string of letters by which you want to filter employee data. For example, enter
ingin the Filter by Employee Name field, and click Filter. A filtered list is displayed, which is shown in:Figure 4-14 Filtered Employee Data in employee.jsp
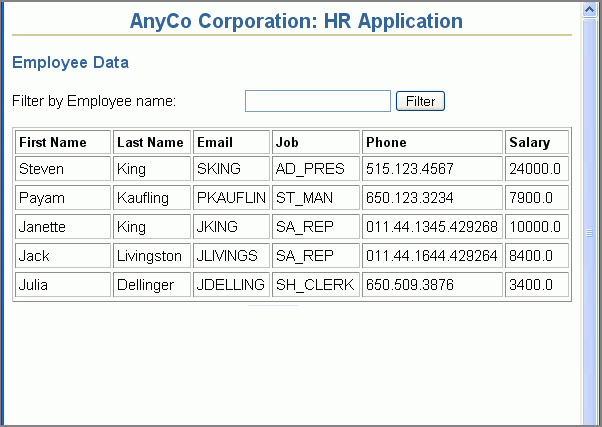
Description of "Figure 4-14 Filtered Employee Data in employee.jsp"
