1 Managing TimesTen Databases
A TimesTen database is a collection of elements such as tables, views, and sequences. You can access and manipulate the TimesTen database through SQL. If your database does not exist, TimesTen creates the database with the specified attributes when the instance administrator connects to the database. You can free the database shared memory segment by disconnecting all existing connections to the TimesTen database.
Thus, this chapter describes first how to configure for a connection to the TimesTen database, because the configuration and management for your TimesTen database is contained in attributes within the connection definition.
Once you have created a database, you can perform the following:
-
Use the
ttIsqlutility to connect to the database and execute a SQL file or start an interactive SQL session, as described in "Batch mode vs. interactive mode". -
Execute an application that uses the database.
The main topics are as follows:
Connecting to TimesTen with ODBC and JDBC drivers
As described in "TimesTen connection options" in the Oracle TimesTen Application-Tier Database Cache Introduction, applications use the TimesTen ODBC driver to access a TimesTen database. The application can use the ODBC direct driver, the Windows ODBC driver manager, the ODBC client driver or the ODBC driver indirectly through a provided interface to access the TimesTen database.
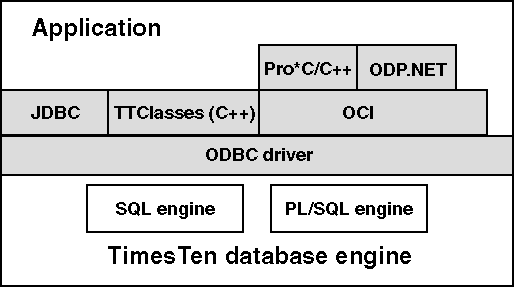
Figure 1-1 shows how the application can use different drivers and interfaces to access the TimesTen database.
Figure 1-1 Application access to TimesTen database diagram
Description of "Figure 1-1 Application access to TimesTen database diagram"
-
C applications interact with TimesTen by linking directly with the TimesTen ODBC driver, by linking with the Windows ODBC driver manager, or by using the OCI or Pro*C/C++ interfaces that access the ODBC driver.
-
Java applications interact with TimesTen by loading the JDBC library.
-
C++ applications interact with TimesTen through a TimesTen-provided set of classes called TTClasses or by using the OCI or Pro*C/C++ interfaces that access the ODBC driver.
-
C# applications interact with TimesTen through Oracle Data Provider for .NET support for the TimesTen database.
Consider the following points:
-
An application that links directly with an ODBC driver, whether it is linked with the direct driver or client driver, is limited to using only the driver with which it is linked. An application linked directly to either of the TimesTen drivers can connect to multiple databases at the same time.
-
The TimesTen direct driver supports multiple connections to multiple TimesTen databases, each of which are all the same TimesTen version.
-
The TimesTen client driver, used to facilitate a client/server connection, supports multiple connections to multiple TimesTen databases, which can be different TimesTen versions.
This option offers less flexibility but better performance than linking with a driver manager.
-
-
An application can link with more than one ODBC driver within the same application, even if the drivers are for different databases. If the application loads more than one ODBC driver, the application must use a driver manager, such as the Windows ODBC driver manager.
An application might need multiple drivers if it needs to use both the TimesTen direct driver and the TimesTen client driver.
The Windows ODBC driver manager dynamically loads an ODBC driver at runtime. However, carefully evaluate the benefits of using the ODBC driver manager, because it may affect the performance of your application with its additional runtime overhead.
Note:
An application that is using an ODBC driver manager cannot use XLA.
For more information on how to compile an application that uses the TimesTen driver manager, see "Compiling and linking applications" in the Oracle TimesTen In-Memory Database C Developer's Guide, "Compiling Java applications" in the Oracle TimesTen In-Memory Database Java Developer's Guide, and "Compiling and linking applications" in the Oracle TimesTen In-Memory Database TTClasses Guide.
The following sections describe how to define TimesTen databases:
Connecting using TimesTen ODBC drivers
TimesTen includes the following ODBC drivers:
-
TimesTen Data Manager driver: A TimesTen ODBC driver for use with direct connect applications.
-
TimesTen Client driver: A TimesTen Client ODBC driver for use with client/server applications.
TimesTen includes the following two versions of the Data Manager ODBC driver:
-
Production: Use the production version of the TimesTen Data Manager driver for most application development and for all deployment.
-
Debug: Use the debug version of the TimesTen Data Manager driver only if you encounter problems with TimesTen itself. This version performs additional internal error checking and is slower than the production version. On UNIX, the TimesTen debug libraries are compiled with the
-goption to display additional debug information.
On Windows, the production version of the TimesTen Data Manager is installed by default. To install the debug version, choose Custom setup. To install the TimesTen Client driver, choose either Typical or Custom setup.
Table 1-1 lists the ODBC drivers for Windows:
Table 1-1 ODBC drivers provided for Windows platforms
| Platform | Version | Name |
|---|---|---|
|
Windows |
Production |
TimesTen Data Manager 11.2.2 Driver. |
|
Windows |
Debug |
TimesTen Data Manager 11.2.2 Debug Driver. |
|
Windows |
Client |
TimesTen Client 11.2.2 Driver |
On UNIX, depending on the options selected at install time, TimesTen may install the Client driver and both the production version and the debug version of the TimesTen Data Manager ODBC driver.
Table 1-2 lists the TimesTen ODBC drivers for UNIX platforms.
Table 1-2 ODBC drivers provided for UNIX platforms
| Platform | Version | Location and name |
|---|---|---|
|
Solaris Linux |
Production |
TimesTen Data Manager 11.2.2 Driver. |
|
Solaris Linux |
Debug |
TimesTen Data Manager 11.2.2 Debug Driver. |
|
Solaris Linux |
Client |
TimesTen Client 11.2.2 Driver. |
|
AIX |
Production |
TimesTen Data Manager 11.2.2 Driver. |
|
AIX |
Debug |
TimesTen Data Manager 11.2.2 Debug Driver. |
|
AIX |
Client |
TimesTen Client 11.2.2 Driver. |
Connecting using the TimesTen JDBC driver and driver manager
JDBC enables Java applications to issue SQL statements to TimesTen and process the results. It is the primary interface for data access in the Java programming language. For TimesTen installations, JDBC is installed with the TimesTen Data Manager.
As shown in Figure 1-1, the TimesTen JDBC driver uses the ODBC driver to access TimesTen databases. For each JDBC method, the driver executes a set of ODBC functions to perform the appropriate operation. Since the JDBC driver depends on ODBC for all database operations, the first step in using JDBC is to define a TimesTen database and the ODBC driver that accesses it on behalf of JDBC.
The TimesTen JDBC API is implemented using native methods to bridge to the TimesTen native API and provides a driver manager that can support multiple drivers connecting to separate databases. The JDBC driver manager in the DriverManager class keeps track of all JDBC drivers that have been loaded and are available to the Java application. The application may load several drivers and access each driver independently. For example, both the TimesTen Client JDBC driver and the TimesTen direct driver can be loaded by an application. Then, Java applications can access databases either on the local system or a remote system.
For a list of the Java functions supported by TimesTen, see "Support for interfaces in the java.sql package" in the Oracle TimesTen In-Memory Database Java Developer's Guide.
Specifying Data Source Names to identify TimesTen databases
When you connect from an application, you use a Data Source Name (DSN) to uniquely identify the particular TimesTen database to which you want to connect. Specifically, a DSN is a character-string name that identifies a TimesTen database and a collection of connection attributes that are to be used when connecting to the database. On Windows, the DSN also specifies the ODBC driver to be used to access the database.
You can also define a default DSN that can be used when a user or an application either does not specify a DSN or specifies a DSN that is not defined in the odbc.ini file at connect time. For details, see "Setting up a default DSN".
Note:
If a user tries to use a DSN that has connection attributes for which they do not have privileges, such as first connection attributes, they receive an error. For more information on first connection attribute privileges, see "Connection Attributes" in the Oracle TimesTen In-Memory Database Reference.Even though the DSN uniquely identifies a TimesTen database, a database can be referenced by multiple DSNs. The difference between each of these unique DSNs is in the specification of the connection attributes to the database. This provides convenient names to different connection configurations for a single database.
Note:
According to the ODBC standard, when an attribute occurs multiple times in a connection string, the first value specified is used, not the last value.A DSN has the following characteristics:
-
Its maximum length is 32 characters.
-
It is case insensitive.
-
It is composed of ASCII characters except for the following: ( ) [ ] { } , ; ? * = ! @ \ /
-
TimesTen does not recommend the use of spaces as part of the DSN. If a DSN contains a space, some TimesTen utilities truncate the DSN at the point where they encounter the space. In addition, a DSN cannot start or end with a space, or consist solely of spaces.
The following sections describe how to configure and manage your DSNs:
Overview of user and system DSNs
DSNs are resolved using a two-tiered naming system, where TimesTen first tries to resolve the DSN within the defined user DSNs and secondly within the defined system DSNs.
-
A user DSN can be used only by the user who created the DSN.
-
On Windows, user DSNs are defined from the User DSN tab of the ODBC Data Source Administrator.
-
On UNIX, define user DSNs in the user
odbc.inifile. TimesTen locates this file by first finding if a file is specified by theODBCINIenvironment variable. If not, TimesTen locates the$HOME/.odbc.inifile.
Although a user DSN is private to the user who created it, it is only the DSN, consisting of the character-string name and its attributes, that is private. The underlying database can be referenced by other users' user DSNs or by system DSNs.
TimesTen supports data sources for both the TimesTen Data Manager and the TimesTen Client in the
.odbc.inifile. -
-
A system DSN can be used by any user on the system on which the system DSN is defined to connect to the TimesTen database.
-
On Windows, system DSNs are defined from the System DSN tab of the ODBC Data Source Administrator.
-
On UNIX, system DSNs are defined in the
sys.odbc.inifile, which is referred to as the systemodbc.inifile. TimesTen locates the system DSN file in the following order:-
The file is located if it is specified by the
SYSODBCINIenvironment variable. -
In a non-root installation, the file is located in
install_dir/info/sys.odbc.ini. In a root installation, the file is located in/var/TimesTen/InstanceName/sys.odbc.ini. -
If not found in either the root or non-root locations, TimesTen looks for the
/var/TimesTen/sys.odbc.inifile. -
If not found in any of these locations, TimesTen looks on the system for the
/etc/odbc.inifile.
-
-
Defining DSNs for direct or client/server connections
DSNs are created to uniquely identify a database, whether local or remote. The following explains the type of DSN to use for either a direct or client/server connection:
-
Data Manager DSN: A DSN that specifies a local database uses the TimesTen Data Manager ODBC driver, which is the direct driver. You can use either the production version or the debug version of the TimesTen Data Manager driver.
A Data Manager DSN refers to a database using a path name and a file name prefix. The database path name specifies the directory location of the database and the prefix for the database, such as
C:\data\chns\AdminDSor/home/chns/AdminDS.Note:
This path name and prefix does not define a file name, but the name of the directory where the database is located and the prefix for all database files. The actual files used by the database append file suffixes, such asC:\data\chns\AdminDS.ds0or/home/chns/AdminDS.log2.A Data Manager DSN that refers to a given TimesTen database must be defined on the same system on which the database resides. TimesTen creates
dsName.resnfiles for each database. These files are used internally by TimesTen for maintaining logs.If multiple Data Manager DSNs refer to the same database, they must all use exactly the same database path name, even if some other path name identifies the same location. For example, you cannot use a symbolic link to refer to the database in one DSN and the actual path name in another DSN. On Windows, you cannot use a mapped drive letter in the database path name.
-
Client DSN: A client DSN specifies a remote database and uses the TimesTen client. A client DSN refers to a TimesTen database indirectly by specifying a
hostname, DSNpair, where the hostname represents the server system on which TimesTen Server is running and the DSN refers to a server DSN that specifies the TimesTen database on the server host. -
Server DSN: A server DSN is always defined as a system DSN and is defined on the server system for each database on that server that can be accessed by client applications. The format and attributes of a server DSN are very similar to those of a Data Manager DSN.
On UNIX, all user DSNs including both client DSNs and Data Manager DSNs that are created by a specific user are defined in the same user odbc.ini file. Similarly, all system DSNs are defined in the same system odbc.ini file.
The following table indicates the types of DSN supported by TimesTen, whether to create a user or system DSN and the location of the DSN.
| DSN type | User or System DSN? | Location of DSN |
|---|---|---|
| Data Manager DSN | Can be a user or system DSN | Located on the system where the database resides. |
| Client DSN | Can be a user or system DSN | Located on any local or remote system. |
| Server DSN | Must be a system DSN | Located on the system where the database resides. |
For more information about client DSNs and server DSNs, see "Working with the TimesTen Client and Server".
Connection attributes for Data Manager DSNs or server DSNs
There are four types of TimesTen Data Manager DSN or server DSN attributes:
Note:
For a complete description of all attributes, see "Connection Attributes" in the Oracle TimesTen In-Memory Database Reference.-
Data Store attributes are associated with a database when it is created and cannot be modified by subsequent connections. They can only be changed by destroying and re-creating the database.
The following are the most commonly used data store attributes:
-
DataStore: Directory name and file name prefix of the database. -
LogDir: Directory name of the database transaction log files. By default, the transaction log files reside in the checkpoint files directory. Placing the transaction log files and checkpoint files on different disks can improve system throughput. -
DatabaseCharacterSet: Required character set specification that defines the storage encoding.
-
-
First connection attributes are used when the TimesTen database is loaded into memory. Only the instance administrator can load a database with first connection attribute settings. By default, TimesTen loads an idle database, which is a database with no connections, into memory when a first connection is made to it. These attributes persist for all subsequent connections until the last connection to the database is closed. First connection attributes can be modified only when the TimesTen database is unloaded and then the instance administrator reconnects with different values for the first connection attributes.
The following are the most commonly used first connection attributes:
-
PermSize: Configures the allocated size of the database's permanent memory region. The permanent memory region contains persistent database elements. TimesTen only writes the permanent memory region to disk during a checkpoint operation. -
TempSize: Configures the allocated size of the database's temporary memory region. The temporary memory region contains transient data generated when executing statements.Note:
Your system must have sufficient main memory to accommodate the entire database. For more details on setting region sizes, see "Specifying the size of a database".
-
-
General connection attributes are set by each connection and persist for the duration of the connection. Each concurrent connection can have different values.
The following are the most commonly used general connection attributes:
-
UID: Specifies the user name to be used for the connection to the database, whether using a direct or client/server connection. To connect as the instance administrator or as an external user, you do not need to specify an user name. When you do not specify an user name, TimesTen assumes that theUIDis the user name identified by the operating system. -
PWD: Specifies the password that corresponds with the specifiedUID. For internal users, if you do not set thePWDattribute in theodbc.inifile for the specified DSN or in the connection string, TimesTen prompts for the password. For external users, you do not provide the password as it is verified by the operating system.When you initiate a client/server connection, the password sent for the connection is encrypted by the client/server protocol.
Note:
For more information on theUIDandPWDgeneral connection attributes, see "UID and PWD" in the Oracle TimesTen In-Memory Database Reference. See "Managing users to control authentication" for details on the instance administrator, external users, or internal users. -
PWDCrypt: Specifies the encrypted password that corresponds with the specifiedUID.
Note:
If you provide connection attributes in the connection string, this overrides the connection attributes set in the DSN. See "Connecting to a database using a connection string" for details. -
-
TimesTen Cache attributes enable you to enter the Oracle Service Identifier for the Oracle database instance from which data is loaded into TimesTen.
Note:
See "Working with the TimesTen Client and Server" for a description of the connection attributes that can be used with the TimesTen Client ODBC driver.On Windows, you specify attributes in the ODBC Data Source Administrator.
On UNIX, you specify attributes in the odbc.ini file. Attributes that do not appear in the odbc.ini file assume their default value.
Defining a Data Manager DSN
The following sections describe how to create a Data Manager DSN on either platform:
Creating a Data Manager DSN on Windows
The following sections describe how to create a DSN on Windows:
Note:
For additional examples of setting up a Data Manager DSN, see "DSN examples".Specify the ODBC driver
Specify the ODBC driver in the ODBC Data Source Administrator.
Note:
JDBC users need to specify the ODBC driver to be used by the JDBC driver, as described in "Connecting using the TimesTen JDBC driver and driver manager".-
On the Windows Desktop from the Start menu, select Settings, Control Panel, Administrative Tools, and then select Data Sources (ODBC). This opens the ODBC Data Source Administrator.
Note:
If you are using a 32-bit TimesTen installation on a 64-bit Windows system, start the 32-bit ODBC Data Source Administrator with the following executable:C:\WINDOWS\SysWOW64\odbcad32.exe
-
Choose whether you want to create a User DSN or System DSN. For a description of user and system DSNs, see "Overview of user and system DSNs".
-
Perform one of the following:
-
Select an existing TimesTen data source and click Configure.
-
Click Add. Then, select the appropriate TimesTen driver from the list. Click Finish. This displays the TimesTen ODBC Setup dialog.
-
Note:
For a list of TimesTen ODBC drivers, see "Connecting using TimesTen ODBC drivers".Specify the Data Manager DSN
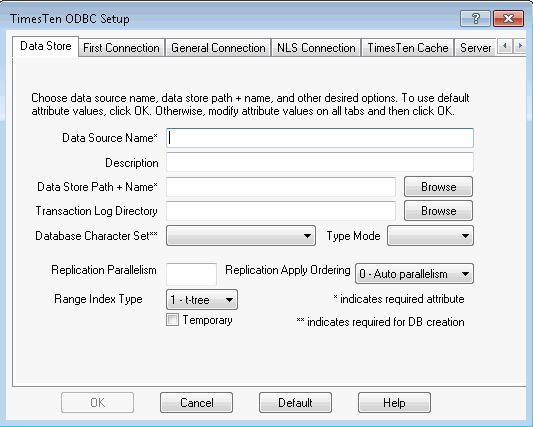
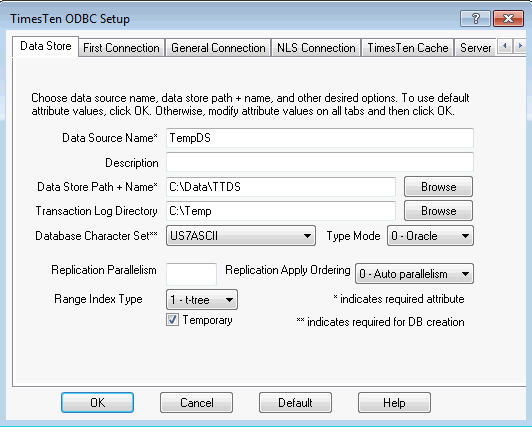
On the Data Store tab of the TimesTen ODBC Setup dialog, specify a data source name (DSN), a database directory path and prefix, and a database character set. The database directory path cannot reference a mapped drive. See Figure 1-2.
For an explanation of the DSN, database path and prefix, see "Specifying Data Source Names to identify TimesTen databases". For an explanation of database character sets, see "Choosing a database character set". The description field is optional.
Specify the connection attributes
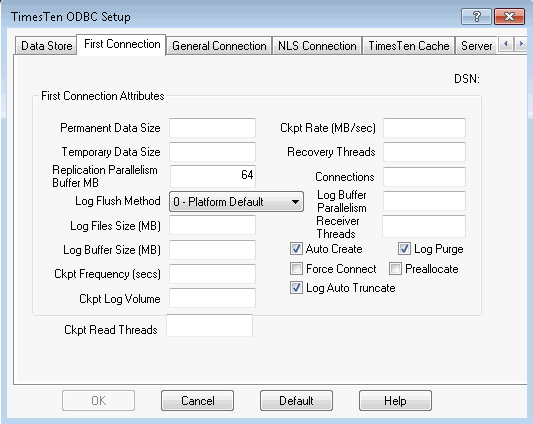
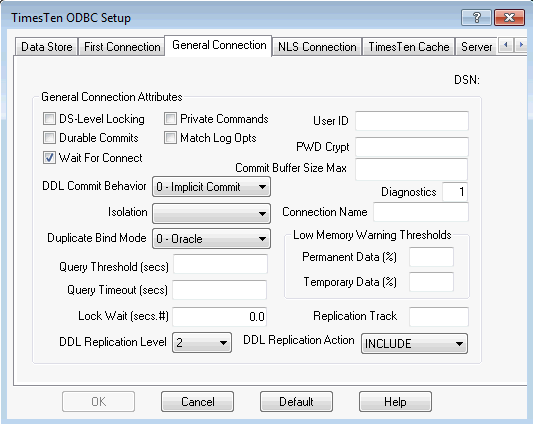
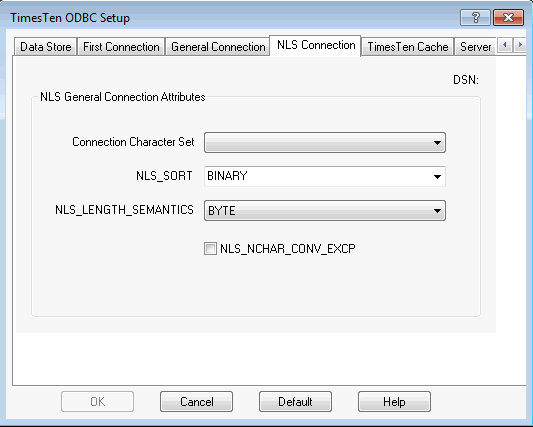
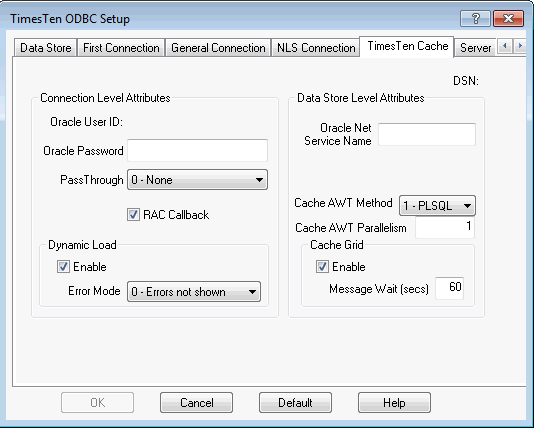
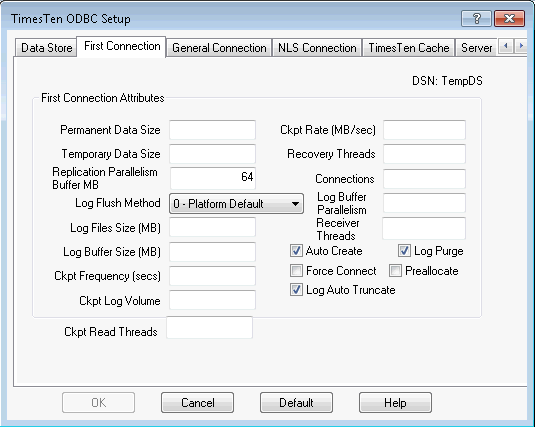
Indicate the desired connection attributes under the First Connection, General Connection, and NLS Connection tabs of the TimesTen ODBC Setup dialog as shown in Figure 1-3, Figure 1-4,and Figure 1-5. In addition, if you are using TimesTen Cache for an Oracle database, specify the connection attributes shown in Figure 1-6. If you are using a multi-threaded client/server configuration, specify the connection attributes shown in Figure 1-7.
Note:
For a description of the connection attributes, see "Connection Attributes" in Oracle TimesTen In-Memory Database Reference.Click OK when finished.
Creating a Data Manager DSN on UNIX
This section includes the following topics:
Note:
For examples on defining a DSN, see "DSN examples".Create a user or system odbc.ini file
On UNIX, user DSNs are defined in the file $HOME/.odbc.ini or in a file named by the ODBCINI environment variable. This file is referred to as the user odbc.ini file. System DSNs are defined in the system odbc.ini file, which is located in install_dir/info/sys.odbc.ini.
The syntax for user and system odbc.ini files are the same. The syntax is described in "odbc.ini file entry descriptions". The system odbc.ini file is created when TimesTen is installed on the system. Users must create their own user odbc.ini file.
Perform the following to create the DSN:
-
Specify the DSN in the
odbc.inifile. The DSN appears inside square brackets at the top of the DSN definition on a line by itself. For example:[AdminDS]
-
Note:
JDBC users need to specify the ODBC driver to be used by the JDBC driver, as described in "Connecting using the TimesTen JDBC driver and driver manager".To set the TimesTen driver, specify the
DRIVERattribute in theodbc.inifile. The following example provides the TimesTen ODBC driver that this DSN is configured to use:[AdminDS] DRIVER=install_dir/lib/libtten.soNote:
For a list of TimesTen ODBC drivers that you can use, see Table 1-2. -
Specify the database directory path and prefix in the
odbc.inifile. The following example defines/users/robinas the database directory path andFixedDsas the prefix for the database files:DataStore=/users/robin/FixedDs
Note:
For more information, see "Specifying Data Source Names to identify TimesTen databases".The database directory path can use environment variables, as discussed in "Using environment variables in database path names".
-
Choose a database character set. The following example defines the database character set in the
odbc.inifile asUS7ASCII:DatabaseCharacterSet=US7ASCII
Note:
For more information, see "Choosing a database character set". -
Set connection attributes in your
odbc.inifile. Attributes that do not appear in theodbc.inifile assume their default value.Note:
See "Connection Attributes" in Oracle TimesTen In-Memory Database Reference. For examples, see "DSN examples".
Using environment variables in database path names
You can use environment variables in the specification of the database path name and transaction log file path name. For example, you can specify $HOME/AdminDS for the location of the database.
Environment variables can be expressed either as $varname or $(varname). The parentheses are optional. A backslash character (\) in the database path name quotes the next character.
Note:
Environment variable expansion uses the environment of the process connecting to the database. Different processes may have different values for the same environment variables and may therefore expand the database path name differently. Environment variables can only be used in the userodbc.ini file. They cannot be specified in the system odbc.ini file.Defining client and server DSNs
For directions on how to define client or server DSNs for each platform, see "Defining server DSNs on a TimesTen Server system" and "Creating client DSNs on a TimesTen Client system".
Resolution path for a DSN
When resolving a specific DSN, TimesTen performs the following:
Note:
-
If a user DSN and a system DSN with the same name exist, TimesTen retrieves the user DSN.
-
On UNIX, if there are multiple DSNs with the same name in the same
odbc.inifile, TimesTen retrieves the first one specified in the file.
-
Searches for a user DSN with the specified name in the following files:
-
The file referenced by the
ODBCINIenvironment variable, if it is set. -
The
.odbc.inifile in the user's home directory, if theODBCINIenvironment variable is not set.
-
-
If no matching user DSN is found, TimesTen looks for a system DSN with the specified name.
-
The file referenced by the
SYSODBCINIenvironment variable, if it is set. -
The
sys.odbc.inifile in the daemon home directory, if theSYSODBCINIenvironment variable is not set. -
On UNIX, for a non-root installation, the file is located in
install_dir/info/sys.odbc.ini. Or for a root installation, the file is located at/var/TimesTen/InstanceName/sys.odbc.inior/var/TimesTen/sys.odbc.ini.
-
DSN examples
This section provides additional examples of how to set up a database:
For each example, the Windows ODBC Data Source Administrator settings are followed by the corresponding odbc.ini entries for UNIX.
Setting up a default DSN
Optionally, you can add a default data source definition. At connect time, if an application specifies a DSN that is not in the odbc.ini file or if the application does not specify a DSN, the default DSN is used to configure the connection to the TimesTen database.
The default data source must be named default when defined. The default DSN can be defined with the same attributes as any other data source, which are described in "DSN specification".
Note:
On Windows platforms, when using the "ODBC Data Source Administrator" to create the default DSN, you can specify only one default DSN in each of the User DSN, System DSN, and File DSN tabs. The default DSN must be associated with an ODBC driver.When connecting, TimesTen uses the default DSN in any of the following scenarios:
-
When you specify the
DSN=defaultkeyword-value pair in the connection string. -
When you specify an undefined value for the
DSNconnection attribute in the connection string. -
When you do not specify any value for the
DSNconnection attribute in the connection string.
However, in general, it is best to connect with a specific data source.
When using a default DSN, provide default as the DSN name when performing TimesTen utility operations that require a DSN name, such as destroying the database with the ttDestroy utility.
The following example shows the user invoking ttIsql to connect using an undefined DSN. Since there is no definition for doesNotExist in the odbc.ini file, TimesTen uses the default DSN to create the database and initiate a connection to it. It also demonstrates the user invoking both the ttStatus and ttDestroy utilities with default specified as the DSN. In addition, it shows the error thrown if the user provides doesNotExist as the DSN, instead of default.
$ ttIsql doesNotExist;

Copyright (c) 1996-2011, Oracle.  All rights reserved.
Type ? or "help" for help, type "exit" to quit ttIsql.

connect "DSN=doesNotExist";
Connection successful:
Command> exit
Disconnecting...
Done.
]$ ttStatus default
TimesTen status report as of Mon Oct 22 12:27:52 2012

Daemon pid 13623 port 16138 instance myhost
TimesTen server pid 13632 started on port 16140
------------------------------------------------------------------------
Data store /timesten/install/info/default
There are no connections to the data store
Replication policy  : Manual
Cache Agent policy  : Manual
PL/SQL enabled.
------------------------------------------------------------------------
Accessible by group xyz
End of report
$ ttDestroy doesNotExist;
Failed to destroy data store: Specified DSN is not found in user and system
odbc.ini files (or registry)
$ ttDestroy default;
The following example shows how to configure connection attributes for a default DSN. While not necessary, you can configure connection attributes for a default DSN as you would configure any other DSN. Notice that it is not specified in the ODBC Data Sources section.
[ODBC Data Sources]
sampledb_1122=TimesTen 11.2.2 Driver
...

[default]
Driver=install_dir/lib/libtten.so
DataStore=install_dir/info/DemoDataStore/default
PermSize=40
TempSize=64
DatabaseCharacterSet=US7ASCII

[sampledb_1122]
Driver=install_dir/lib/libtten.so
DataStore=install_dir/info/DemoDataStore/sampledb_1122
PermSize=40
TempSize=32
PLSQL=1
DatabaseCharacterSet=US7ASCII
Setting up a temporary database
This example illustrates how to set up a temporary database. For information on temporary databases, see "Database overview".
On Windows, you can use the settings in the TimesTen ODBC Setup dialog to set up a temporary database. See Figure 1-9 and Figure 1-10.
To set up a temporary database on UNIX, create the following entries in your odbc.ini file. For a list of drivers for all UNIX platforms, see the table in "Connecting using TimesTen ODBC drivers".
The text in square brackets is the data source name.
[TempDs]
Driver=install_dir/lib/libtten.so
DataStore=/users/robin/TempDs
#this is a temporary database
Temporary=1
#create database if it is not found
AutoCreate=1
#log database updates to disk
LogPurge=1
DatabaseCharacterSet=US7ASCII
Specifying PL/SQL connection attributes in a DSN
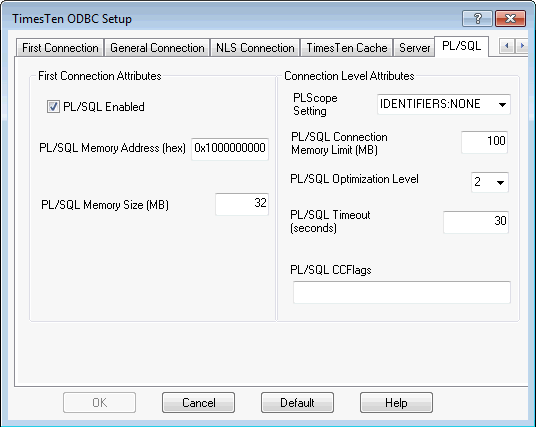
You can specify values for PL/SQL general connection attributes.
Note:
For a complete list of PL/SQL connection attributes, see "Connection Attributes" in the Oracle TimesTen In-Memory Database Reference.The following are some PL/SQL connection attributes:
-
PLSCOPE_SETTINGS- Controls whether the PL/SQL compiler generates cross-reference information. -
PLSQL_OPTIMIZE_LEVEL- Sets the optimization level that is used to compile PL/SQL library units. -
PLSQL_MEMORY_ADDRESS- Specifies the virtual address, as a hexadecimal value, at which the PL/SQL shared memory segment is loaded into each process that uses the TimesTen direct drivers. This memory address must be identical in all connections to your database and in all processes that connect to your database. -
PLSQL_MEMORY_SIZE- Determines the size, in megabytes, of the PL/SQL shared memory segment.
This example creates the PLdsn DSN, enables PL/SQL by setting PLSQL to "1" and sets the PL/SQL shared memory segment size to 32 MB.
[PLdsn]
Datastore=/users/user1/PLdsn
PermSize=32
DatabaseCharacterSet=AL32UTF8
ConnectionCharacterSet=AL32UTF8
PLSQL=1
PLSQL_MEMORY_SIZE=32
For more examples, see "PL/SQL connection attributes" in Oracle TimesTen In-Memory Database PL/SQL Developer's Guide.
Creating multiple DSNs to a single database
You can create two or more DSNs that refer to the same database but have different connection attributes.
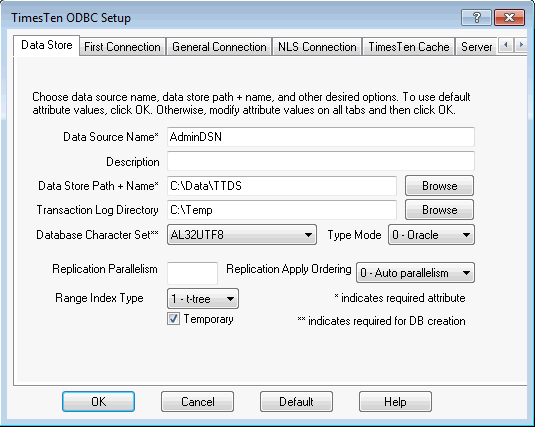
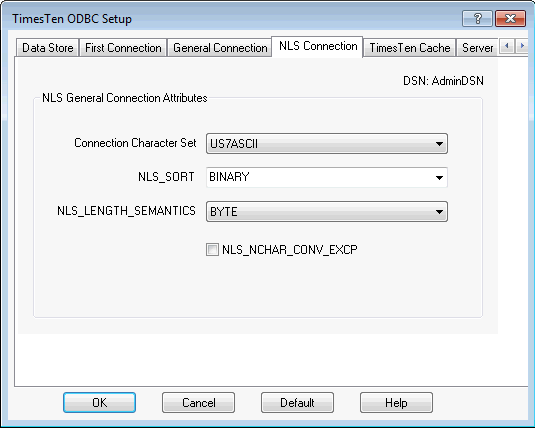
This example creates two DSNs, AdminDSN and GlobalDSN. The DSNs are identical except for their connection character sets. Applications that use the US7ASCII character set can connect to the TTDS database by using AdminDSN. Applications that use multibyte characters can connect to the TTDS database by using GlobalDSN.
For Windows, use the ODBC Data Source Administrator to define AdminDSN as shown in Figure 1-11. AdminDSN is created with the AL32UTF8 database character set. Figure 1-12 shows that US7ASCII is the connection character set for AdminDSN.
Figure 1-11 Creating AdminDSN using TTDS database
Description of "Figure 1-11 Creating AdminDSN using TTDS database"
Figure 1-12 Setting the connection character set for AdminDSN
Description of "Figure 1-12 Setting the connection character set for AdminDSN"
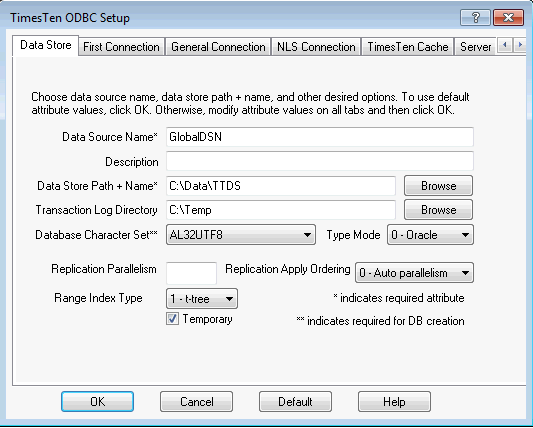
GlobalDSN is also created with the AL32UTF8 database character set, as shown in Figure 1-13. Figure 1-14 shows that the connection character set for GlobalDSN is AL32UTF8.
Figure 1-13 Creating GlobalDSN using TTDS database
Description of "Figure 1-13 Creating GlobalDSN using TTDS database"
Figure 1-14 Setting the connection character set for GlobalDSN
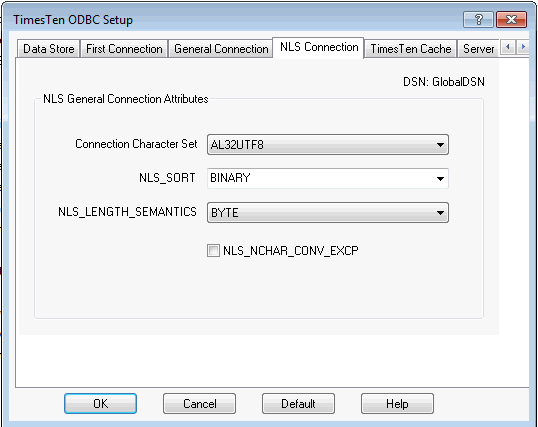
Description of "Figure 1-14 Setting the connection character set for GlobalDSN"
The next example shows how to specify the DSNs on UNIX. It uses the TimesTen Data Manager ODBC driver for Solaris.
The text in square brackets is the data source name.
[AdminDSN]
Driver=install_dir/lib/libtten.so
Datastore=/data/TTDS
DatabaseCharacterSet=AL32UTF8
ConnectionCharacterSet=US7ASCII

[GlobalDSN]
Driver=install_dir/lib/libtten.so
DataStore=/data/TTDS
DatabaseCharacterSet=AL32UTF8
ConnectionCharacterSet=AL32UTF8
odbc.ini file entry descriptions
The following sections describe the entries in the odbc.ini file:
ODBC Data Sources
Each entry in the optional ODBC Data Sources section lists a data source and a description of the driver it uses. The data source section has the following format:
[ODBC Data Sources]
DSN=driver-description
-
The
DSNis required and it identifies the data source to which the driver connects. You choose this name. -
The
driver-descriptionis required. It describes the driver that connects to the data source.
The optional Data Sources section, when present in the system DSN file on the TimesTen Server, is used during the setup of client DSNs. All system DSNs are made available to the client DSN setup for the ODBC Data Source Administrator on the client, which displays all available DSNs on the TimesTen Server. The user can always add a new system DSN in the ODBC Data Source Administrator. When adding DSNs to the system DSN file, you should only include those DSNs that can be advertised to clients. All system DSNs are potentially accessible through the client/server configuration, even if they are not advertised.
DSN specification
Each DSN listed in the ODBC Data Sources section has its own DSN specification. The DSN specification for Data Manager DSN has the format shown in Table 1-3.
Table 1-3 Data Source specification format
| Component | Description |
|---|---|
|
|
The |
|
|
The TimesTen Data Manager driver that is linked with the data source. This is relevant when using a driver manager or for the server in a client/server scenario. |
|
|
The directory path and prefix of the database to access. This is required. |
|
|
The database character set determines the character set in which data is stored. The database character set is required and cannot be altered after the database has been created. For more information, see "Choosing a database character set". |
|
Optional attributes |
See "Connection Attributes" in Oracle TimesTen In-Memory Database Reference for information about attributes. |
For example, the sampledb_1122 DSN could have a specification that includes the following:
[sampledb_1122]
Driver=install_dir/lib/libtten.so
DataStore=install_dir/info/DemoDataStore/sampledb_1122
...
The database specification for TimesTen client DSN has the format shown in Table 1-4.
Note:
While the syntax for the TimesTen client DSN is listed here, full directions for setting the client DSN and server DSN are located in "Defining server DSNs on a TimesTen Server system" and "Creating client DSNs on a TimesTen Client system".Table 1-4 Database specification for TimesTen Client configurations
| Component | Description |
|---|---|
|
|
The |
|
|
The |
|
|
The |
|
|
Client connection timeout value in seconds. |
Note:
Most TimesTen Data Manager attributes are ignored for TimesTen Client databases.For example, the client/server data source sampledbCS_1122 that connects to sampledb_1122 on the TimesTen Server ttserver could have a data source specification that includes the following:
[sampledbCS_1122]
TTC_Server=ttserver
TTC_SERVER_DSN=sampledb_1122
TTC_Timeout=30
odbc.ini file example
The following example shows portions of a UNIX .odbc.ini file:
...
[ODBC Data Sources]
sampledb_1122=TimesTen 11.2.2 Driver
...

[sampledb_1122]
Driver=install_dir/lib/libtten.so
DataStore=install_dir/info/DemoDataStore/sampledb_1122
PermSize=40
TempSize=32
PLSQL=1
DatabaseCharacterSet=US7ASCII
...

########################################################################
# This following sample definitions should be in the .odbc.ini file
# that is used for the TimesTen 11.2.2 Client.
# The Server Name is set in the TTC_SERVER attribute.
# The Server DSN is set in the TTC_SERVER_DSN attribute.
#########################################################################

[ODBC Data Sources]
sampledbCS_1122=TimesTen 11.2.2 Client Driver
...

[sampledbCS_1122]
TTC_SERVER=localhost
TTC_SERVER_DSN=sampledb_1122
...
Connecting to a database using a connection string
TimesTen applications require a DSN or a connection string be specified to connect to a database. For modularity and maintainability, it is better to set attributes in a DSN rather than in a connection string within the application, unless a particular connection requires that specific attribute settings override the settings in the DSN or the default settings.
The syntax for a connection string contains connection attribute definitions, where each attribute is separated by a semicolon.
These precedence rules are used to determine the settings of DSN attributes:
-
Attribute settings specified in a connection string have the highest precedence.If an attribute appears more than once in a connection string, the first specification is used.
-
If an attribute is not specified in the connection string, the attribute settings that are specified in the DSN are used.
-
Default attribute settings have the lowest precedence.
You can connect to a TimesTen database without a predefined DSN with any ODBC application or the ttIsql utility if the connection string contains the Driver, DataStore, and DatabaseCharacterSet attributes. Define the connection string as follows:
-
The name or path name of the ODBC driver using the
Driverattribute.-
On Windows, the value of the
Driverattribute should be the name of the TimesTen ODBC Driver. For example, the value can be TimesTen Data Manager 11.2.2. -
On UNIX systems, the value of the
Driverattribute should be the pathname of the TimesTen ODBC Driver shared library file. The file resides in theinstall_dir/libdirectory.
-
-
The database path and file name prefix using the
DataStoreattribute. -
The character set for the database using the
DatabaseCharacterSetattribute.
The following example shows how you can connect providing the Driver, DataStore, and DatabaseCharacterSet attributes using a connection string in the ttIsql utility:
C:\ ttIsql
Copyright (c) 1996-2011, Oracle.  All rights reserved.
Type ? or "help" for help, type "exit" to quit ttIsql.
Command> connect "Driver=TimesTen Data Manager
11.2.2;DataStore=C:\sales\admin;DatabaseCharacterSet=US7ASCII";
Specifying a RAM policy
TimesTen allows you to specify a RAM policy that determines when databases are loaded and unloaded from main memory. For each database, you can have a different RAM policy.
The RAM policy options are as follows:
-
inUse: The database is loaded into memory when the first connection to the database is opened, and it remains in memory as long as it has at least one active connection. When the last connection to the database is closed, the database is unloaded from memory. This is the default policy.
-
inUse with RamGrace: The database is loaded into memory when the first connection to the database is opened, and it remains in memory as long as it has at least one active connection. When the last connection to the database is closed, the database remains in memory for a "grace period." The database is unloaded from memory only if no processes have connected to the database for the duration of the grace period. The grace period can be set or reset at any time. It stays in effect until the next time the grace period is changed.
-
always: The database always stays in memory. If the TimesTen daemon is restarted, it automatically reloads the database. The database is always automatically reloaded unless an unrecoverable error condition occurs. For more details on database error recovery, see "Changes to RAM policy after automatic recovery fails".
-
manual: The database is manually loaded and unloaded by system administrators. Once loaded, TimesTen ensures that the database stays loaded until the administrator unloads the database or unless an unrecoverable error condition occurs. For more details on database error recovery, see "Changes to RAM policy after automatic recovery fails".
A system administrator can set the RAM policy or manually load or unload the database with either the ttAdmin utility or the C API RAM policy utilities. For more details, see "ttAdmin" in the Oracle TimesTen In-Memory Database Reference or the "TimesTen Utility API" chapter in the Oracle TimesTen In-Memory Database C Developer's Guide.
Note:
By default, if an automatic recovery of the database is unsuccessful after a fatal error, TimesTen changes thealways and manual RAM policies to InUse to prevent reoccurring failures. For more information on how to prevent the RAM policy from changing, see "Changes to RAM policy after automatic recovery fails".The following example sets the RAM policy to always for the database identified by the ttdata DSN:
Note:
The first line shows the RAM residence policy set toalways. The rest of the output details other policies you can set with the ttAdmin utility. See "ttAdmin" in the Oracle TimesTen In-Memory Database Reference for more information.% ttadmin –rampolicy always ttdata RAM Residence Policy : always Replication Agent Policy : manual Replication Manually Started : False Cache Agent Policy : manual Cache Agent Manually Started : False
Changes to RAM policy after automatic recovery fails
If a fatal error invalidates the database and the automatic database recovery performed by TimesTen is unsuccessful, the following occurs by default:
-
TimesTen changes the
alwaysandmanualRAM policies toInUseto prevent reoccurring errors. For both thealwaysandmanualRAM policies, TimesTen automatically reloads the database after each failure, even if the same failure occurs multiple times. However, for theInUseRAM policy, TimesTen does not automatically reload the database until a process tries to connect. -
If a fatal error causes the database to be invalidated, user processes connected to this database may not know that the database has been invalidated. In this case, the invalidated database exists in memory until all user processes close their connections. Thus, the invalidated database could coexist in memory with a newly reloaded database.
Note:
Reloading a large database into memory when an invalidated database still exists in memory can fill up available RAM. See "Preventing an automatic reload of the database after failure" on how to stop automatic reloading of the database.You can modify the default database recovery behavior by setting the -enablePolicyInactive option in the ttendaemon.options file before you start the TimesTen daemon. Once set, the following is the behavior when automatic recovery fails:
-
The RAM policies of
manualandalwaysremain unchanged. -
The replication and cache agents are not restarted.
-
After several failed attempts to reload the database, TimesTen sets the
policyInactivemode, which prevents any more attempts at loading the database.
Any one of the following clears the policyInactive mode, so that normal behavior can resume:
-
The TimesTen daemon restarts.
-
A process connects successfully.
-
The administrator executes a
ttAdmincommand for the database that changes the RAM policy, performs a RAM load, or starts either the cache or replication agents.
You can see if policyInactive mode is active when one of the following messages is displayed in the ttStatus output:
-
"
Automatic reloads disabled." -
"
Data store should be manually loaded, but inactive due to failures." This is shown when the RAM policy ismanual. -
"
Data store should be loaded, but inactive due to failures." This is shown if the RAM policy isalways.
Preventing an automatic reload of the database after failure
After a fatal error that causes the database to be invalidated, TimesTen attempts to reload and recover the database, as long as it is consistent with the settings for the RAM policy, cache agent policy, and replication agent policy. However, user processes could still be connected to the invalidated database if they do not know that the original database has been invalidated. In this case, the invalidated database exists in memory until all user processes close their connections. Thus, the invalidated database could coexist in memory with the newly reloaded database. This can be an issue if the database is large.
Note:
Not only does the RAM policy determines whether the database is reloaded and recovered, but the cache agent and replication agent policies also factor into whether the database is reloaded after invalidation. If the cache agent and replication agent policies are set so that the daemon automatically restarts the agent after a failure, the agent initiates a connection to the database. If this is the first connection, the daemon reloads the database and performs a recovery.For more information on cache agent and replication agent policies, see "Starting and stopping the replication agents" in the Oracle TimesTen In-Memory Database Replication Guide, "Set a cache agent start policy" in the Oracle TimesTen Application-Tier Database Cache User's Guide, and "ttAdmin" in the Oracle TimesTen In-Memory Database Reference.
You can prevent the database from being automatically reloaded after an invalidation using the ttAdmin -noautoreload command. You can reset to the default automatic database reload behavior with the ttAdmin -autoreload command. See "ttAdmin" in the Oracle TimesTen In-Memory Database Reference for more details.
Note:
ThettRamPolicyAutoReloadSet built-in procedure performs the same actions as ttAdmin -noautoreload and ttAdmin -autoreload. See "ttRamPolicyAutoReloadSet" in the Oracle TimesTen In-Memory Database Reference for more details.Any one of the following initiates a reload and recovery of the database so that normal behavior can resume:
-
The TimesTen daemon restarts.
-
A process connects successfully.
-
The administrator executes a
ttAdmincommand for the database that changes the RAM policy, performs a RAM load, or starts either the cache or replication agents.
If you set the behavior to prevent automatic reloads of the database, you may receive the following error when connecting to a database that was not reloaded.
Error 707, "Attempt to connect to a data store that has been manually unloaded from RAM"
Loading and unloading the database from memory
Loading and unloading the database from memory is described in these sections:
Loading the database into memory
Set the RAM policy to manual or inUse before loading the database into memory. If the RAM policy is set to always, then the database is already loaded since this policy states to keep the database loaded at all times. Also, ensure that the TimesTen daemon is running. The default RAM policy for a TimesTen database is inUse. For more information on specifying a RAM policy, see "Specifying a RAM policy".
Before you try to load the database into memory, confirm that the TimesTen daemon is running:
ttDaemonAdmin -start
To load the database into memory, run the ttAdmin utility:
-
The following example sets the RAM policy of a TimesTen database to
manual:ttAdmin -ramPolicy manual sampledb_1122 RAM Residence Policy : manual Manually Loaded In RAM : False Replication Agent Policy : manual Replication Manually Started : False Cache Agent Policy : manual Cache Agent Manually Started : False
Then, load the TimesTen database into memory with the
ttAdmin -ramloadutility. The-ramLoadoption of thettAdminutility can only be used with the manual RAM policy:ttAdmin -ramLoad sampledb_1122 RAM Residence Policy : manual Manually Loaded In RAM : True Replication Agent Policy : manual Replication Manually Started : False Cache Agent Policy : manual Cache Agent Manually Started : False
-
The following example defines the database RAM policy as
inUsewith a grace period of 200 seconds:ttAdmin -ramPolicy inUse -ramGrace 200 sampledb_1122 RAM Residence Policy : inUse plus grace period RAM Residence Grace (Secs) : 200 Replication Agent Policy : manual Replication Manually Started : False Cache Agent Policy : manual Cache Agent Manually Started : False
If your database is configured replication or cache for your database, run the ttAdmin utility to start the replication and cache agents.
ttAdmin -repStart sampledb_1122
ttAdmin -cacheStart sampledb_1122
For more information on these utilities, see "ttAdmin" and "ttDaemonAdmin" in the Oracle TimesTen In-Memory Database Reference.
Unloading the database from memory
Before unloading the database from memory, you must first close all active connections to the database and set the RAM policy of the database to manual or inUse.
-
To close all active connections to the database, run the
ttStatusutility to find processes connected to the database and stop them. For more information onttStatus, see "ttStatus" in the Oracle TimesTen In-Memory Database Reference.If you configured cache or replication for your database, stop the cache and replication agents with the
-cacheStopand-repStopoptions of thettAdminutility. -
To set the RAM policy to
manualorinUse, see "Specifying a RAM policy" for information. -
To unload a database with a
manualRAM policy from memory, run thettAdmin -ramUnloadutility. TimesTen unloads a database with aninUseRAM policy from memory once you close all active connections. For more information on unloading a database with amanualRAM policy from memory, see "Unloading a database from memory" in the Oracle TimesTen In-Memory Database Installation Guide.
For more information on the ttAdmin utility, see "ttAdmin" in the Oracle TimesTen In-Memory Database Reference.
Specifying the size of a database
TimesTen manages database space using two separate memory regions within a single contiguous memory space. One region contains permanent data and the other contains temporary data.
-
Permanent data includes the tables and indexes that make up a TimesTen database. When a database is loaded into memory, the contents of the permanent memory region are read from files stored on disk. The permanent memory region is written to disk during checkpoint operations.
-
Temporary data includes locks, cursors, compiled commands, and other structures needed for command execution and query evaluation. The temporary memory region is created when a database is loaded into memory and is destroyed when it is unloaded.
The connection attributes that control the size of the database when it is in memory are PermSize and TempSize. The PermSize attribute specifies the size of the permanent memory region and the TempSize attribute specifies the size of the temporary memory region.
Note:
See "Connection Attributes" in the Oracle TimesTen In-Memory Database Reference for further description of these attributes.The sizes of the permanent and temporary memory regions are set when a database is loaded into memory and cannot be changed while the database is in memory. To change the size of either region, you must unload the database from memory and then reconnect using different values for the PermSize or TempSize attributes. For more information on unloading the database from memory, see "Unloading the database from memory".
Managing the database size is described in these sections:
Estimating and modifying the memory region sizes for the database
Procedures, tables, or rows cannot be created in the database if the permanent or temporary memory region is full. In order to have the correct size for your database, set the appropriate size in the PermSize and TempSize connection attributes.
-
PermSizeconnection attribute: You can increase but not decrease the permanent memory region. -
TempSizeconnection attribute: You can increase or decrease the size of the temporary memory region for databases that do not participate in replication.
To make size estimates, use the ttSize utility or run the application until you can make a reasonable estimate.
You must make sure that you have a shared memory segment that is large enough to hold the database. In general, the minimum size of this shared memory segment should be:
PermSize + TempSize + LogBufMB + 64 MB overhead
Note:
Additional shared segments may be created either for PL/SQL with thePLSQL_MEMORY_SIZE or for Client/Server with the -serverShmSize daemon option.When you are calculating the amount of PermSize to allocate, take into account that PL/SQL procedures, functions and packages occupy space in the permanent memory region. The amount of permanent memory region required by a stored PL/SQL unit depends on the size and complexity of the unit. Small procedures can take less than 3 KBs, while larger ones can take considerably more. On average, reasonably complex units could be expected to use about 20 KBs of permanent memory region space.
If the database is configured for replication, reconfigure the database sizes for all replicas of the database. Once you have made the change in database size, load the database into memory and restart the cache and replication agents.
For more details, see "Installation prerequisites" in Oracle TimesTen In-Memory Database Installation Guide and the descriptions of the "TempSize" and "PermSize" attributes in Oracle TimesTen In-Memory Database Reference.
Ensuring sufficient disk space
TimesTen saves a copy of the database in two checkpoint files, each of which is stored in the directory that is specified with the DataStore attribute. As each checkpoint file grows on disk, it never decreases in size. This can result in the size of each checkpoint file being equal to the maximum size that the database has ever reached in the permanent memory region. The maximum size for each checkpoint file is PermSize + the database header. For each permanent database, you must have enough disk space for both checkpoint files and all transaction log files. For more information about the DataStore attribute, see "DataStore" in the Oracle TimesTen In-Memory Database Reference.
You can set the Preallocate connection attribute to 1 to have TimesTen reserve disk space at connect time for checkpoint files. This is useful for big databases, to ensure that the disk always has room for the checkpoint files as data is added to the database. For more information about the Preallocate connection attribute, see "Preallocate" in the Oracle TimesTen In-Memory Database Reference.
Monitoring PermSize and TempSize attributes
The TimesTen table SYS.MONITOR contains several columns that can be used to monitor usage of PermSize and TempSize. These columns include PERM_ALLOCATED_SIZE, TEMP_ALLOCATED_SIZE, PERM_IN_USE_SIZE, PERM_IN_USE_HIGH_WATER, TEMP_IN_USE_SIZE, and TEMP_IN_USE_HIGH_WATER. Each of these columns show in KB units the currently allocated size of the database and the in-use size of the database. The system updates this information each time a connection is made or released and each time a transaction is committed or rolled back.
You can monitor block-level fragmentation in the database by calling the ttBlockInfo built-in procedure. For more details, see "ttBlockInfo" in the Oracle TimesTen In-Memory Database Reference.
Receiving out-of-memory warnings
TimesTen provides two general connection attributes that determine when a low memory warning should be issued: PermWarnThreshold and TempWarnThreshold. Both attributes take a percentage value.
To receive out-of memory warnings, applications must call the built-in procedure ttWarnOnLowMemory.
These attributes also set the threshold for SNMP warning. See "Diagnostics through SNMP Traps" in the Oracle TimesTen In-Memory Database Error Messages and SNMP Traps.
Manage existing tables in the database
The following utilities enable you to manage certain aspects of existing tables in the database:
-
Add rows of data to an existing table. Use the
ttBulkCputility. You can save data to an ASCII file and use thettBulkCputility to load the data rows into a table in a TimesTen database.The rows you are adding must contain the same number of columns as the table, and the data in each column must be of the type defined for that column.
Because the
ttBulkCputility works on data stored in ASCII files, you can also use this utility to import data from other applications, provided the number of columns and data types are compatible with those in the table in the TimesTen database and that the file found is compatible withttBulkCp. -
Rename the owner of tables in a database. Use the
ttMigrateutility. When restoring tables, you can use the-renameoption to rename the owner of tables.
Thread programming with TimesTen
TimesTen supports multithreaded application access to databases. When a connection is made to a database, any thread may issue operations on the connection.
Typically, a thread issues operations on its own connection and therefore in a separate transaction from all other threads. In environments where threads are created and destroyed rapidly, better performance may be obtained by maintaining a pool of connections. Threads can allocate connections from this pool on demand to avoid the connect and disconnect overhead.
TimesTen allows multiple threads to issue requests on the same connection and therefore the same transaction. These requests are serialized by TimesTen, although the application may require additional serialization of its own.
TimesTen also allows a thread to issue requests against multiple connections, managing activities in several separate and concurrent transactions on the same or different databases.
Defragmenting TimesTen databases
Under some circumstances, a TimesTen database may develop memory fragmentation such that significant amounts of free memory are allocated to partially filled pages of existing tables. This can result in an inability to allocate memory for other uses (such as new pages for other tables) due to a lack of free memory. In these circumstances, it is necessary to defragment the database in order to make this memory available for other uses.
A secondary table partition is created after a table has been altered with the ALTER TABLE ADD SQL statement. Defragmentation enables you to remove the secondary table partitions and create a single table partition that contains all of the table columns. When secondary table partitions have been created, it is recommended to periodically defragment the database in order to improve space utilization and performance.
The following procedures address both types of database fragmentation:
Offline defragmentation of TimesTen databases
To defragment a database, use the ttMigrate utility as follows:
-
Stop all connections to the database.
-
Save a copy of the database using
ttMigrate.ttMigrate -c ttdb ttdb.dat
-
As the administration user, rebuild the
ttdbdatabase:ttMigrate -r -relaxedUpgrade -connstr "dsn=ttdb" ttdb.dat
Note:
If you do not want to condense table partitions, remove the-relaxedUpgradeoption when executing thettMigrate -rcommand.
At this time:
-
All the users, cache groups, and the active standby pair have been restored to
ttdb. -
The cache groups are in
AUTOREFRESH STATE = OFF. -
The cache agent and replication agent are not running.
Table partitions can be added when columns are added to tables with the ALTER TABLE ADD SQL statement. See the notes on "ALTER TABLE" in the Oracle TimesTen In-Memory Database SQL Reference for more information.
For more information on ttMigrate, see "ttMigrate" in the Oracle TimesTen In-Memory Database Reference.
Online defragmentation of TimesTen databases
Use a combination of the ttMigrate -relaxedUpgrade and ttRepAdmin -duplicate utilities to defragment TimesTen databases (with minimal overall service downtime) that are involved in a replication scheme where TABLE DEFINITION CHECKING is set to RELAXED. In addition, the ttMigrate -relaxedUpgrade option condenses partitions.
Note:
You can only defragment TimesTen databases that are involved in an active standby pair replication scheme if the replication scheme either does not contain any cache groups or contains onlyREADONLY cache groups.The following sections describe how to defragment TimesTen databases that are involved in a replication scheme:
Note:
The examples provided in each section assume that you are familiar with the configuration and management of replication schemes. For more information, see "Getting Started" in the Oracle TimesTen In-Memory Database Replication Guide.-
Online defragmentation of databases in an active standby pair replication scheme
-
Online defragmentation of databases in a non active standby pair replication scheme
Online defragmentation of databases in an active standby pair replication scheme
The following sections describe how to defragment TimesTen databases that are involved in an active standby pair replication scheme:
The example in this section shows how to perform an online defragmentation with an active standby pair replication scheme where the active database is ttdb1 and the standby database is ttdb2.
Migrate and rebuild the standby database
The following shows how to stop replication to the standby TimesTen database, save a copy of the standby database, and then defragment the standby database.
Note:
While the standby database is defragmented, application processing can continue on the active database.Perform the following to save a copy of the standby database:
-
Stop the replication agent on the standby database (
ttdb2):ttAdmin –repStop ttdb2
-
If there any subscribers, execute
ttRepStateSaveon the active database to set the status of the standby to failed. As long as the standby database is unavailable, updates to the active database are replicated directly to the subscriber databases.ttRepStateSave('FAILED', 'ttdb2', 'ttsrv2'); -
Save a copy of the standby database using
ttMigrate.ttMigrate -c -relaxedUpgrade ttdb2 ttdb2.dat
-
Stop the cache agent, drop any cache groups, and destroy the standby.
ttAdmin –cacheStop ttdb2
While connected as cache manager user, drop all cache groups:
Command> DROP CACHE GROUP t_cg;
Destroy the standby database:
ttDestroy ttdb2
-
Rebuild the standby database. Execute the following on the standby as the instance administrator:
ttIsql ttdb2
-
Create the cache manager user and grant the user
ADMINprivileges.Command> CREATE USER cacheadmin IDENTIFIED BY cadminpwd; Command> GRANT CREATE SESSION, CACHE_MANAGER, CREATE ANY TABLE, DROP ANY TABLE TO cacheadmin; Command> GRANT ADMIN TO cacheadmin;
Note:
The cache manager user requiresADMINprivileges in order to executettMigrate –r. Once migration is completed, you can revoke theADMINprivilege from this user if desired.For more information on
ttMigrate, see "ttMigrate" in the Oracle TimesTen In-Memory Database Reference. -
As the cache manager user, rebuild the
ttdb2database:ttMigrate -r -relaxedUpgrade -cacheuid cacheadmin -cachepwd cadminpwd -connstr "dsn=ttdb2;uid=cacheadmin;pwd=cadminpwd;oraclepwd=oraclepwd" ttdb2.dat
At this time:
-
All the users, cache groups, and the active standby pair have been restored to
ttdb2. -
The cache groups are in
AUTOREFRESH STATE = OFF. -
The cache agent and replication agent are not running.
-
-
As the cache manager user, start the cache agent on the standby:
ttAdmin –cacheStart ttdb2
-
Load any cache groups.
Command> ALTER CACHE GROUP t_cg SET AUTOREFRESH STATE PAUSED;
Command> LOAD CACHE GROUP t_cg COMMIT EVERY 256 ROWS PARALLEL <nThreads>;
Note:
-
Choose
nThreadsbased on how many CPU cores you use to insert the data into TimesTen for this load operation. -
If there are several read-only cache groups it is recommended that you run several
LOADoperations in separate sessions in parallel, if the TimesTen and Oracle Database resources are available.
-
-
After completion, verify the cache group state.
Command> cacheGroups;
Cache Group CACHEADMIN.T_CG:
  Cache Group Type: Read Only
  Autorefresh: Yes
  Autorefresh Mode: Incremental
  Autorefresh State: On
  Autorefresh Interval: 10 Seconds

  Autorefresh Status: ok
  Aging: No aging defined

  Root Table: ORATT.T
  Table Type: Read Only

1 cache group found.
-
Start the replication agent on the standby database:
ttAdmin -repStart ttdb2
-
Check the replication state on the standby:
ttIsql ttdb2
Command> call ttRepStateGet;
< STANDBY, NO GRID >
1 row found.
The standby database (ttdb2) has been defragmented and both the active and standby databases are functional.
Reverse the active and standby roles
In order to perform the database defragmentation on the active database, switch the roles of the active and standby database. The active (ttdb1) becomes the standby database. The original standby (ttdb2) becomes the active database.
-
Stop all application processing and disconnect all application connections. Any query only processing can be moved to work at the
ttdb2TimesTen database. -
Call the
ttRepSubscriberWaitbuilt-in procedure at the current active database (ttdb1), with the database name and host of the current standby database (ttdb2) as input parameters. This ensures that all queued updates have been transmitted to the current standby database.Note:
If you set thewaitTimeto-1, the call waits until all transactions that committed before the call have been transmitted to the subscriber.However, if you set the
waitTimeto any value (this value cannot beNULL), ensure that the returntimeOutparameter value is0x00before continuing. If the returned value0x01, call thettRepSubscriberWaitbuilt-in procedure until all transactions that committed before the call have been transmitted to the subscriber.For more information about the
ttRepSubscriberWaitbuilt-in procedure, see "ttRepSubscriberWait" in the Oracle TimesTen In-Memory Database Reference.Command> call ttRepSubscriberWait(NULL,NULL,'ttdb2','ttsrv2', 100);
-
Stop the replication agent on the current active database.
Command> call ttRepStop;
-
Call the
ttRepDeactivatebuilt-in procedure on the current active database. This puts the database in theIDLEstate.Command> call ttRepDeactivate; Command> call ttRepStateGet; < IDLE, NO GRID > 1 row found.
-
Promote the standby to active by calling the
ttRepStateSet('ACTIVE')built-in procedure on the old standby database. This database now becomes the active database in the active standby pair. Use thettRepStateGetbuilt-on to verify that the database has become active.Command> call ttRepStateSet('ACTIVE'); Command> call ttRepStateGet; < ACTIVE, NO GRID > 1 row found. -
Stop the replication agent on the database that used to be the active database.
ttAdmin -repStop ttdb1
-
Execute
ttRepStateSaveon the new active database to set the status of the old active database to failed. As long as the standby database is unavailable, updates to the active database are replicated directly to the subscriber databases.Command> call ttRepStateSave('FAILED', 'ttdb1', 'ttsrv1'); -
Restart the full application workload on the new active database (
ttdb2).
This database now acts as the standby database in the active standby pair.
Destroy and re-create the new standby
Destroy and recreate the new standby using ttRepAdmin -duplicate from the new active. During these steps, application processing can continue at the active database.
-
Stop the cache agent on the new standby database:
ttAdmin –cacheStop ttdb1
-
As the cache manager user, drop all cache groups:
Command> DROP CACHE GROUP t_cg;
-
Destroy the database:
ttDestroy ttdb1
-
Re-create the new standby database by duplicating the new active.
ttRepAdmin -duplicate -from ttdb2 -host ttsrv2 –setMasterRepStart
 -UID ttadmin -PWD ttadminpwd -keepCG -cacheUID cacheadmin
 -cachePWD cadminpwd ttdb1
-
Start cache and replication agents on the new standby database:
ttAdmin –cacheStart ttdb1
ttAdmin –repStart ttdb1
This process defragments both the active and standby databases with only a few seconds of service interruption.
Online defragmentation of databases in a non active standby pair replication scheme
The following sections describe how to defragment TimesTen databases that are involved in a non active standby pair replication scheme:
Note:
These sections discuss how to defragment databases that are involved in a bidirectional replication scheme. In bidirectional replication schemes, each database is both a master and subscriber.The examples in this section show how to perform an online defragmentation with bidirectional and unidirectional replication schemes with two TimesTen databases named ttdb1 and ttdb2. For the unidirectional replication example, ttdb1 represents the master and ttdb2 represents the subscriber.
Migrate and rebuild a database
The first step in the procedure is to stop replication on one of the TimesTen databases and then defragment this database.
Note:
While one of the databases is defragmented, application processing can continue on the other database.Perform the following to save a copy of the TimesTen database:
-
Stop the replication agents on one of the databases.
On the
ttdb2database:ttAdmin –repStop ttdb2
-
Save a copy of the
ttdb1database usingttMigrate.ttMigrate -c -relaxedUpgrade ttdb2 ttdb2.dat
-
Destroy the database:
ttDestroy ttdb2
-
As a TimesTen user with
ADMINprivileges, rebuild thettdb2database:ttMigrate -r -relaxedUpgrade -connstr "dsn=ttdb2;uid=ttadmin;pwd=ttadminpwd" ttdb2.dat
At this time:
-
All the users have been restored to
ttdb2. -
The replication agent is not running.
-
-
Restart the replication agent on
ttdb2:ttAdmin -repStart ttdb2
The ttdb2 TimesTen database has been defragmented.
Alter the replication scheme
In order to perform the database defragmentation on the ttdb1 database, perform the following:
-
Stop all application processing and disconnect all application connections. Any processing can be moved to work at the
ttdb2TimesTen database. -
Call the
ttRepSubscriberWaitbuilt-in procedure at the TimesTen database that has not been defragmented (ttdb1), with the database name and host of the defragmented database (ttdb2) as input parameters. This ensures that all queued updates have been transmitted to both databases.Note:
If you set thewaitTimeto-1, the call waits until all transactions that committed before the call have been transmitted to the subscriber.However, if you set the
waitTimeto any value (this value may not beNULL), ensure that the returntimeOutparameter value is0x00before continuing. If the returned value0x01, call thettRepSubscriberWaitbuilt-in procedure until all transactions that committed before the call have been transmitted to the subscriber.For more information about the
ttRepSubscriberWaitbuilt-in procedure, see "ttRepSubscriberWait" in the Oracle TimesTen In-Memory Database Reference.On ttdb1:
ttIsql ttdb1

Command> call ttRepSubscriberWait(NULL,NULL,'ttdb2','ttsrv2', 100);
If you are using a bidirectional replication scheme, skip steps 3-4 and move to step 5.
-
For a unidirectional replication scheme, where
ttdb1is the master andttdb2is the subscriber, drop the replication scheme on both TimesTen databases:On
ttdb1:ttIsql ttdb1 Command> DROP REPLICATION r1;
On
ttdb2:ttIsql ttdb2 Command> DROP REPLICATION r1;
-
For a unidirectional replication scheme, drop the replication scheme on the master (
ttdb1) and subscriber (ttdb2):On
ttdb1:ttIsql ttdb1 Command> DROP REPLICATION r1;
On
ttdb2:ttIsql ttdb2 Command> DROP REPLICATION r1;
-
Start the replication agent on
ttdb2:ttAdmin -repStart ttdb2
-
Stop the replication agent on
ttdb1.ttAdmin -repStop ttdb1
If you modified a unidirectional replication scheme, the ttdb2 database now acts as the master database in the unidirectional scheme; the ttdb1 database acts as the subscriber database in the unidirectional replication scheme.
Destroy and re-create a database
Destroy and recreate the TimesTen database in the replication scheme that has not yet been defragmented using ttRepAdmin -duplicate. During these steps, application processing can continue on the defragmented database.
-
Destroy the database:
ttDestroy ttdb1
-
Recreate the new TimesTen database (
ttdb1) by duplicating the previously defragmented TimesTen database (ttdb2) involved in the replication scheme.ttRepAdmin -duplicate -from ttdb2 -host ttsrv2 –setMasterRepStart -UID ttadmin -PWD ttadminpwd ttdb1
-
Start the replication agent on the new standby database:
ttAdmin –repStart ttdb1
This process defragments both the TimesTen databases involves in either a unidirectional or bidirectional replication scheme with only a few seconds of service interruption.
