5 Using Oracle Developer Tools for Visual Studio
This chapter contains:
Using Oracle Developer Tools
Oracle Developer Tools for Visual Studio (ODT) is a tightly integrated Add-in for Visual Studio. Using enhancements that ODT brings to the Server Explorer, you can automatically create tables, indexes, constraints, data connections and other database schema objects. Additionally you can automatically generate application code.
Connecting to the Oracle Database
This section shows you how to use the Server Explorer to connect to the Oracle Database for the purpose of automatically creating or modifying database schema objects.
-
From the View menu, select Server Explorer.
-
In Server Explorer, right-click Data Connections.
-
Select Add Connection.
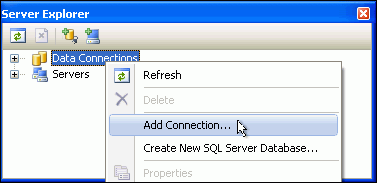
Description of the illustration addconnection1.gif
-
When the Add Connection window appears, determine if the Data source says Oracle Database (Oracle ODP.NET).
If it does, skip to Step 6.
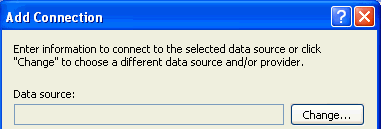
Description of the illustration addconnection1a.gif
If Data source does not say Oracle Database (Oracle ODP.NET), select Change.
The Change Data Source window appears.
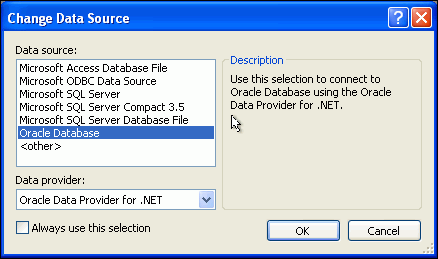
Description of the illustration addconnection2a.gif
-
Choose Oracle Database and then select Oracle Data Provider for .NET.
-
On the Connection Details tab, in the Add Connection window, enter the following information:
Data source name: For this example, use the alias of the remote database instance,
orcl.If you are connecting to a database on the same computer, use the
Local Database.Select the Use a specific user name and password option.
For User name, enter
HR.For Password, enter the password created when the
hraccount was unlocked and set up.To save the password for future sessions, check the Save password box.
Ensure that Role is set to
Default. This refers to the default roles that have been granted to the userhr.The Connection name should be generated automatically from the Data source name and the User name values. In this exercise, it will be HR.orcl.
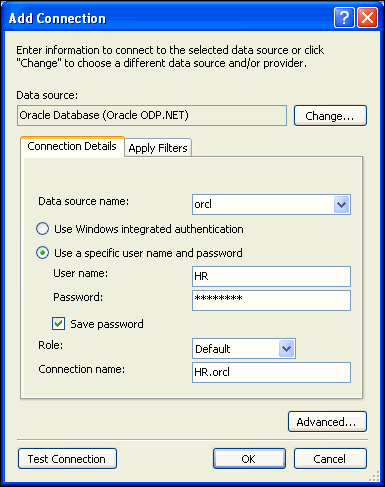
Description of the illustration addconnection2.gif
-
Click the Apply Filters tab, and verify that the
HRschema is in the Displayed schemas column. When you expand the schema category nodes in the data connection, only those schema objects (tables, views, and so on) selected in the Apply Filters tab appear.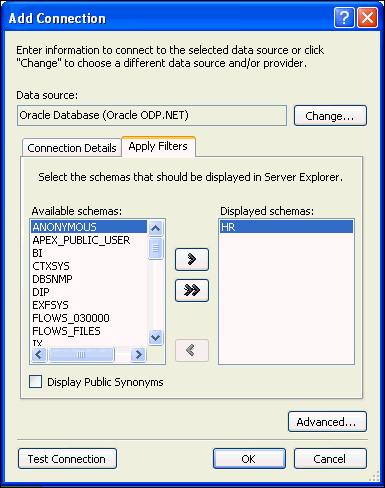
Description of the illustration addconnection3.gif
-
Click Test connection.

Description of the illustration addconnection4.gif
The test should succeed. Click OK.
If the test fails, it may be due to one or more of the following issues that you must address before proceeding with further steps:
-
The database is not started.
-
The database listener is not started.
-
The database connectivity is not properly configured.
-
You do not have the correct user name, password, or role.
-
-
In the Add Connection window, click OK.
-
In the Server Explorer, expand the HR.ORCL connection to show the contents of the
HRschema. You should see Tables, Views, Procedures, Functions, Packages, Synonyms, Sequences, and so on.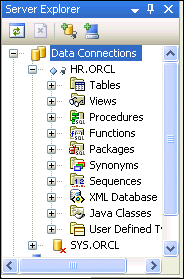
Description of the illustration addconnection5.gif
Creating a Table and Its Columns
Oracle Developer Tools includes a user interface for creating database objects. In this section, you will create a table named DEPENDENTS.
-
In Server Explorer, right-click Tables and select New Relational Table.

Description of the illustration table1.gif
A table design window appears.
-
In design view, enter
DEPENDENTSfor Table name.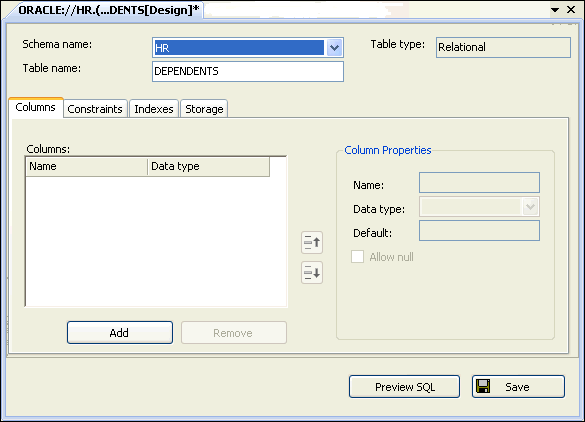
Description of the illustration table2.gif
-
In the Column Properties tab, add the following six columns in this manner:
Click Add. Then enter the new column information. Keep clicking add until you have added all the new columns.
Fields may differ depending on the data type. You might have to close windows such as Server Explorer or Solution Explorer to access the entire tab.
-
Name
LAST_NAME, Data TypeVARCHAR2, and Size30. Leave all other properties at their default values. -
Name
FIRST_NAME, Data TypeVARCHAR2, and Size20. Leave all other properties at their default values. -
Name
BIRTH_DATE, Data TypeDATE. Leave all other properties at their default values. -
Name
RELATIONSHIP, Data TypeVARCHAR2, and Size20. Leave all other properties at their default values. -
Name
EMPLOYEE_ID, Data TypeNUMBER, deselect Allow null, enter Precision6and Scale0. -
Name
DEPENDENT_ID, Data TypeNUMBER, deselect Allow null check box, enter Precision6and Scale0.
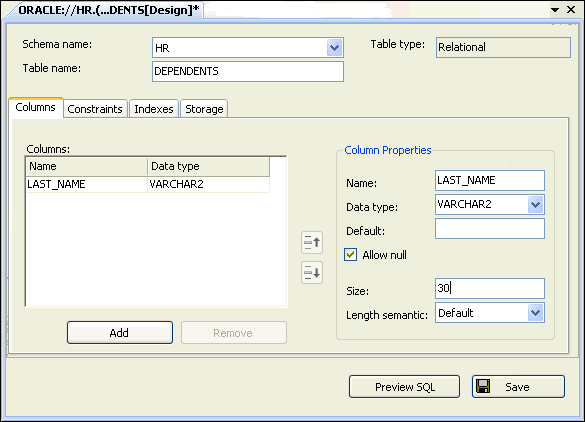
Description of the illustration table3.gif
-
-
The SQL statement for constructing the table appears in the Preview SQL window, similar to this.
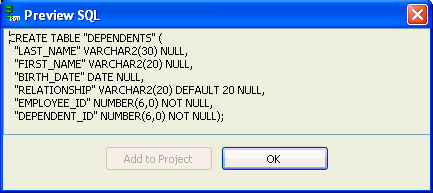
Description of the illustration table4.gif
Click OK to close the Preview SQL window.
-
In the table design view, click Save.
This action creates the new table
DEPENDENTSin theHRschema. The new table is listed in the Server Explorer.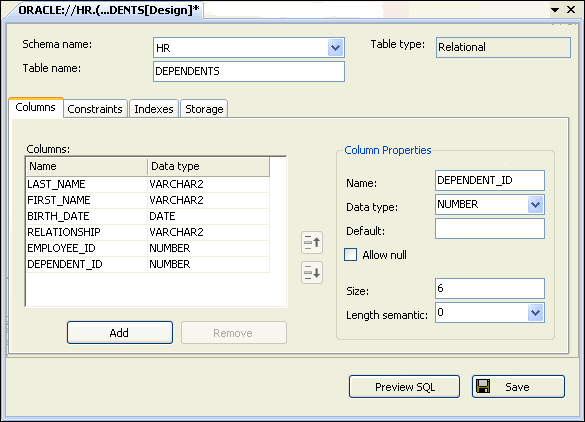
Description of the illustration table5.gif
Creating a Table Index
Indexes are an optional but very powerful feature of relational databases. An index enables quick access to the rows (or records) in a table. In this section, you will create an index for the DEPENDENTS table.
-
In the
DEPENDENTSTable Design view, click the Indexes tab. -
Click Add under the Indexes area.
The Index Properties area becomes active.
-
Under Index Properties (to the right), enter the Name
DEPENDENTS_INDEX, and leave all other properties in their default state. -
At the bottom of the Index Properties area, click Add.
-
Under Index keys, click in the first cell of the Key column, and select DEPENDENT_ID from the list.
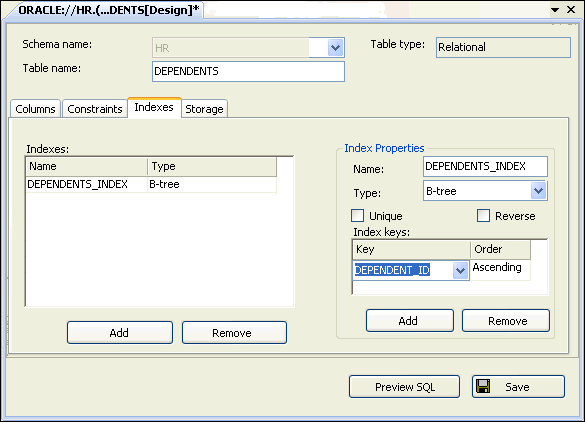
Description of the illustration index1.gif
-
A Preview SQL window appears, displaying SQL statement to construct the index.
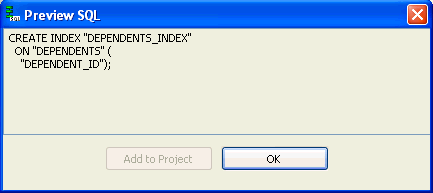
Description of the illustration index2.gif
Click OK to close the Preview SQL window.
-
In the table design view, click Save.
This creates the new index on the table
DEPENDENTSin theHRschema. To see this in the Server Explorer, expand theDEPENDENTStable and related Indexes.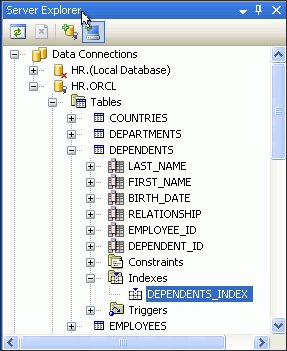
Description of the illustration index3.gif
Adding Table Constraints
The database uses constraints to automatically enforce data integrity defining rules for permissible data values. Constraints also implement primary and foreign keys in the table. In this section, you will add such constraints to the new table DEPENDENTS.
How to add foreign and primary keys:
-
In the
DEPENDENTStable design view, click the Constraints tab.Note that depending on your configuration, there may already be default check constraints in the list.
-
Under the Constraints area, add the following constraints in this manner:.
Under Constraint Properties, Click Add. Then enter the new constraint information. Keep clicking add until you have added all the new constraints.
-
Name
EMPLOYEES_FK, TypeForeign Key, TableEMPLOYEES, ConstraintEMP_EMP_ID_PK. Under Association, select Referenced Column:EMPLOYEE_ID,and Local Column:EMPLOYEE_ID, set the On delete value toCascade. Leave all other properties at their default values.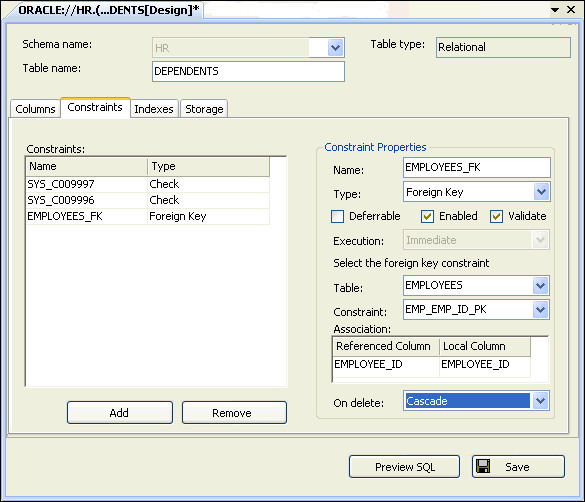
Description of the illustration constraint1.gif
-
Name
DEPENDENTS_PK, TypePrimary Key.Under the Primary key columns area, click Add (you may need to scroll down). Under Primary Key Columns, select Key:
DEPENDENT_ID, set the Using index value toDEPENDENTS_INDEX. Leave all other properties at their default values.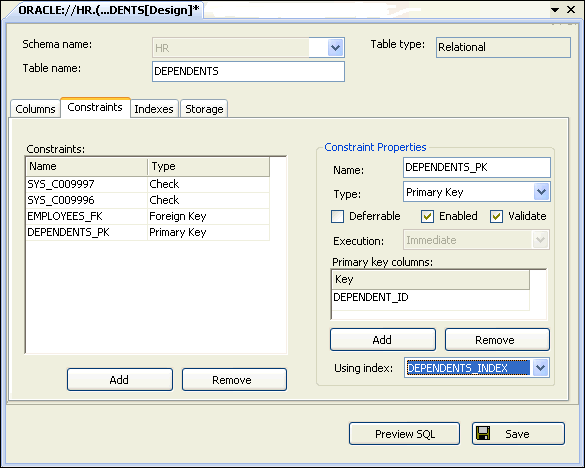
Description of the illustration constraint2.gif
-
-
The Preview SQL window displays the code generated for constraints on table
DEPENDENTS. Note that adding constraints is anALTER TABLEcommand because constraints change the definitions of theDEPENDENT_IDandEMPLOYEE_IDcolumns of the table.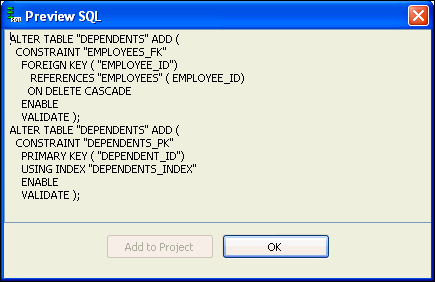
Description of the illustration constraint3.gif
Click OK to close the Preview SQL window.
-
In the table design view, click Save.
This action creates the two new constraints on the
DEPENDENTStable in theHRschema. To see the Server Explorer, expand the hierarchy tree for the tableDEPENDENTSand constraints.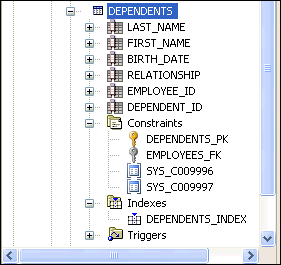
Description of the illustration constraint4.gif
Adding Data to a Table
You must now add data to the new DEPENDENTS table.
-
In Server Explorer, right-click the
DEPENDENTStable and select Retrieve Data.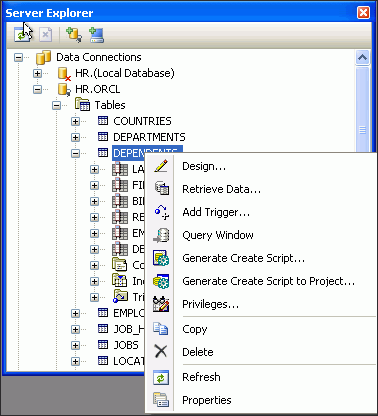
Description of the illustration retrieve1.gif
A table grid for
DEPENDENTSappears in design view. -
Enter the four records listed in Table 5-1 into the table grid.
Table 5-1 New Data for the DEPENDENTS Table
LAST_NAME FIRST_NAME BIRTH_DATE RELATIONSHIP EMPLOYEE_ID DEPENDENT_ID Ernst
Mary
06-MAY-2000
daughter
104
1041
Atkinson
Sue
12-JUL-1998
daughter
130
1301
Ernst
David
02-APR-2007
son
104
1042
Sciarra
Aaron
31-JAN-2008
son
111
1111
The grid now looks as follows:

Description of the illustration retrieve2.gif
Note that the data is automatically saved as you move between rows.
Generating Code Automatically to Display and Update Data
To explore the content of the DEPENDENTS table, we will build a form that uses a simple table query. In this section you will use the Visual Studio integrated development environment (IDE), to automatically generate the code that corresponds to your actions.
-
Start a new project, as described in "Creating a New Project". Name the new project as indicated.
Visual C#:
HR_ODT_CS.Visual Basic:
HR_ODT_VB. -
Check Create Directory for Solution. Click OK.
-
Switch to the Form1 design view, if you are not already in it.
Note: All applications start with Form1, but this is not related to applications created in previous chapters.
-
Click on the Server Explorer window to enable the Show Data Sources window.
-
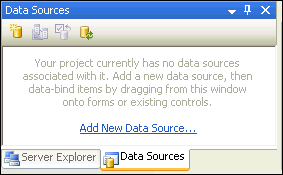
From the Visual Studio Data menu, select Show Data Sources.
The Data Source window appears.
Description of the illustration datasource1.gif
-
In the Data Sources window, click Add New Data Source.
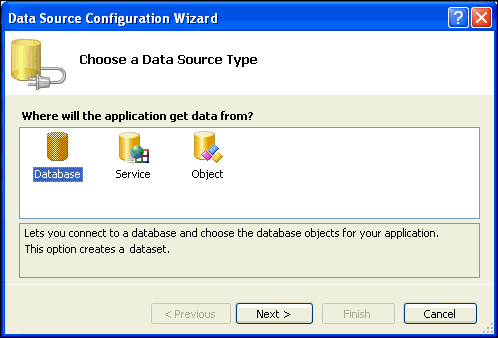
The Data Source Configuration Wizard opens.
-
In the Data Source Configuration Wizard, under Choose a Data Source Type, select Database.
Click Next.
Description of the illustration datasource2.gif
-
Under Choose Your Data Connection, select HR.ORCL, or HR.(Local Database). For this example, we will use HR.ORCL.
Select Yes, include sensitive data in the connection string.
Click Next.
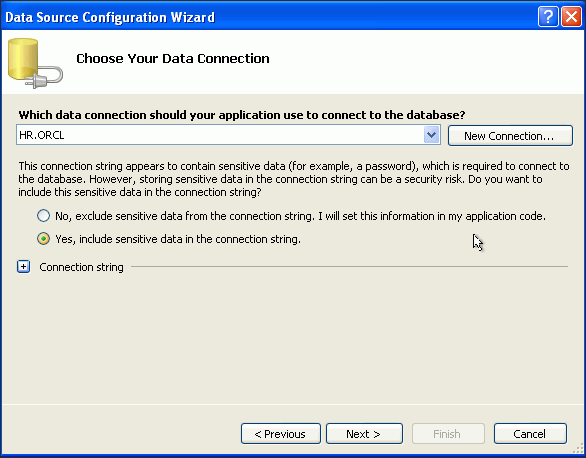
Description of the illustration datasource3.gif
-
Under Save the Connection String to the Application Configuration File, select Yes, save the connection as:
ConnectionString.Click Next.
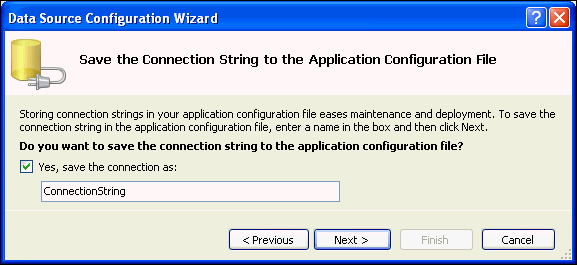
Description of the illustration datasource4.gif
-
Under Choose Your Database Objects, expand Tables.
Check the DEPENDENTS(HR) table.
Change the DataSet name to tableDependents.
Click Finish.
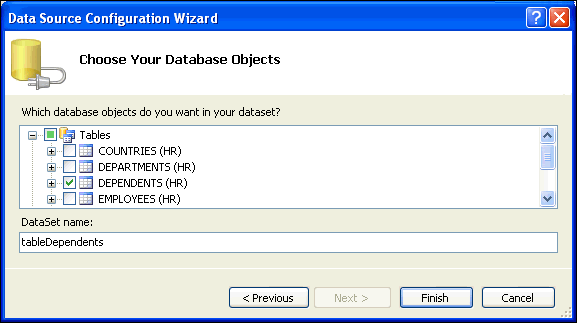
Description of the illustration datasource5.gif
See Also:
"Using the DataSet Class with Oracle Data Provider for .NET" for information about the DataSet Class
To automatically generate code using drag-and-drop:
-
Switch to the Form1 Design view.
-
In the Data Sources window, expand tableDependents.
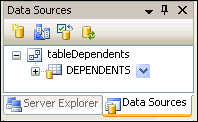
Description of the illustration datasource6.gif
-
Select the DEPENDENTS table, and drag it onto Form1.
You may need to resize both the form and the table grid.
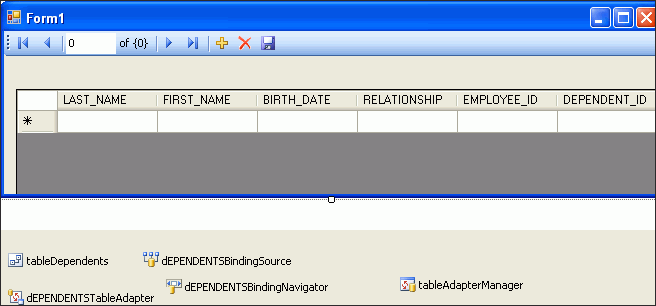
Description of the illustration datasource7.gif
Note that along with the table grid (which includes record navigation elements), the following components were added to the design view of your project. These objects represent automatically generated code for Form1.
Visual C#:
tableDependents,dEPENDENTSBindingSource,dEPENDENTSTableAdapter,tableAdapterManager, anddEPENDENTSBindingNavigatorVisual Basic:
TableDependents,DEPENDENTSBindingSource,DEPENDENTSTableAdapter,TableAdapterManager, andDEPENDENTSBiningNavigator -
Double-click the Save icon (floppy disk) near the top of Form1.
This opens the code window for the Save icon for Form1.
-
In the private method,
xxxSaveItem_Click(), encapsulate the existing code in atry...catchblock. See the code listed for the complete Visual C# and Visual Basic names of this automatically generated method.Also, add a
MessageBox.show()call to both the try and catch sections. The updated method code follows, with new or changed code in bold font.Visual C#:
private void dEPENDENTSBindingNavigatorSaveItem_Click(object sender, EventArgs e)
{
 try
 {
  this.Validate();
  this.dEPENDENTSBindingSource.EndEdit();
  this.tableAdapterManager.UpdateAll(this.tableDependents);

  MessageBox.Show("Update successful");
 }
 catch (System.Exception ex)
 {
  MessageBox.Show("Update failed: "+ ex.Message.ToString());
 }
}
Visual Basic#:
Private Sub DEPENDENTSBindingNavigatorSaveItem_Click(
 ByVal sender As System.Object, ByVal e As System.EventArgs)
 Handles DEPENDENTSBindingNavigatorSaveItem.Click

 Try
  Me.Validate()
  Me.DEPENDENTSBindingSource.EndEdit()
  Me.TableAdapterManager.UpdateAll(Me.TableDependents)
  MessageBox.Show("Update successful")

 Catch ex As Exception
  MessageBox.Show("Update failed: " + ex.Message.ToString())

 End Try

End Sub
-
To compile and run the application, follow the instructions in section "Compiling and Running the Application".
You can test the new application in the following manner. The floppy disk icon represents the Save command.
-
Change the
DEPENDENT_IDvalue for Mary Ernst to1110and click the Save icon. The message boxUpdate successfulshould appear. Click OK to dismiss the message box. -
Change the
EMPLOYEE_IDvalue for David Ernst to99999and click the Save icon. The following message should appear:Update failed: ORA-02291: integrity constraint (HR.EMPLOYEES_FK) violated - parent key not found. Click OK to dismiss the message box.