1 Customizing With XML Documents
Analytic Workspace Manager provides numerous SQL reports so that you can query the Oracle Database data dictionary and system tables without having to open another SQL interface. It also provides an extensive list of templates for generating calculated measures. You can supplement both of these features by adding custom SQL reports and calculation templates.
To define these customizations, you create XML documents. For an introduction to XML, refer to a source such as the W3Schools XML tutorial at http://www.w3schools.com. Use an XML-enabled editor or browser to validate the syntax of your XML documents.
This chapter contains the following topics:
Describing SQL Reports
You can add reports to the Analytic Workspace Manager navigation tree that appear along with the other built-in reports. You provide a name for the report and a SQL SELECT command. You can optionally modify the report contents at run-time and organize them into folders.
Creating an XML Document for SQL Reports
-
Develop a SQL query that returns the information to make available in Analytic Workspace Manager.
-
Create a text file named
awmtree.xmlin the directory with the Analytic Workspace Manager executable, typicallyOracle_home/olap/awm. -
Begin the file with an XML declaration like this one:
<?xml version="1.0" encoding="utf-8"?>
Specify the appropriate encoding for your site.
-
Enter the XML for the template, as described in "Reference: Elements for SQL Reports".
-
For the
sqlattribute of the<AWMNode>element, enter theSELECTcommand that you developed in Step 1. You can replace values in aWHEREclause with bind variables from parent<AWMNode>elements, as described in "Using Bind Variables to Restrict the Report Contents". -
Refresh the navigation tree. The new reports appear at the end of the tree.
If the new reports do not appear, then look for syntax errors in the XML.
Example of a Simple Report
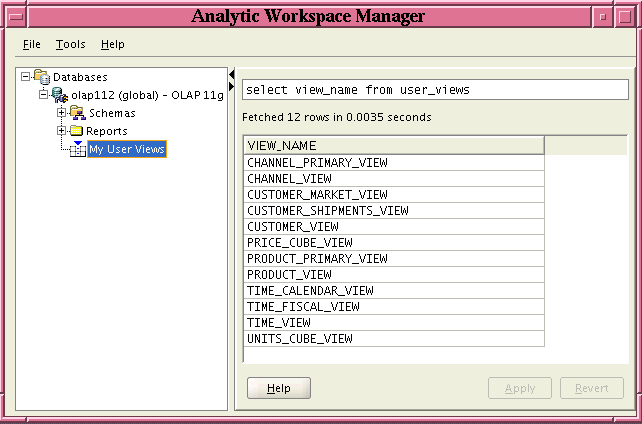
Figure 1-1 shows a new report named My User Views in the Analytic Workspace Manager navigation tree. The report displays the results of this query: SELECT view_name FROM user_views.
The XML document in Example 1-1 defines the My User Views report. The document contains two elements: <AWMTree> and <AWMNode>. <AWMTree> is the root element and identifies this document as containing XML that defines a report for Analytic Workspace Manager. The document can have one or more <AWMNode> elements. In this example, a single <AWMNode> element defines the My User Views report.
Among the attributes that the <AWMNode> element can have are name and sql. Example 1-1 uses name to identify the report as My User Views, and sql to specify a SELECT statement that executes when you select the report in the tree.
Creating Report Folders
Folders provide an easy way to organize your reports. A folder is simply an <AWMNode> element without a SQL statement, and it is the parent of other <AWMNode> elements. You can nest <AWMNode> elements as deeply as you want.
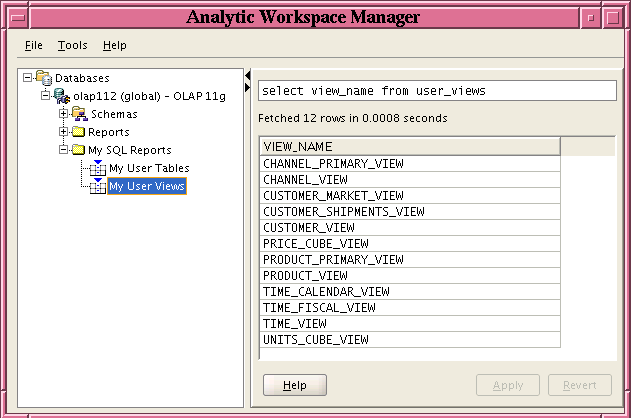
Figure 1-2 shows a folder named My SQL Reports. It contains two reports, My User Tables and My User Views.
The XML document in Example 1-2 shows that the <AWMNode> elements defining the two reports are the children of the <AWMNode> element that defines the My SQL Reports folder.
Using Bind Variables to Restrict the Report Contents
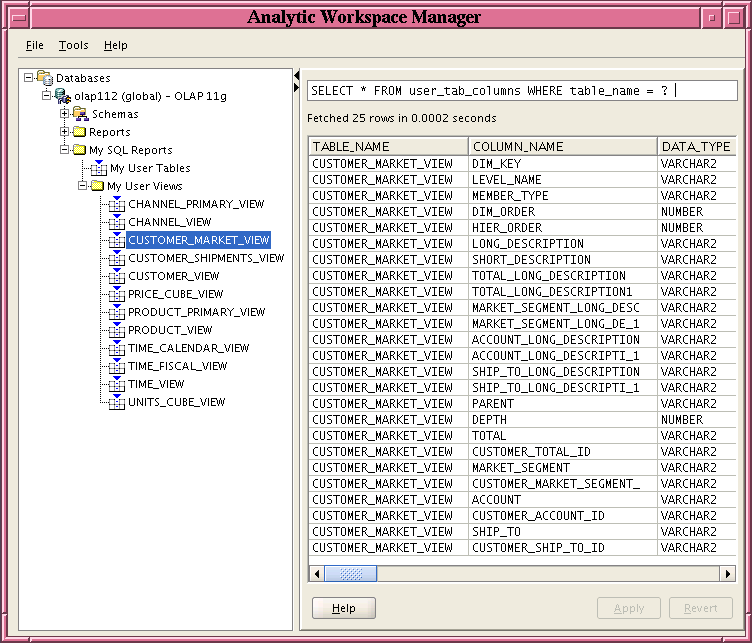
Bind variables restrict the contents of a report based on your run-time selection from a list of values in the navigation tree. Figure 1-3 shows the list of views returned by the My User Views report, which is now displayed in the navigation tree instead of in the property inspector. The property inspector displays a report for the particular view selected in the tree.
The most deeply nested <AWMNode> element (the "leaf" element) is displayed in a grid in the property inspector and can return multiple columns. The parent elements are displayed in the navigation tree and either return no columns (that is, a folder) or one column, as shown here.
Figure 1-3 Modifying the Content of a Report
Description of "Figure 1-3 Modifying the Content of a Report"
The type parameter of an <AWMNode> element stores the run-time selection. By referencing the name of the type parameter in a nested <AWMNode> element, you pass the value into that SELECT statement. The XML document in Example 1-2 shows an <AWMNode> element nested in the My User Views <AWMNode>. The nested <AWMNode> uses the value of the type element from the parent <AWMNode> element as a bind variable. You reference a bind variable by putting it in braces {}, as in {view} in the example.
Example 1-3 Passing the Name of a View to a SELECT Statement
<?xml version="1.0" encoding="utf-8" ?>
<AWMTree>
   <AWMNode name="My SQL Reports">
      <AWMNode
         name="My User Tables"
         sql="select table_name from user_tables"/>
      <AWMNode
         name="My User Views"
         type="view"
         sql="select view_name from user_views">
         <AWMNode sql="SELECT * FROM user_tab_columns WHERE table_name = {view}"/>
      </AWMNode>
   </AWMNode>
</AWMTree>
Creating Reports in Object Folders
The awmtree.xml document defines reports that appear in the navigation tree under a database connection, after the Reports folder. You can also define reports that appear in the folders for all schemas, analytic workspaces, cubes, or dimensions. The reports must be in XML documents that have the following names:
-
aw.xml, for reports that appear in all analytic workspace folders. -
dimension.xml, for reports that appear in all dimension folders.
These files must be in a JAR file in the plug-in directory.
To create reports in object folders:
-
Open Analytic Workspace Manager and select Configuration from the Tools menu, as shown in Figure 2-1. The Configuration dialog box appears.
-
Select Enable plugins and enter the path to a plug-in directory, if these parameters are not set already, as shown in Figure 2-2.
-
Click OK, and close Analytic Workspace Manager.
-
Create one or more XML document files.
-
In the plug-in directory, create a JAR file containing the XML files and any icons referenced by them. You can create one JAR file for all of them or create individual JAR files.
-
Open Analytic Workspace Manager and expand the navigation tree to see the reports.
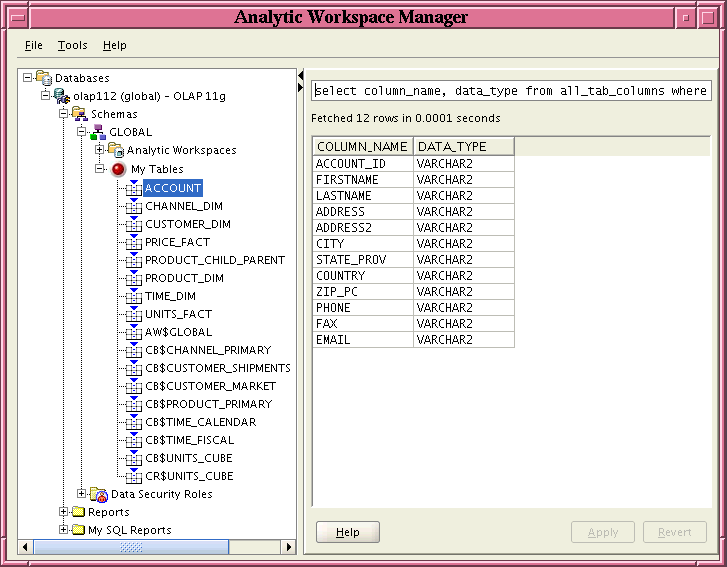
Figure 1-4 shows a report folder named My Tables described in a schema.xml document. It uses a custom icon (red button) in the navigation tree. The My Tables folder appears in the GLOBAL schema folder.
Figure 1-4 Reports in the GLOBAL Schema Folder
Description of "Figure 1-4 Reports in the GLOBAL Schema Folder"
The schema.xml document in Example 1-4 has an <AWMNode> element named My Tables. That element has an icon attribute that specifies a graphics file. In the JAR file that contains the schema.xml file and the button.jpg file, both files are in a directory named plugin11202.
Note:
The references to icon files or Java class files in an XML document must reflect the directory structure of the JAR file containing them. The examples in this document of XML documents and Java plug-ins were created in a JDeveloper project namedplugin11202. The project deploys the XML and Java class files in a JAR file. In the JAR file, the XML files and class files are in a directory named plugin11202. In Example 1-4, the icon attribute specification includes the directory: icon="plugin11202/button.jpg". In the examples of XML documents in Chapter 3, the viewClass attribute specifications include the package name, as in viewClass="plugin11202.DimEditorPlugin" in Example 3-7.Example 1-4 Including an Icon in a Report
<?xml version="1.0" encoding="US-ASCII" ?>
<AWMTree>
  <AWMNode name="My Tables"
           icon="plugin11202/button.jpg"
           type="table"
           sql="select table_name from all_tables where owner = {owner}">
    <AWMNode sql="select column_name, data_type from all_tab_columns where owner = {owner} and table_name = {table}"/>
  </AWMNode>
</AWMTree>
Reference: Elements for SQL Reports
An XML document for SQL reports has the basic format shown in Example 1-5.
Example 1-5 Basic XML Structure for Reports
<AWMTree>
   <AWMNode>
      <AWMNode>
         <ShowIfQueryTrue>
      <AWMNode>
            .
            .
            .
<AWMTree>
The root element that identifies this document as containing custom reports for Analytic Workspace Manager. It contains one or more <AWMNode> elements.
<AWMNode>
None
<AWMNode>
Defines a report folder or SQL report. It contains one or more <AWMNode> elements.
<AWMNode>, <ShowIfQueryTrue>
<AWMNode> has the following attributes:
-
name: The name of the folder or report. For a folder, this attribute is the only one required.
-
type: The name of a bind variable that stores the selected value of the report. Use this bind variable to pass a user selection to a second, nested report.
-
sql: A SQL
SELECTstatement, which can contain a bind variable in aWHEREclause. The bind variable is defined by thetypeattribute of a parent<AWMNode>attribute. The query results appear in the tree for a parent<AWMNode>element; for leaf elements, the results appear in the property inspector. -
viewClass: A Java class that implements the
ViewerPluginorEditorPlugininterface. The plug-in displays in the property inspector. For information on these Java plug-in interfaces, see Chapter 2, "Introducing Analytic Workspace Manager Plug-ins". TheviewClassandviewSQLattributes are mutually exclusive. Use only one of them for any single<AWMNode>. -
viewSql: A SQL
SELECTstatement. The query results appear in the property inspector. Use this attribute to specify a SQL statement for a parent<AWMNode>. TheviewSQLandviewClassattributes are mutually exclusive. Use only one or the other for any single<AWMNode>. -
icon: An image to use in the navigation tree. The image must be in a JAR file in the plug-in directory and should be about 20 x 20 pixels.
Describing Calculation Templates
You can define a calculation template that appears in the Create a Calculated Measure dialog box like any other calculation. You provide a name for the calculation, the text of the template, and a calculation using the OLAP expression syntax.
Creating an XML Document for Calculations
-
Create a custom measure in Analytic Workspace Manager that performs the type of calculation that you want in a template. Use this custom measure to validate the syntax of the expression for the template.
See Also:
Analytic Workspace Manager Help for the OLAP expression syntax reference. -
Create a text file named
awmcalcs.xmlin the directory with the Analytic Workspace Manager executable, typicallyORACLE_HOME/olap/awm. -
Begin the file with an XML declaration like this one:
<?xml version="1.0" encoding="utf-8"?>
Specify the appropriate encoding for your site.
-
Enter the XML for the template, as described in "Reference: Elements for Calculations".
-
For the expression attribute of the
<Calc>element, cut-and-paste the calculation from the custom measure that you created earlier. Replace the names of the measure, dimension, and so forth with the variables from theuiparameter. -
Open Analytic Workspace Manager. The new categories and templates appear at the end of the Calculation Type list in the Create Calculated Measure dialog box.
If the new entries do not appear, then look for syntax errors in the XML. To see changes to the XML document, just reopen the Create Calculated Measure dialog box.
Example of a Simple Calculation Template
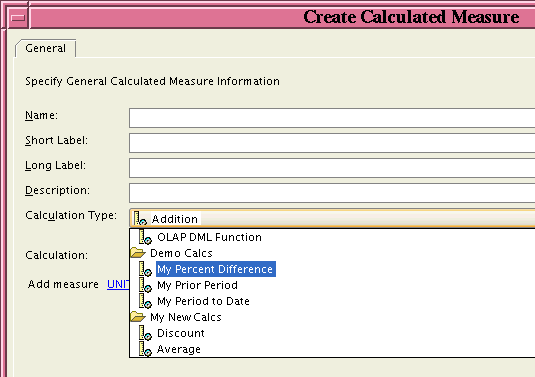
Figure 1-5 shows the Calculation Type list in the Create Calculated Measure dialog box. The list contains a new folder named My New Calcs with two additional calculations: Discount and Average.
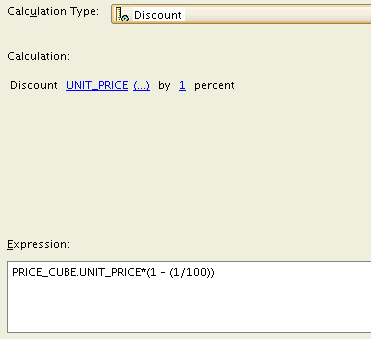
Figure 1-6 shows the template portion of the General tab that appears when a user selects Discount from the tree.
The XML document in Example 1-6 defines the My New Calcs folder and the Discount and the Average calculations. The document contains three elements: <AWMCalcs>, <Category>, and <Calc>. <AWMCalcs> is the root element. It can have one or more <Category> elements. In this example, the <Category> element defines a folder named My New Calcs.
A <Category> element can have one or more <Calc> elements. This document has two <Calc> elements named Discount and Average.
A <Calc> element has four attributes: name, description, ui, and expression. Each attribute takes a quoted string as a value. The ui element consists of literal text and hypertext links. You create the links by entering one of several available parameters.
Example 1-6 uses the {measure} and {number} parameters. You use the same parameters in the expression attribute as bind variables, which pass the user choices to the calculation. Notice that the Average calculation uses two {measure} parameters. The expression attribute refers to them by their order in the ui attribute: {measure:1} and {measure:2}.
Refer to "Reference: Elements for Calculations" for full descriptions of these elements.
Example 1-6 Creating the Discount and Average Calculation Templates
<?xml version ="1.0" encoding="UTF-8" ?>
<AWMCalcs>
   <Category name="NEW_CALCS" description="My New Calcs">
      <Calc
         name="Discount"
         description="Discount"
         ui="Discount {measure} by {number} percent"
         expression="{measure}*(1 - ({number}/100))"/>
      <Calc
         name="Average"
         description="Average"
         ui="Average of {measure} and {measure}"
         expression="({measure:1}+{measure:2})/2"/>
   </Category>
</AWMCalcs>
Adding an Option to a Calculation
You can add an option that changes the basic calculation. The option appears as a check box in the Create Calculated Measure dialog box. Users select the option to create the modified calculation.
Two elements support these options: <CalcOptional> and <CalcOptionalDefinitions>. You can define a <CalcOptional> element locally or globally. Within a <Calc> element, <CalcOptional> applies only to that particular calculation. Within a <CalcOptionalDefinitions> element, <CalcOptional> applies to all calculations that reference it by name.
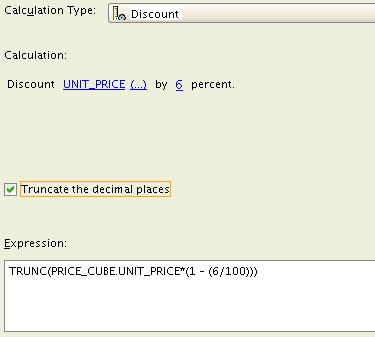
Figure 1-7 shows the sample calculation with an option of truncating the values of the measure to whole numbers. The user has changed the percentage value to 6.
Figure 1-7 Providing an Option to a Calculation
Description of "Figure 1-7 Providing an Option to a Calculation"
Example 1-7 shows the Truncate option defined locally in a <Calc> element. The option applies only to the Discount calculation.
Example 1-7 Adding an Option to One Calculation
<Calc
   name="Discount"
   description="Discount"
   ui="Discount {measure} by {number} percent"
   expression="{measure}*(1 - ({number}/100))">
   <CalcOptional
      name="truncate"
      type="boolean"
      text="Truncate the decimal places"
      expression="TRUNC($expression$)"/>
</Calc>
Example 1-8 shows the Truncate option defined globally in the <CalcOptionalDefinitions> element. The option is used by the Discount and the Average calculations, and it is available to any other calculations that might be defined.
Example 1-8 Adding an Option to Multiple Calculations
<AWMCalcs>
   <CalcOptionalDefinitions>
      <CalcOptional
         name="truncate"
         type="boolean"
         text="Truncate the decimal places"
         expression="TRUNC($expression$)" />
   </CalcOptionalDefinitions>
   <Category name="NEW_CALCS" description="My New Calcs">
      <Calc
         name="Discount"
         description="Discount"
         ui="Discount {measure} by {number} percent"
         expression="{measure}*(1 - ({number}/100))">
         <CalcOptional name="truncate"/>
      </Calc>
      <Calc
         name="Average"
         description="Average"
         ui="Average of {measure} and {measure}"
         expression="({measure:1}+{measure:2})/2">
         <CalcOptional name="truncate"/>
      </Calc>
   </Category>
</AWMCalcs>
Creating More Complex Calculation Templates
This example creates five calculations in two folders. The calculations in both folders use the global options defined at the beginning of the XML document. Figure 1-8 shows the calculations as they appear in the Calculation Type list.
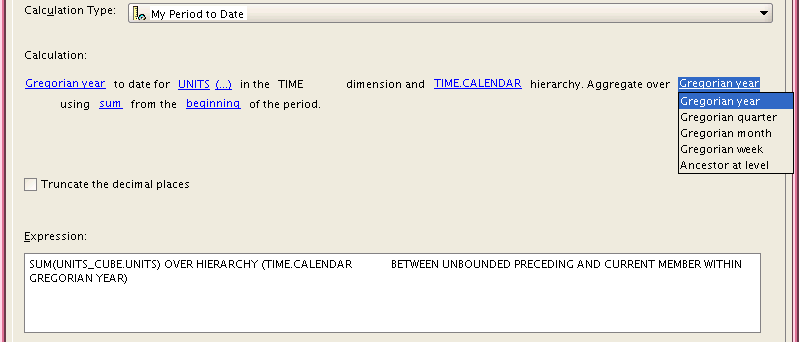
The My Period To Date calculation has the most complex syntax, including three lists. Using the <Params> element, you can create the lists quickly. This is the definition of the first list, which is displayed in Figure 1-9:
<Params>
   <Param type="list" name="timePeriods">
      <Item expression="GREGORIAN YEAR" text="Gregorian year"/>
      <Item expression="GREGORIAN QUARTER" text="Gregorian quarter"/>
      <Item expression="GREGORIAN MONTH" text="Gregorian month"/>
      <Item expression="GREGORIAN WEEK" text="Gregorian week"/>
      <Item expression="ANCESTOR AT LEVEL {level}" text="Ancestor at level"/>
   </Param>
</Params>
Figure 1-9 Choice Lists In a Calculation Template
Description of "Figure 1-9 Choice Lists In a Calculation Template"
Example 1-9 shows the complete XML document that defines the five calculation templates shown in Figure 1-8.
Example 1-9 Sample AWMCalcs Document
<?xml version ="1.0" encoding="UTF-8" ?>

<AWMCalcs>
  <Params>
    <Param type="list" name="timePeriods">
      <Item expression="GREGORIAN YEAR" text="Gregorian year"/>
      <Item expression="GREGORIAN QUARTER" text="Gregorian quarter"/>
      <Item expression="GREGORIAN MONTH" text="Gregorian month"/>
      <Item expression="GREGORIAN WEEK" text="Gregorian week"/>
      <Item expression="ANCESTOR AT LEVEL {level}" text="Ancestor at level"/>
    </Param>
    <Param type="list" name="aggOps">
      <Item expression="SUM" text="sum"/>
      <Item expression="MAX" text="maximum"/>
      <Item expression="MIN" text="minimum"/>
      <Item expression="AVG" text="average"/>
    </Param>

  </Params>
  <CalcOptionalDefinitions>
    <CalcOptional
        name="percentages"
        type="boolean"
        text="Multiply by 100"
        expression="($expression$)*100"/>
    <CalcOptional
        name="truncate"
        type="boolean"
        text="Truncate the decimal places"
        expression="TRUNC($expression$)" />
  </CalcOptionalDefinitions>
  <Category name="DEMO_CALCS" description="Demo Calcs">
    <Calc
        name="PctDif"
        description="My Percent Difference"
        ui="Percent difference between {measure} and {measure}."
        expression="({measure:1} - {measure:2}) / abs({measure:2})">
      <CalcOptional name="percentages" />
    </Calc>
    <Calc
        name="PriorPeriod"
        description="My Prior Period"
        ui="Prior period for measure {time_measure} in the {time_dimension}
            dimension and {hierarchy} hierarchy {number} period(s) ago."
        expression="LAG({time_measure},{number}) over hierarchy ({hierarchy})" />
    <Calc
        name="Periodtodate"
        description="My Period to Date"
        ui="{timePeriods} to date for {time_measure} in the {time_dimension}
           dimension and {hierarchy} hierarchy. Aggregate over {timePeriods}
           using {aggOps} from the {calcRange} of the period."
        expression="{aggOps}({time_measure}) OVER HIERARCHY ({hierarchy}
           BETWEEN {calcRange} WITHIN {timePeriods})">
        <Param type="list" name="calcRange">
           <Item expression="UNBOUNDED PRECEDING AND CURRENT MEMBER"
              text="beginning"/>
           <Item expression="CURRENT MEMBER AND UNBOUNDED FOLLOWING"
              text="end"/>
      </Param>
      <CalcOptional name="truncate"/>
    </Calc>
  </Category>
  <Category name="NEW_CALCS" description="My New Calcs">
    <Calc
        name="Discount"
        description="Discount"
        ui="Discount {measure} by {number} percent."
        expression="{measure}*(1 - ({number}/100))">
         <CalcOptional name="truncate"/>
    </Calc>
    <Calc
        name="Average"
        description="Average"
        ui="Average of {measure} and {measure}"
        expression="({measure:1}+{measure:2})/2">
      <CalcOptional name="truncate"/>
    </Calc>
  </Category>
</AWMCalcs>
Reference: Elements for Calculations
An XML document for calculations has the basic format shown in Example 1-10.
Example 1-10 Basic XML Structure for Calculations
<AWMCalcs>
   <Category>
      <Calc>
Example 1-11 expands on this basic structure to include the definition of options in the calculations.
Example 1-11 XML Structure for Calculations With Options
<AWMCalcs>
   <CalcOptionalDefinitions>
      <CalcOptional>
   <Category>
      <Calc>
         <CalcOptional>
Example 1-12 expands the basic structure to include choice lists in the user interface.
Example 1-12 XML Structure for Calculations With Choice Lists
<AWMCalcs>
   <Params>
      <Param>
         <Item>
   <Category>
      <Calc>
         <Param>
            <Item>
Following are the descriptions of the elements.
<AWMCalcs>
The root element that identifies this document as containing the custom calculation templates for Analytic Workspace Manager. It contains a <Category> element, and can also contain a <CalcOptionalDefinitions> element, a <Params> element, or both.
<CalcOptionalDefinitions>, <Category>, <Params>
None
<Calc>
Describes a calculation template. It can contain a <CalcOptional> element, or one or more <Param> elements, or both.
<CalcOptional>, <Param>
<Calc> has the following attributes:
-
name: A unique name for the calculation, which conforms to the same naming conventions as other OLAP objects.
-
description: A description of the calculation. Analytic Workspace Manager adds the description to the list of calculation templates.
-
ui: The text of the template, which Analytic Workspace Manager displays in the Calculation Type list of the Create Calculated Measure dialog box. Enclose hypertext parameters in braces
{}. Table 1-1 describes the valid parameters. -
expression: The calculation that is executed by the calculated measure. This calculation is defined using the expression syntax and by using as bind variables the hypertext parameters from the
uiattribute. Enclose the bind variables in braces {}. If theuiattribute uses the same parameter two or more times, then reference them by the order they appeared, such as{measure:1}and{measure:2}. For a simple example, see Example 1-6.
Table 1-1 Parameters for the ui Attribute
| Parameter | Description |
|---|---|
|
|
Lists the attributes of the selected dimension. |
|
|
Lists all dimensions of the current cube. |
|
|
Lists the members of the selected dimension. |
|
|
Lists the hierarchies of the selected dimension. |
|
|
Lists the levels of the selected hierarchy. |
|
|
Lists the levels of the selected dimension. |
|
|
Displays a list of values specified in this format:
Alternatively, use the |
|
|
Lists all measures in the analytic workspace with at least one dimension in common with the current cube. |
|
|
Displays a text field that accepts numeric input. |
|
|
Displays a text field that accepts any text input. |
|
|
Lists the time dimensions of the current cube. |
|
|
Lists all measures for cubes that have a time dimension. |
|
|
Displays the current selection from a |
|
|
A parameter defined in a |
<CalcOptional>
Defines a check box that can be used by one or more calculations to modify the basic expression. For example, a calculation that generates a fraction might offer a Multiply By 100 option to return the results as a percentage.
Include a <CalcOptional> element in a <Calc> element where you want a check box to appear. You can fully define the option within the <Calc> element, or you can define the option within a <CalcOptionalDefinitions> element and reference it by name with a second <CalcOptional> element in the <Calc> element.
A <Calc> element can contain a <CalcOptional> element. A <CalcOptionalDefinitions> element can have one or more <CalcOptional> elements.
None
<CalcOptional> has the following attributes:
-
name: A unique name for the option, which conforms to the same naming conventions as other OLAP objects.
-
text: A description of the option. This text labels the check box.
-
expression: The calculation that is executed when the option is selected. Use the expression syntax and
($expression$)for the basic calculation defined by the current<Calc>element.
<CalcOptionalDefinitions>
Contains one or more <CalcOptional> elements so they can be referenced by multiple calculations. This element must appear directly after <AWMCalcs>.
<CalcOptional>
None
<Category>
Defines a heading in the list of calculations in Analytic Workspace Manager. It contains one or more <Calc> elements.
<Calc>
<Category> has the following attributes:
<Param>
Describes a list of values or a number field referenced in a <Calc> ui attribute. An expression that corresponds to the choice made by the user is entered in the calculation instead of the displayed value. This element contains one or more <Item> elements.
<Item>
<Param> has the following attributes:
